


Advanced Guide
>
Printing from a Computer
>
Printing with Other Application Software
>
Changing the Print Quality and
Correcting Image Data
> Adjusting Intensity
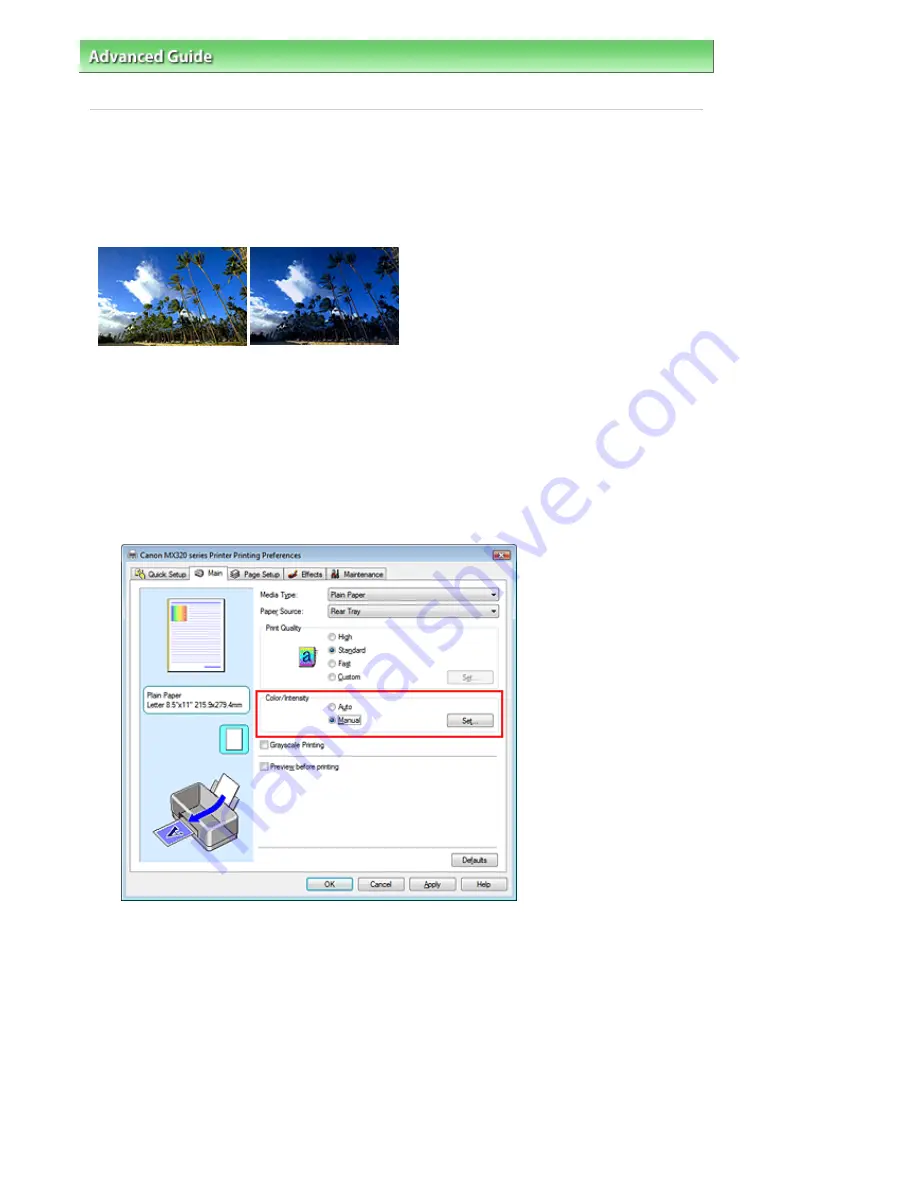
Adjusting Intensity
You can dilute (brighten) or intensify (darken) the colors of the overall image data during printing.
If you want to sharpen the print results, you should intensify the colors.
The following sample shows the case when the intensity is increased so that all colors become more
intense when the image data is printed.
No adjustment
Higher Intensity
The procedure for adjusting intensity is as follows:
You can also set intensity on the Quick Setup tab by choosing Photo Printing under Commonly Used
Settings, and then choosing Color/Intensity Manual Adjustment under Additional Features.
1.
Open the
printer driver setup window
2.
Select the manual color adjustment
Select Manual for Color/Intensity on the Main tab, and click Set....
The Manual Color Adjustment dialog box opens.
3.
Adjust intensity
Moving the Intensity slider to the right intensifies (darkens) the colors. Moving the slider to the left
dilutes (brightens) the colors.
You can also directly enter a value linked to the slider. Enter a value in the range from -50 to 50.
After adjusting each color, click OK.
Page 302 of 817 pages
Adjusting Intensity
Содержание MX320
Страница 12: ...Page top Page 12 of 817 pages Main Components ...
Страница 42: ...Page top Page 42 of 817 pages Using Various Copy Functions ...
Страница 70: ... When using ITU T No 1 chart Standard mode Page top Page 70 of 817 pages Receiving Faxes ...
Страница 79: ...Page top Page 79 of 817 pages Printing Photos Directly from Your Digital Camera or Mobile Phone ...
Страница 90: ...Page top Page 90 of 817 pages Loading Envelopes ...
Страница 99: ...Page top Page 99 of 817 pages Loading a Document in the ADF ...
Страница 158: ...See Help for details on the Select Images screen Page top Page 158 of 817 pages Selecting a Photo ...
Страница 160: ...Note See Help for details on the Edit screen Page top Page 160 of 817 pages Editing ...
Страница 162: ...Page top Page 162 of 817 pages Printing ...
Страница 166: ...Page top Page 166 of 817 pages Selecting the Paper and Layout ...
Страница 169: ...Page top Page 169 of 817 pages Editing ...
Страница 171: ...Page top Page 171 of 817 pages Printing ...
Страница 178: ...Page top Page 178 of 817 pages Printing ...
Страница 185: ...Page top Page 185 of 817 pages Printing ...
Страница 218: ...Page top Page 218 of 817 pages Cropping Photos Photo Print ...
Страница 240: ...Note See Help for details on comments Page top Page 240 of 817 pages Attaching Comments to Photos ...
Страница 273: ...Page top Page 273 of 817 pages Stamp Background Printing ...
Страница 313: ...Page top Page 313 of 817 pages Reducing Photo Noise ...
Страница 365: ...7 Save the scanned images Saving Saving as PDF Files Page top Page 365 of 817 pages Scanning Photos and Documents ...
Страница 489: ...Note See Save Dialog Box for details Page top Page 489 of 817 pages Scanner Button Settings Tab Save ...
Страница 552: ...None No cropping frame will be displayed after previewing Page top Page 552 of 817 pages Preview Tab ...
Страница 614: ...Page top Page 614 of 817 pages Creating an Address Book ...
Страница 673: ...Text LCD Page top Page 673 of 817 pages Bluetooth Settings Screen ...
Страница 715: ...Colors Are Uneven or Streaked Page top Page 715 of 817 pages Print Results Not Satisfactory ...
Страница 721: ...Page top Page 721 of 817 pages Colors Are Unclear ...
Страница 732: ...Page top Page 732 of 817 pages Printing Does Not Start ...
Страница 738: ...Page top Page 738 of 817 pages Paper Does Not Feed Properly ...


