background image

Specifying the Print Quality

3-23

3

Using the Pr

int Options

Specifying the Print Quality

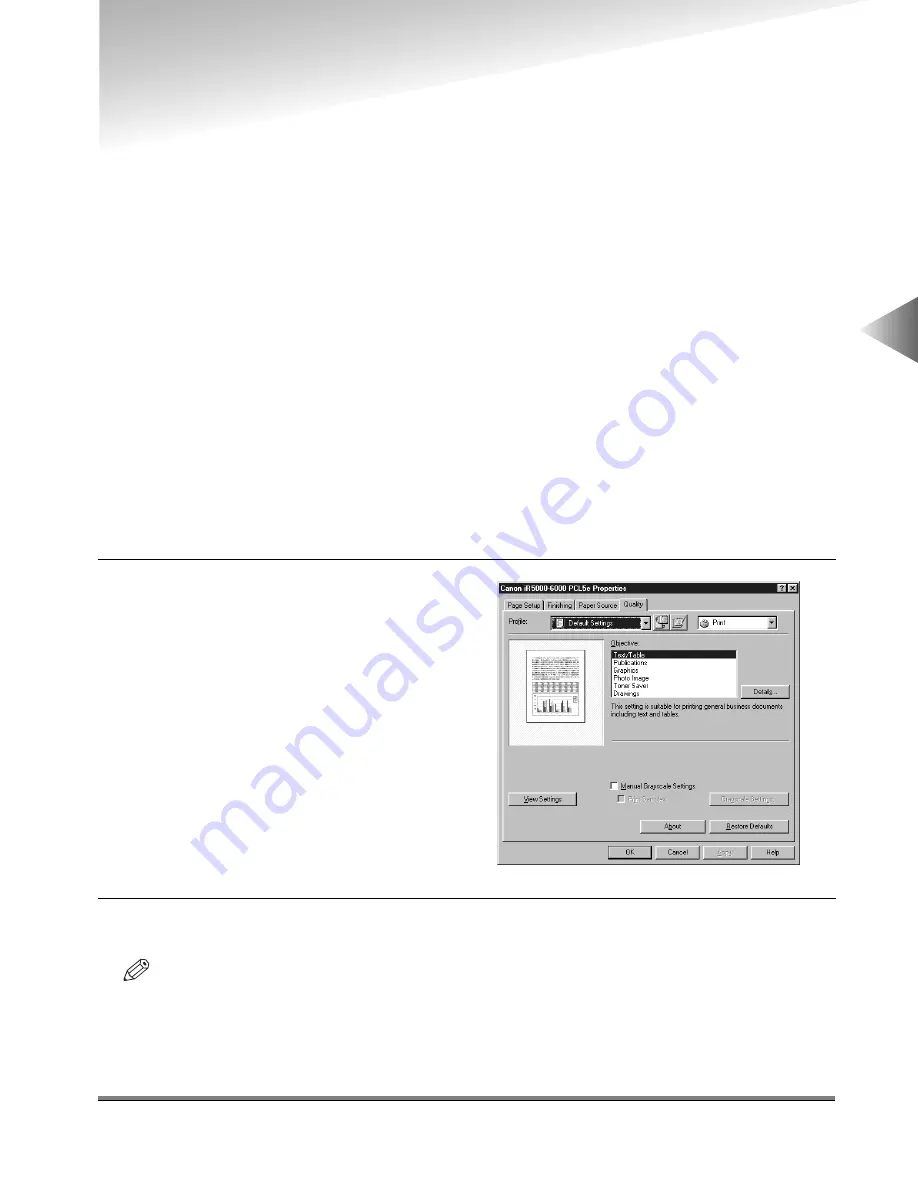
The Quality sheet allows you to select print quality settings called Objectives.

What is an Objective?

Objectives are print quality settings selected to give the best result for a particular type of print job.

The following Objectives are stored in the printer driver:

Text/Table

Publications

Graphics

Photo Image

Toner Saver (Available for imageRUNNER 6000/5000, iR3250, imageRUNNER 600/550/60 
and imageRUNNER 400/330)

Drawings

Selecting and Editing an Objective

Select the Objective most suitable for your type of print job. You can also edit the settings of an
Objective.

To select an Objective

2

Click the required Objective in the Objective list box.

NOTE

• An explanation of the selected Objective is displayed below the Objective list box. Use the information to

decide which Objective to print under.

1

Display the Quality sheet.

Содержание IR5000 - iR B/W Laser

Страница 1: ...PCL Driver Guide Please read this guide before operating this equipment After you finish reading this guide store it in a safe place for future reference...

Страница 2: ...purpose or use or against infringement of any patent Canon Inc shall not be liable for any direct incidental or consequential damages of any nature or loss of expenses resulting from the use of this m...

Страница 3: ...nd Windows NT are registered trademarks of Microsoft Corporation in the United States and or other countries NetWare and Novell are registered trademarks of Novell Inc US 1996 Novell Inc all rights re...

Страница 4: ...Started Provides instructions for installing the PCL5e or PCL 6 printer drivers setting the system configuration and printing a document Chapter 3 Using the Print Options Provides instructions for spe...

Страница 5: ...TANT Indicates important items or prohibited actions that should always be observed when using the printer drivers and fax driver Always read these to avoid improper operation NOTE Indicates items for...

Страница 6: ...Dialog Box 2 9 For Windows 95 98 2 9 For Windows NT4 0 2000 2 10 Setting Up the Printer Configuration 2 11 Printing a Document 2 13 Chapter 3 Using the Print Options Using Profiles for Printing 3 2 Wh...

Страница 7: ...pecifying the ID and Password for Job Accounting 3 29 Printing under Job Accounting for Windows 95 98 3 30 Printing under Job Accounting for Windows NT4 0 2000 3 31 Specifying the Grayscale Settings 3...

Страница 8: ...n of system environments required for using the PCL5e and PCL 6 printer drivers and Fax driver and also explains how to find help and information regarding the installing and use of these drivers Intr...

Страница 9: ...ax device In Windows 95 98 NT4 0 2000 environments you can use both printer drivers The PCL 6 printer driver is recommended for printing image data The PCL5e printer driver is recommended for printing...

Страница 10: ...ws 95 98 NT4 0 2000 can be used in the following sys tem environments Software Microsoft Windows 95 Microsoft Windows 98 Microsoft Windows NT4 0 or Microsoft Windows 2000 Computer Any computer on whic...

Страница 11: ...th the driver Online Help You can locate additional help for questions you may have regarding your printer in the online Help file provided with the driver software In the Properties dialog box you ca...

Страница 12: ...guration and printing a document Installing the Software 2 2 Installing the Printer Driver 2 2 Installing Canon NetSpot Suite Service 2 6 Uninstalling the Printer Driver 2 8 Accessing the Properties D...

Страница 13: ...e driver imageRUNNER 400 330 System Version 2 0 or later is supported only by the PCL5e Printer Driver Ver sion 4 2 or later To install using the Installer 1 Insert the User Software CD into the CD RO...

Страница 14: ...r Wizard dialog box when selecting which item to install this message will not display 5 In the Printer Wizard dialog box click the check box of the driver you want to install Then click the Next butt...

Страница 15: ...Windows NT4 0 2000 Server because the Installer detects the OS on which the driver is going to be installed To install using the Add Printer Wizard 1 Click the Start button point to Settings and then...

Страница 16: ...the folder of the driver you want to install and then click the OK button PCL5e Windows 95 98 PCL Drivers USEng Printer PCL5e WIN9X Windows NT4 0 PCL Drivers USEng Printer PCL5e WINNT40 Windows 2000...

Страница 17: ...using the Add Printer Wizard or install only the printer driver when using the installer install Canon NetSpot Suite Service with the following proce dure 1 Insert the User Software CD into the CD ROM...

Страница 18: ...Getting Started 7 After the files are copied click the Finish button to finish the installation program 6 A message asking if you want to install NetSpot Suite Service is displayed Click the Yes butt...

Страница 19: ...lick the My computer icon and then double click the CD ROM disk drive icon 3 Double click the PCL Drivers USEng and Setup folder icons 4 In the Setup folder double click the P5uninst exe icon to start...

Страница 20: ...n the specified settings are available for the current print job 1 Select the Print command to display the Print dialog box 2 Select your printer name from the drop down list box and then click the Pr...

Страница 21: ...alog box from the Printers folder If you access the Document Properties dialog box from the Printers folder you can specify the default printer driver settings for every print job 1 Click the Start bu...

Страница 22: ...2 In the Printers folder right click the icon of your printer and then click Properties 5 Select the protocol used for your network under Protocol 3 In the Properties dialog box click the Configuratio...

Страница 23: ...set up the printer configuration automatically please note the following points For imageRUNNER 6000 5000 and iR3250 it is necessary to install Canon NetSpot Suite Service See P2 6 for installing Can...

Страница 24: ...display the Properties dialog box 3 Specify the various print settings in the Properties dialog box or select a Profile To switch between sheets click the tabs for the Page Setup Finishing Paper Sour...

Страница 25: ...Printing a Document 2 14 2 Getting Started...

Страница 26: ...fying the Finishing Options 3 9 Selecting a Finishing Option 3 9 Using Booklet Printing 3 12 Specifying the Paper Source 3 15 Using Overlay Printing 3 20 What is Overlay Printing 3 20 Creating a Form...

Страница 27: ...ay either the Page Setup Finishing Paper Source or Quality sheets 2 Select the Profile you want from the Profile drop down list box 3 Click the OK button NOTE For Windows NT4 0 2000 you can select a P...

Страница 28: ...or Windows NT4 0 2000 Profiles specified in the Printer Properties dialog box can be accessed and used by all the clients connected to the server 1 Click the Start button point to Settings and then cl...

Страница 29: ...3 4 3 Using the Print Options 5 Specify the settings for the Profile in the Page Setup Finishing Paper Source and Quality sheets 6 Display the Attribution sheet 7 Specify the Name Icon and Comment an...

Страница 30: ...essible from the application click the File menu and then click Printer Settings or Page Settings depending on the application to specify the page size 3 Select the actual paper size to be printed on...

Страница 31: ...rom the application click the File menu and then click Printer Settings or Page Settings depending on the application to specify the page size 3 Select the actual paper size to be printed on from the...

Страница 32: ...t of paper The number of document pages which can be printed on one sheet of paper is 2 4 6 8 9 and 16 To print multiple pages on one sheet 2 Select the required page layout from the Page Layout drop...

Страница 33: ...g edge for the paper printout from the Binding Location drop down list box When the Binding Location option is selected the document and margins are positioned correctly on the pages for 2 Sided Print...

Страница 34: ...ailable output options are Off Outputs the document without sorting Available only for imageRUNNER 600 550 60 Collate Outputs sorted copies of the document into the output tray or bins Group Outputs d...

Страница 35: ...py Available for imageRUNNER 6000 5000 imageRUNNER 600 550 60 and imageRUNNER 400 330 6 Click the OK button in the Finishing sheet NOTE The available Finishing options vary depending on the output opt...

Страница 36: ...00 GP55 GP30 3 Select Collate Group or Staple under Finishing 1 Specify the number of copies to print in Copies in the Page Setup sheet 2 Display the Finishing sheet 4 Click the Output Details button...

Страница 37: ...d GP55 GP30 Booklet Printing is not available when You are using Windows NT4 0 Disabled is selected for Spooling at Host in the Configuration sheet for Windows 95 98 or in the Device Settings sheet fo...

Страница 38: ...are using Windows 95 98 2000 you can use different paper for the cover page of the booklet Select Different for Cover and Others under Paper Selection in the Paper Source sheet and specify the paper s...

Страница 39: ...rce or to print the pages from different paper sources NOTE For imageRUNNER 6000 5000 and iR3250 you can also specify whether the paper loading method is according to paper source or paper type To spe...

Страница 40: ...last pages from different paper sources 1 Display the Paper Source sheet 3 Select the paper sources required for the first other and last pages from each of the corresponding drop down list boxes 4 C...

Страница 41: ...t pages from different paper sources 1 Display the Paper Source sheet 3 Select the paper sources required for the first second other and last pages from each of the corresponding drop down list boxes...

Страница 42: ...for Windows 95 98 2000 3 Select the paper sources required for the cover and body pages from each of the corresponding drop down list boxes 4 Click the OK button 1 Display the Finishing sheet and sele...

Страница 43: ...sheet 3 Select the paper source required for the interleaf sheets from the Interleaf Sheet drop down list box 4 Click the Print on Interleaf Sheets check box if you want to print the same data on the...

Страница 44: ...ication as a form file you can print a text data document overlaid with the form file to create a perfectly formatted document Creating a Form File Before using Overlay Printing a form file must be cr...

Страница 45: ...button in the Page Setup sheet 9 Click the OK button in the Print dialog box The document is registered as a form file The document is not printed out when creating a form file 10 Select None under P...

Страница 46: ...int Options Printing with an Overlay 1 In the application select the Print command and then click the Properties button in the Print dialog box 2 Display the Page Setup sheet 3 Click the Page Options...

Страница 47: ...the OK button in the Page Options dialog box 7 Click the OK button in the Page Setup sheet 8 Click the OK button in the Print dialog box The document is printed with the selected form file overlaid 9...

Страница 48: ...ext Table Publications Graphics Photo Image Toner Saver Available for imageRUNNER 6000 5000 iR3250 imageRUNNER 600 550 60 and imageRUNNER 400 330 Drawings Selecting and Editing an Objective Select the...

Страница 49: ...ings for an Objective 2 Select the Objective whose settings you want to change 4 Specify the new settings and then click the OK button 5 Click the OK button in the Quality sheet 1 Display the Quality...

Страница 50: ...ox NOTE For imageRUNNER 6000 5000 and imageRUNNER 600 550 60 clicking the Proof Print check box prints a copy of the document at the same time as sending the document to the Mail Box 4 Click the OK bu...

Страница 51: ...ource or Quality sheet 3 Specify the name of the data to register as an image form and then select Image Form Memory under Store Destination 4 Click the OK button NOTE Only the first page of the docum...

Страница 52: ...the OK button in the Secured Print Settings dialog box 5 Click the OK button to close the Properties dialog box and then click the OK button in the Print dialog box The Confirm Password dialog box is...

Страница 53: ...OK button in the message box to switch to the Edit and Preview mode 3 Click the OK button to close the Properties dialog box and then click the OK button in the Print dialog box 4 Repeat step 1 to 3 f...

Страница 54: ...Job Accounting In order to print documents using the Job Accounting feature follow the procedure below to specify the ID and password IMPORTANT It is necessary to install Canon NetSpot Suite Service f...

Страница 55: ...he Print dialog box 2 Specify the various settings in the Properties dialog box 3 Click the OK button to close the Properties dialog box and then click the OK button in the Print dialog box 5 Click th...

Страница 56: ...dialog box 3 Click the OK button to close the Properties dialog box and then click the OK button in the Print dialog box The document is printed under the specified ID and password When the Allow Pass...

Страница 57: ...t allows you to specify the brightness and contrast settings affecting a printed document Adjust the brightness and contrast using the nine image sample thumbnails A default original image and an adju...

Страница 58: ...e image type to adjust from the Sample Picture drop down list box and then adjust the brightness and contrast For detailed information about the Adjustment sheet refer to the online help 3 Click the G...

Страница 59: ...e Matching check box and then specify the method of color matching Or deselect the Enable Matching check box and then specify the gamma value For detailed information about the Matching sheet refer to...

Страница 60: ...settings for faxing a document IMPORTANT If a fax board is not installed in your printer the fax options are not available Installing the Fax Driver 4 2 Specifying the Installed Fax Memory 4 6 Faxing...

Страница 61: ...Installer 1 Insert the User Software CD into the CD ROM disk drive 2 Double click the My Computer icon and then double click the CD ROM disk drive icon 3 Double click the PCL Drivers USEng and Setup...

Страница 62: ...e 9 After the files are copied click the Finish button to finish the installation program The printer icon is displayed in the Printers folder The driver is now installed NOTE Use the Installer only f...

Страница 63: ...ow the instructions on the screen to continue the installation 5 Insert the User Software CD into the CD ROM disk drive and then click the Have Disk button 3 Confirm the Wizard is started and then cli...

Страница 64: ...llow the instructions on the screen to continue and then click the Finish button to start copying the files The printer icon is displayed in the Printers folder The driver is now installed 7 Select yo...

Страница 65: ...ick the Start button point to Settings and then click Printers 2 In the Printers folder right click the icon of your fax and then click Properties 4 Select the amount of memory from the FAX Memory dro...

Страница 66: ...box and then click the OK button 4 Repeat step 3 if you want to send the fax to multiple recipients 5 Specify the various settings in each sheet To switch between sheets click the tab for each sheet 6...

Страница 67: ...ion is available only for iR3250 1 In the Windows application with the document open click the command to print your document 2 In the Print dialog box select your fax name from the Name drop down lis...

Страница 68: ...le recipients 9 Specify the various settings in each sheet To switch between sheets click the tab for each sheet 10 After all the fax settings are specified click the OK button in the Properties dialo...

Страница 69: ...an add recipients by Typing a new name and fax number in the Recipient Name and FAX Number boxes Selecting a recipient in the Select from Address Book dialog box To add a new name and fax number as a...

Страница 70: ...x and then click the Add to Recipient List button 4 Click the OK button in the Select Recipient from Address Book dialog box The new recipient is displayed in the Recipient List list box in the Send F...

Страница 71: ...ining a new individual You see the same dialog box under the title Edit Individual if you click the Edit button in the Address Book sheet when an individual entry is selected in the Entries list box T...

Страница 72: ...to the memory box of the recipient s fax click the Use Subaddress check box NOTE The Subaddress option is available only for iR3250 8 Enter the subaddress and the password of the recipient s fax and...

Страница 73: ...individual entry To delete an Individual 1 Select the entry you want to delete in the Entries list box and then click the Delete button 1 Display the Address Book sheet and then click the Individuals...

Страница 74: ...n the Address Book sheet when a group entry is selected in the Entries list box The Edit Group dialog box allows you to change information on an existing group entry To add a new Group 3 Enter the new...

Страница 75: ...ble Recipients list box and then click the Add button To remove a member of the selected group select the individual or group you want to remove from the Current Group Members list box and then click...

Страница 76: ...Defining the Address Book Entries 4 17 4 Using the Fax Options To delete a Group 1 Select the entry you want to delete in the Entries list box and then click the Delete button...

Страница 77: ...following check boxes to include that information about the sender or recipient on the cover sheet Sender Name FAX Number Company Dept Div Logo Signature and Remark 1 Display the Cover Sheet sheet 5...

Страница 78: ...cation and position of the selected logo or signature and then click the OK button in the Edit Logo Signature dialog box 10 If Remark is selected select a remark from the drop down list box or enter a...

Страница 79: ...Attaching a Cover Sheet to a Fax 4 20 4 Using the Fax Options...

Страница 80: ...ix 5 C H A P T E R Appendix This chapter provides information about additional software used with the PCL5e or PCL 6 printer drivers Additional Software 5 2 Canon Port Setting Tool 5 2 Device Status E...

Страница 81: ...pot Suite Service For more information about using Canon Port Setting Tool see the Online Help To display the Online Help start Canon Port Setting Tool and then click the Help button Device Status Ext...

Страница 82: ...elete a Group 4 17 To edit a Group 4 16 Defining an Individual 4 12 To add a new Individual 4 12 To delete an Individual 4 14 To edit an Individual 4 14 E Editing an Objective 3 23 Editing Profiles 3...

Страница 83: ...29 O Objective 3 23 Overlay Printing 3 19 3 21 P Paper Source 3 14 Different for Cover and Others 3 17 Different for First Others and Last 3 15 Different for First Second Others and Last 3 16 Same Pa...

Страница 84: ...as an Image Form 3 26 To send a document to the Mail Box 3 25 Setting Up the Printer Configuration 2 11 Specifying the Fax Recipients 4 10 To add a new name and fax number as a recipient 4 10 To add...

Страница 85: ...Index A 4...

Страница 86: ...urrey RH2 8BF United Kingdom CANON DEUTSCHLAND GmbH Europark Fichtenhain A10 47807 Krefeld Germany CANON ITALIA S p A Palazzo L Strada 6 20089 Milanofiori Rozzano MI Italy CANON LATIN AMERICA INC 6505...

Отзывы: