Chapter 2
2-21
A full turn of the screwdriver will change the left
margin by 1.0 mm.
6) Tighten the 2 screws you loosened in step 3).
7) Attach the left face cover you removed in step 2)
back to the machine.
8) Close the left deck.
- If the gap between the front cover/cassette 3 front
cover and the left front cover is appreciable, perform
the following:
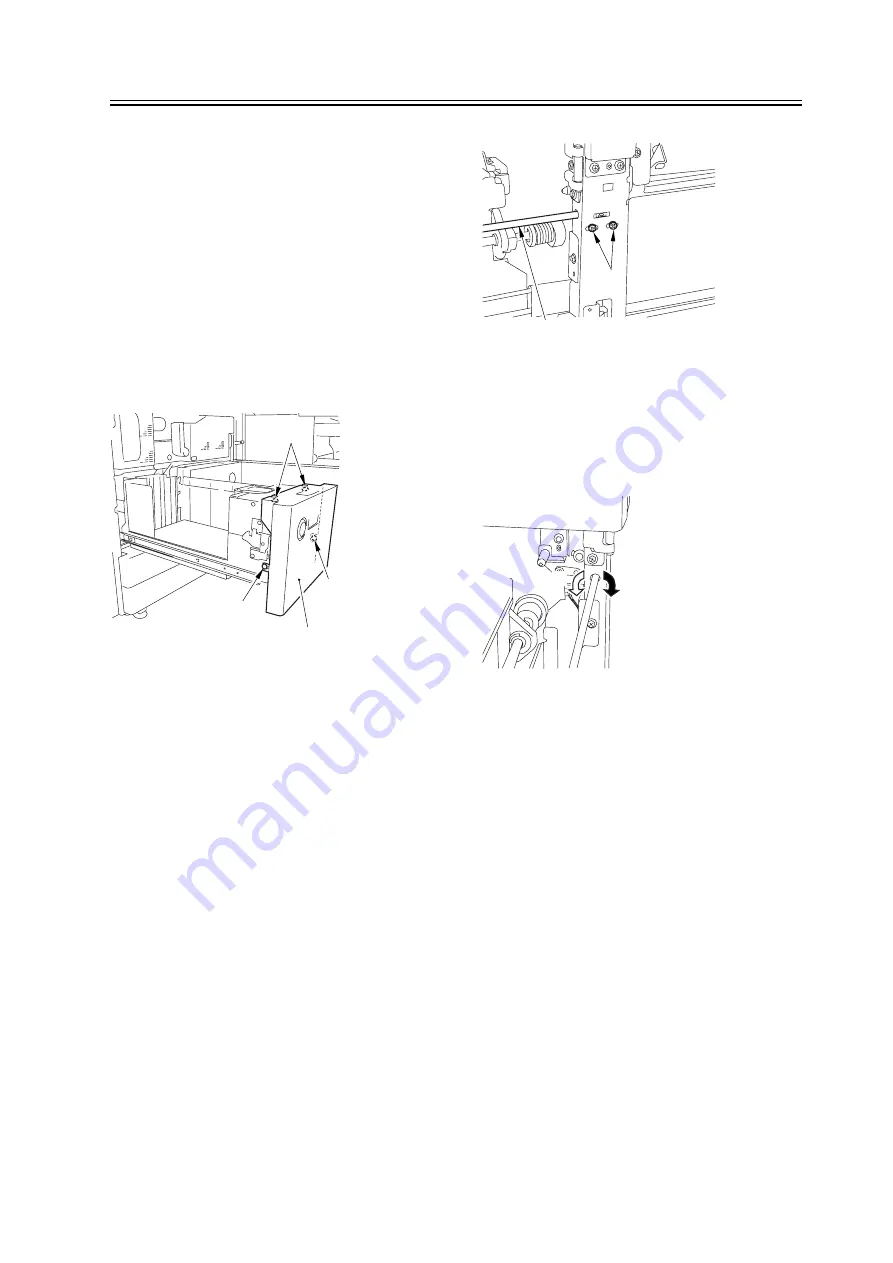
9) Slide out the left deck, and loosen the 4 screws [1];
then, shift the front left cover [2].
F-2-20
10) Close the left deck; when the gap is gone, slide out
the left deck once again, and tighten the 4 screws you
loosened in step 9).
- If there still is a gap, go back to step 9).
11) Close the left deck.
2. Right Deck Left/Right Margin Adjustment
1) Push the release button, and slide out the right deck.
2) Open the upper right color and the lower right cover
3) Loosen the 2 screws [1]; then, insert a screwdriver
[2] through the opening in the front right stay, and turn
the adjusting screw to adjust the left/right margin.
F-2-21
4) Check to make sure that the left/right margin of
printouts made on paper from the right deck is as
indicated.
5) As necessary, perform the following:
F-2-22
- turn the screwdriver counterclockwise to decrease
the left margin [1].
- turn the screwdriver clockwise to increase the left
margin [1].
A full turn of the screwdriver changes the left margin
by 1.0 mm.
6) Tighten the 2 screws you loosened in step 3).
7) Close the upper right cover and the lower right
cover
8) Close the right deck.
- If the gap between the front cover/cassette 3 front
cover and the front right cover is appreciable, perform
the following:
9) Slide out the right deck, and loosen the 4 screws,
and shift the front right cover [2].
[1]
[1]
[1]
[2]
[1]
[2]
[1]
[2]
Содержание iR C6800 Series
Страница 1: ...Jan 20 2005 Portable Manual iR C6800 Series ...
Страница 2: ......
Страница 6: ......
Страница 12: ......
Страница 13: ...Chapter 1 Maintenance and Inspection ...
Страница 14: ......
Страница 16: ......
Страница 20: ...Chapter 1 1 4 Under high humidity and high temperature condition 85 000 images ...
Страница 51: ...Chapter 2 Standards and Adjustments ...
Страница 52: ......
Страница 79: ...F 2 27 1 ...
Страница 99: ...F 2 88 F 2 89 1 OK NG NG ...
Страница 110: ......
Страница 111: ...Chapter 3 Error Code ...
Страница 112: ......
Страница 114: ......
Страница 172: ......
Страница 173: ...Chapter 4 User Mode Items ...
Страница 174: ......
Страница 176: ......
Страница 188: ...LIPS emulation 12 items utility printer initialize yes no Item Description ...
Страница 190: ......
Страница 191: ...Chapter 5 Service Mode ...
Страница 192: ......
Страница 380: ......
Страница 381: ...Chapter 6 Outline of Components ...
Страница 382: ......
Страница 384: ......
Страница 387: ...F 6 1 SL7 CL3 CL2 SL6 SL8 SL9 SL2 SL1 SL4 SL3 SL5 CL1 SL10 SL11 SL12 ...
Страница 393: ...F 6 3 M19 M32 M31 M30 M17 M14 M29 M6 M9 M10 M11 M12 M25 M13 M28 M20 M22 M21 M26 M27 M15 M2 M5 M4 M3 M8 M1 M18 M23 ...
Страница 397: ...F 6 5 FM2 FM10 FM11 FM12 FM6 FM3 FM4 FM8 FM9 FM5 FM7 FM1 ...
Страница 407: ...F 6 9 PS65 PS38 PS39 PS46 PS44 PS45 PS52 PS53 PS58 PS59 PS37 ...
Страница 413: ...LA1 J602 601 J206 Notation Main controller PCB Inverter PCB Reader controller PCB AC driver PCB DC controller PCB ...
Страница 417: ...F 6 13 13 2 5 3 14 15 16 9 6 12 7 1 11 4 25 24 21 23 19 20 31 29 28 27 26 22 18 17 32 30 10 8 ...
Страница 418: ......
Страница 419: ...Chapter 7 System Construction ...
Страница 420: ......
Страница 422: ......
Страница 443: ...Chapter 8 Upgrading ...
Страница 444: ......
Страница 446: ......
Страница 455: ...Jan 20 2005 ...
Страница 456: ......


