Playback the Recorded Files
Various Settings and [Performance Check]
Camera and Picture Control Recording onto the Hard Disk Playback the Recorded Files
CONSOLE Windows
6-52
Waveform Vector Monitor
A waveform of the playback picture and the color information are displayed. The functions are the
same as the waveform vector monitor (
4-32) of [Rec Panel].
File Browser
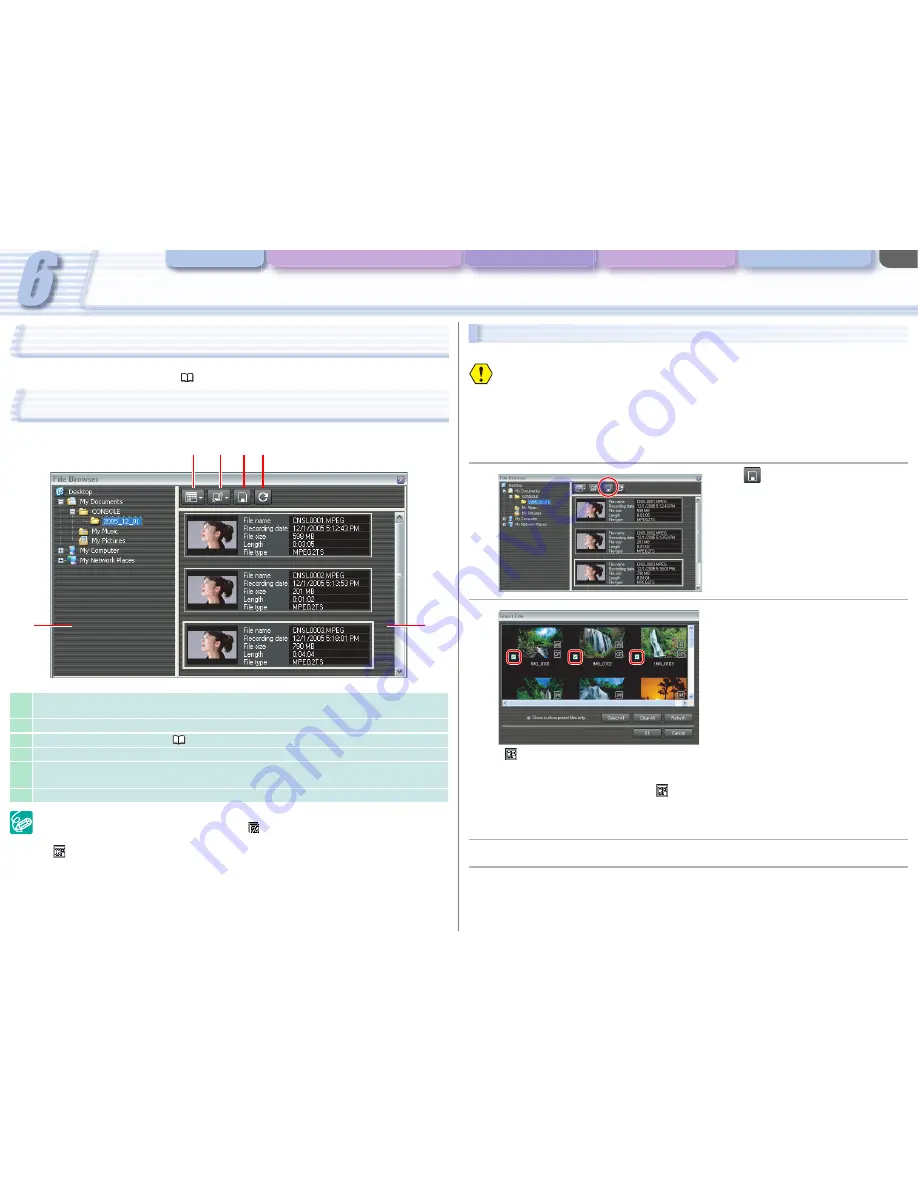
In the file browser, the files stored in the hard disk are displayed.
Placing the cursor over a file for a few seconds will display the file information.
Files recorded in 24F mode are marked with
(NTSC only).
To delete a file, right-click the thumbnail and select [Delete] from the displayed menu.
will be attached to the thumbnails of all Custom Preset files. By right clicking on the
thumbnail, you can check the settings of the Custom Preset and can load the Custom
Preset file to the camcorder.
1
Selects the display pattern. You can select to display only the thumbnails or the thumbnails
with the file information.
2
Selects the display order of the files.
3
Copies from the memory card (
6-52).
4
Refreshes the files displayed in the window.
5
Displays the files in the selected folder.
Double-clicking a file, the selected file will be played back in [Play Viewer].
6
Displays the explorer view.
1
3
4
2
5
6
Copying from the Memory Card
You can copy the still image and the Custom Preset files from the memory card to the hard disk.
If the total number of files recorded on the memory card is more than 1500 (XL H1) or 2000
(XH G1/XH A1), the file browser cannot display the files correctly. In this case, please copy
the files to the hard disk using a card reader/writer, and then check the files in the file
browser.
When using XL2, you cannot use a memory card.
You need to set the camcorder’s recording program to EXT.CONT.
Proper operation cannot be guaranteed if you are not using Canon camcorders to create the
image files.
1
Click .
The thumbnails of still image files and the
Custom Preset files are displayed.
2
Select a file you wish to copy.
•
is attached to the thumbnails of the still image files that have the corresponding Custom
Preset files that were recorded in the separate file at the same time when the images were
recorded.
- When selecting a still image with
, the still image and its Custom Preset file also are
copied.
• By clicking [Select All] selects all files in the card.
• By clicking [Show custom preset files only.] displays the Custom Preset files only.
3
Click [OK].
4
Select a folder for storing the copied file and click [OK].
To cancel the copying, click [Cancel].


