9
GB
Consumption: 306 g/h (4.2 kW) - Injector N° 61956
Category: butane direct pressure.
Thank you for choosing the Campingaz
®
Garden Torch R
thermal weeder.
IMPORTANT: YOU ARE USING GAS, BE
VERY CAREFUL!
The purpose of these directions for use is to enable
you to use your Campingaz
®
Garden Torch R
appliance
properly and in complete safety.
Please read them carefully, so as to familiarise
yourself with the appliance before assembling it
onto its gas container.
Please follow the instructions that appear in these
directions for use. Any failure to follow these
instructions may pose a danger both to the user
and to people in the vicinity.
Always keep these directions for use in a safe
place so that you can refer to them if need be.
This appliance must only be used with Campingaz
®
cylinders 904 and 907. It may be dangerous to use
any other gas containers.
La Société Application Des Gaz will not accept any
liability in the event that a cylinder manufactured
by any other brand is used.
This equipment should only be used outside pre-
mises and kept away from inflammable materials.
Do not use an appliance that is leaking, not work-
ing properly or damaged. Return it to the shop you
bought it from, which will give you details of the
nearest after-sales service outlet.
Never modify this appliance or use it for applica-
tions for which it is not intended.
SAFETY INSTRUCTIONS
BEWARE OF FIRE RISK! DRY GRASS CATCHES
FIRE EASILY AND THE FIRE CAN SPREAD RAPIDLY.
- Follow local regulations that list the prohibitions
for using fire (available from your municipal
government).
- Wear gloves.
- Wear closed shoes.
- Avoid breathing in smoke from combustion.
- Do not use the thermal weeder in an enclosed area.
- Keep out of the reach of children.
WEEDING WITH THE
GARDEN TORCH R
The Campingaz
®
GARDEN TORCH R
weeds by produ-
cing a thermal shock on the plants to be eliminated.
The idea is not to burn the plant but merely to heat it for
a few seconds. You will see that the plant immediately
shrivels up and changes color. It wilts and will disinte-
grate over the following days.
Please note
- This device is not designed for lawns; it should be
used instead for the upkeep of gardens, borders, rock
gardens and tiled or paved walkways.
- For greater effectiveness, weed in the spring when
plants first appear (young sprouts) or in the fall (sap
descends).
- For perennials, it will be necessary to intervene a
number of times at closely spaced intervals.
ASSEMBLING THE GARDEN TORCH R
- Remove the device and its accessories from the pac-
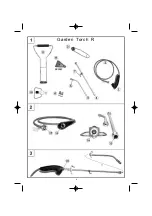
kaging (fig. 1).
- Be sure that the sealing rings on the output connec-
tions are present and in good condition (fig. 2):
1 - torch extender (13)
2 - nozzle (14)
3 - hose (15)
4 - relay valve (16)
Do not use the device if a sealing ring is missing or
damaged: take it back to your dealer.
- The torch has two components: a part with a burner
(3) (fig. 1) and an extender (4) (used for weeding ope-
rations).
- If you want to use the torch extender, screw it into the
nozzle outlet connection (20) (fig. 3), then screw the
part containing the burner to the other end of the
extender.
- If you do not want to use the extender (operations
other than weeding), screw the part with the burner (3)
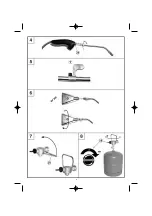
(fig. 4) directly onto the nozzle outlet connection (20).
- The support hook (7 - fig. 1), which is fixed to the
nozzle, is useful for hanging the device on the support
frame (see the "Support Frame" section below).
- Screw the flat nozzle (
BP 300
) into the end of the bur-
ner (fig. 6).
MOUNTING ON THE CAMPINGAZ
®
904 OR
907 CYLINDER
(If an empty cylinder is in place, read section "REMOV-
ING THE CAMPINGAZ® 904 OR 907 CYLINDER").
When inserting or removing a cylinder, always do so in
an airy location, preferably outside and never close to
a naked flame, heat source or spark (cigarette, electri-
cal appliance, etc.), and well away from any other peo-
ple and inflammable materials.
Mounting the relay valve (10 - fig. 1) on the cylinder
- Place the gas cylinder on a horizontal surface and
close, then remove, the stopper.
a) If you do not use the support frame (11)
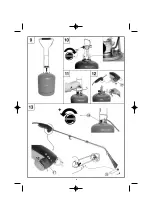
- Turn the relay valve (18) wheel in a clockwise
direction (toward "-", as indicated by the arrow)
until it stops (fig. 8).
- Screw the relay valve directly on the gas cylinder
all the way in (fig. 8).
b) If you use the support frame (11)
- Turn the relay valve (18) wheel in a clockwise
direction (toward "-", as indicated by the arrow)
until it stops (fig. 10).
- Place the support frame vertically on the gas cylin-
der (fig. 9).
- Place the handle of the relay valve (25) in a verti-
cal position (fig. 7).
- Place the relay valve on the cylinder with the
handle toward the top. Place the two ends of the
handle in the support slots (fig. 10).
- Holding the valve, screw it all the way into the
cylinder (fig. 11). The support frame should follow
the turning movement.
Mounting the relay valve hose (fig. 12)
- Check to see that the gas outlet is closed by turning
the adjustment wheel located under the nozzle hand-
le (17) in a clockwise direction (toward the "-" marked
on the button) until it stops.
- Screw the hose all the way into the relay valve.
- Avoid twisting the flexible hose.
The thermal weeder is ready to use.
In case of leakage (gas smell before opening the valve),
immediately put the equipment outside, in a well-ventilated
area, without inflammation source, where it will be
possible to locate and stop the leak. If you wish to check
the tightness of the equipment, do it outside. Do not try
to locate a leak with a flame, use gas leak detection liquid.


