background image

10

GB

USE

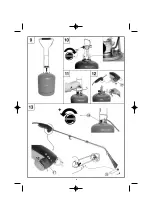
Lighting (fig. 13)

- Turn the adjustment wheel on the relay valve (18)

located on the gas cylinder in a counterclockwise

direction (toward "+", as indicated by the arrow).

- Turn the adjustment wheel located under the nozzle

handle (17) in a counterclockwise direction (toward

the "+" marked on the button).

- Place a lighted match in front of the burner or use the

flint spark lighter (21) supplied with the torch.

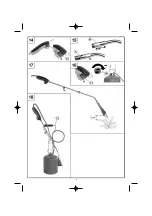
Adjusting GARDEN TORCH R flame strength (fig. 14)

- Adjust the flame to the level desired by turning the

adjustment wheel located under the nozzle handle

(17) toward "+" to increase or toward "-" to decrease

gas flow.

- To obtain a constant maximum flow, turn the adjust-

ment wheel located under the device handle to the "+"

mark.

Adjusting flame temperature (fig. 15)

Adjust flame temperature by opening or closing the "A"

air holes in the burner using the air adjustment ring (6),

which can be slid over the burner by simultaneously

pressing on the two fins found on the ring.

Careful!

The adjustment ring may be very hot after intensive use.

Allow the device to cool completely before readjusting

the air holes or use protective gloves.

With the flat BP 300 nozzle

- "A" air holes completely open: pointed blue flame.

- Air adjustment ring partially blocking the air holes:

broad yellow flame.

Extinction (fig. 16)

- Turn the adjustment wheel located under the nozzle

handle (17) in a clockwise direction (toward the "-"

marked on the button) until it stops.

- Turn the relay valve (18) adjustment wheel in a clock-

wise direction (toward the "-", as indicated by the

arrow) until it stops.

How to Weed

The idea is not to burn the weed, but merely to heat

it by placing the nozzle approximately 5 cm above

the plant for a few seconds (fig. 17). 

To check weeding effectiveness, press a plant leaf bet-

ween two fingers right after using the thermal weeder.

This should leave a dark green, somewhat translucent

mark on the leaf.

Please note: avoid weeding when there is a strong

wind or when the grass is wet. This causes a nota-

ble loss of heat and results will not be good.

To facilitate moving the gas cylinder during weeding, we

suggest you use the support frame (11). Since the gas

cylinder is attached underneath the frame, it is easier to

move (see the "USING THE SUPPORT FRAME" sec-

tion below).

USING THE SUPPORT FRAME (11) (fig. 18)

The support frame makes it easier to use your torch

during operations, such as weeding, where it is neces-

sary to move the cylinder. The handle facilitates car-

rying.

For storage, attach the gas cylinder beneath the frame

and just hook the torch and nozzle on it; roll the hose

around the hooks and place the non-utilized burner on a

rod to avoid losing it.

REMOVING THE CAMPINGAZ

®

904 OR 907

CYLINDER

The cylinder can be removed even if it is not empty.

Remove the cylinder outside and away from other peo-

ple.

- Check that the gas outlet is closed by turning the relay

valve adjustment button (18) on the gas cylinder in a

clockwise direction (toward "-", as indicated by the

arrow) (fig. 16) until it stops. 

- Unscrew the relay valve (10) from the gas cylinder.

- Check the sealing rings before reassembling the cylin-

der (fig. 2).

OTHER FUNCTIONS

It is possible to assemble the torch without the extender

to make it shorter (see the section on "ASSEMBLING

THE GORDEN TORCH R" for assembly instructions) for

use in one of the following operations:

- Lighting a barbecue

- Thermal paint removal

- Thawing pipes or other items.

STORAGE

- Check that the gas outlet is completely closed by tur-

ning the relay valve adjustment button (18) on the gas

cylinder in a clockwise direction (toward"-", as indica-

ted by the arrow) (fig. 16) until it stops.

- After the thermal weeder has completely cooled, place

it in a cool, dry, ventilated place, out of the reach of

children, and never in a basement or storage cellar.

- Use the support frame to store your device.

- If the device will not be used for an extended period of

time, disconnect the gas cylinder by following the

instructions in the section on "ROMOVING THE CAM-

PINGAZ

®

904 OR 907 CYLINDER".

Содержание Garden Torch R

Страница 1: ...I 6 INSTRUCTIONS FOR USE 9 GEBRUIKSAANWIJZING 15 BEDIENUNGSANLEITUNG 12 ISTRUZIONI PER L USO 18 INSTRUCCIONES DE EMPLEO 21 ES MODO DE EMPREGO 24 PT IT FR NL BRUKSANVISNING 27 BRUKSANVISNING 30 BETJENI...

Страница 2: ...2 Garden Torch R...

Страница 3: ...3...

Страница 4: ...4...

Страница 5: ...5...

Страница 6: ...us la poign e du pistolet 17 dans le sens de rotation des aiguilles d une montre sens marqu sur le bouton Visser fond le tuyau sur le robinet relais Eviter les efforts de torsion sur le tuyau souple D...

Страница 7: ...gaz avant l ouverture du robi net mettez imm diatement l appareil l ext rieur dans un endroit tr s ventil sans source d inflamma tion o la fuite pourra tre recherch e et arr t e Si vous voulez v rifie...

Страница 8: ...ers non agr iv de l utilisation de pi ces de rechange qui ne seraient pas d origine NOTA l usage professionnel de ce produit est exclu de la garantie Toute prise en charge pendant la p riode de garant...

Страница 9: ...resent and in good condition fig 2 1 torch extender 13 2 nozzle 14 3 hose 15 4 relay valve 16 Do not use the device if a sealing ring is missing or damaged take it back to your dealer The torch has tw...

Страница 10: ...avoid weeding when there is a strong wind or when the grass is wet This causes a nota ble loss of heat and results will not be good To facilitate moving the gas cylinder during weeding we suggest you...

Страница 11: ...hall in no event exceed the price of the product The warranty is null and void and does not apply should the damage arise from i abuse of the products ii failure to operate and maintain the products i...

Страница 12: ...n von Rasenfl chen gedacht es dient zur Pflege von G rten Einfassungen Steing rten Platten oder Pflasterwegen Unkrautvernichten ist besonders wirksam im Fr hjahr wenn die Triebe der Pflanzen noch sehr...

Страница 13: ...rn nur erhitzt werden indem man den Brenner einige Sekunden lang ca 5 cm ber die Pflanze h lt Abb 17 Um die Wirksamkeit Ihrer Arbeit zu sehen zerdr cken Sie nach der Anwendung des thermischen Unkrautv...

Страница 14: ...er nicht gem den Bedienungsanweisungen durchgef hrte Wartung des Ger ts iii durch Reparatur nderung Wartung des Ger ts durch einen nicht zugelasse nen Dritten iv durch Verwendung von nicht Original Er...

Страница 15: ...ng is jonge plant of in het najaar wanneer het plantensap daalt Bij winterharde planten dient er meerdere malen te worden behandeld met zeer regelmatige intervallen ASSEMBLAGE VAN DE GARDEN TORCH R Ha...

Страница 16: ...g van de pijl Hoe wordt het onkruid verwijderd De plant wordt niet verbrand maar wordt alleen gedu rende enkele seconden verhit door het mondstuk van de branderbuis gedurende enkele seconden op ongeve...

Страница 17: ...n is niet van toepassing wanneer de schade ontstaan is door i onjuist gebruik of onjuiste opslag van het product ii gebrek aan onderhoud van het product of onderhoud dat niet in conform is aan de gebr...

Страница 18: ...apparecchio e gli accessori fig 1 Verificare la presenza ed il corretto stato delle guarni zioni di tenuta poste sui raccordi d uscita fig 2 1 prolunga della lancia 13 2 pistola 14 3 tubo 15 4 rubine...

Страница 19: ...osizionando l imboccatura ad una dis tanza di 5 cm circa sopra la pianta per alcuni secondi fig 17 Per verificare la qualit del diserbaggio premete tra l in dice ed il pollice una foglia subito dopo i...

Страница 20: ...fetto di manutenzione del prodotto o ad una manutenzione non conforme alle istru zioni iii alla riparazione modifica manutenzione del prodotto da parte di terzi non autorizzati iv all uso di pezzi di...

Страница 21: ...JE DEL GARDEN TORCH R Saque el aparato y sus accesorios de su embalaje Fig 1 Compruebe la presencia y el buen estado de las juntas de estanqueidad de los enchufes de salida Fig 2 1 alargadera de la la...

Страница 22: ...la planta durante algunos segundos Fig 17 Para comprobar la eficacia de su desherbado atrape entre sus dedos una hoja del vegetal tras al paso del desherbante t rmico sus dedos deben dejar una marca v...

Страница 23: ...ndro al que est conectado antes de ser enviado al servicio postventa oficial El producto ser reparado reemplazado o reembolsado en totalidad o en parte La garant a es nula y no se aplica cuando el pro...

Страница 24: ...zer v rias inter ven es a intervalos curtos MONTAGEM DO GARDEN TORCH R Retirar o aparelho e respectivos acess rios da emba lagem fig 1 Certificar se da exist ncia e bom estado das juntas de estanqueid...

Страница 25: ...co a cerca de 5 cm acima da planta durante alguns segundos fig 17 Para ter a certeza da efic cia da monda apertar entre dois dedos uma folha logo depois de passar com o queimador de monda t rmica os d...

Страница 26: ...a e descri o do problema encontrado Qualquer produto que funcione a g s dever ser separado do cartucho ou do cilindro ao qual est ligado antes de ser devolvido a um centro de assist ncia p s venda cer...

Страница 27: ...P starkare v xter f r man ingripa flera g nger i snabb f ljd MONTERING AV GARDEN TORCH R Ta ut apparaten och dess tillbeh r ur emballaget fig 1 F rs kra dig om att t tningsfogarna p utg ngs ledningarn...

Страница 28: ...fingrarna omedel bart efter att ogr sbr nnaren har behandlat den dina fingrar kommer att efterl mna ett m rkgr nt m rke som r lite genomskinligt p bladet OBS Undvik att utf ra ogr sbek mpningen d det...

Страница 29: ...i ett felaktigt underh ll av produkten eller ett underh ll som inte verensst mmer med bruksanvisningen iii reparationer ndringar underh ll av produkten som utf rs av tredje man som inte auktoriserats...

Страница 30: ...med korte mellomrom MONTERING AV GARDEN TORCH R Ta apparatet og tilbeh ret ut av emballasjen fig 1 Kontroller at alle de vanntette koblingene p utgangs koblingene er tilstede og i god i stand fig 2 1...

Страница 31: ...tter at du har brukt den termiske ugressfjerneren p det Fingrene skal etterlate et m rkegr nt litt gjennomsiktig merke p bladet Merknad Ikke bruk ugressfjerneren i sterk vind eller n r gresset er fukt...

Страница 32: ...duktet ikke har v rt betjent eller vedlikeholdt i overensstemmelse med bruksanvisningen iii produktet er reparert vedlikeholdt endret eller modifisert av ikke godkjent tredjepart iv det ikke er brukt...

Страница 33: ...F GARDEN TORCH R Tag apparatet og det medf lgende udstyr ud af embal lagen fig 1 Kontroller at t tningerne p udgangsforskruningerne fig 2 er til stede og i god stand fig 2 1 lansens forl ngerled 13 2...

Страница 34: ...fektivitet pres et planteblad mellem to fingre umiddelbart efter anvendelse af ukrudtsbr nderen p bladet skal der v re en m rkegr n og svagt gennemsigtig aftegning af et fingem rke Bem rk Undg ukrudts...

Страница 35: ...k bsdatoen f eks kvittering og en beskrivelse af det opst ede problem Hvis apparatet er gasdrevet afmonteres patronen eller cylinderen der er tilsluttet selve apparatet f r det indleveres hos et serv...

Страница 36: ...sta kuva 1 Varmista ett ulostulojen yll on saumatiivisteet ja ett ne ovat hyv ss kunnossa kuva 2 1 keih n pidennys 13 2 pistooli 14 3 johto 15 4 liitosventtiili 16 l k yt laitetta jos jokin tiiviste p...

Страница 37: ...tt tuulisella ilmalla tai kun kas vusto on m rk T llaisissa tapauksissa l mp hukka on suuri eik tulos ole hyv Kaasus ili n kuljettamisen helpottamiseksi ehdotamme tuen 11 k ytt Kaasus ili asetetaan se...

Страница 38: ...tt inen tuote on otettava erilleen patruunasta tai s ili st johon se on liitetty ennen tuotteen palaut tamista valtuutettuun palvelupisteeseen Tuote joko korjataan vaihdetaan uuteen tai siit annetaan...

Отзывы: