SECTION 4. SENSOR INSTALLATION
4-5
4.9 107/108 SOIL TEMPERATURE
PROBE
1. Select an undisturbed area of ground on the
side of the tower that will receive the least
amount of traffic. Route the sensor lead
from the datalogger to the selected area.
2. Dig a narrow trench next to the sensor lead,
ending the trench at least 6" short of the
probe tip. Lay the sensor lead into the
trench.
3. Use a screwdriver to poke a horizontal hole
into the undisturbed soil at the end of the
trench at the appropriate measurement
depth. Insert the probe tip into the hole and
carefully backfill the trench.
4. If bare soil is required, a soil sterilant such
as Paramitol
can be applied to the area
where the probe is buried. Soil erosion can
be a problem when the probe is under bare
soil. To prevent erosion from occurring,
bury a 36” square frame constructed from
2” x 4" lumber around the probe, with the
top of the frame even with the soil surface.
4.10 CS500 VAISALA TEMPERATURE
AND RH PROBE
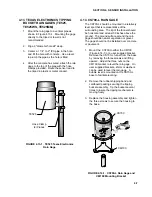
Mount the CS500 probe inside the 41301
(UT6P) 6-Plate Gill Radiation shield as shown in
Figure 4.10-1.
1. Loosen the two mounting clamp screws on
the base of the radiation shield. Insert the
CS500 sensor through the clamp until the
base of the sensor is even with the bottom
of the clamp.
Tighten the two screws evenly until the clamp is
snug against the sensor base.
FIGURE 4.10-1. CS500 Temperature and
RH Probe
41031
Mounting
Clamp
CS500
Base
UT018
CS500
Mounting
Clamp
UTGP
CS500
Base


