background image

CALREC 

Putting Sound in the Picture


25

Any standard specification modern 
PC running Windows 7 or Windows XP                                                       
Professional can be used as a backup 
or replacement to connect to the 
console and run the various Calrec 
applications

.

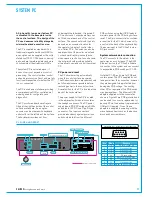
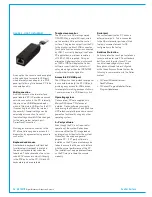
Connection by the PC's USB port, via 
the supplied USB-Ethernet adaptor into 
a spare POE switch P1–P6 port ensures 
the PC's network port is not damaged 
by POE power.  Note, not all available 
USB-Ethernet adaptors have protection 
against POE power, please refer to the 
manufacturers specification if not using 
ones supplied by Calrec.

Starting the Calrec Main Application on a 
second PC will disable it on the first PC.

If using a laptop, or a different monitor 
screen to the one supplied, a minimum 
screen resolution of 1280 x 1024 is 
required to display the Calrec software 
correctly.  Currently, such pixel height is 
not widely supported by budget range 
laptops.  Using an alternative higher 
resolution monitor such as 1920 x 1080 
will display the Calrec software correctly 
but the content will not scale up higher 
than the 1280x1024 monitor size it was 
designed for.

Calrec can supply pre-configured laptops 
and replacement PC's ready to work 
out of the box.  The setup instructions 
on this page can be used to configure 
a non-Calrec supplied PC.  Minimum 
requirements for the PC are listed below.

ARTEMIS BACKUP PC SETUP FOR WINDOWS XP (WINDOWS 7 IS SIMILAR)

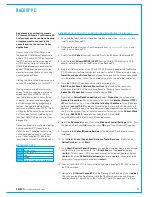
1.  Download the latest version of Java Runtime Environment from 

www.java.com

 and  

     install it on the Backup PC.

2.  Download the latest version of .net Framework from 

www.microsoft.com/net

 and  

     install it on the Backup PC.

3.  Copy folder 

C:\Calrec

 from the Console PC onto the 

C:

 drive of the Backup PC.

4.  Copy the folder 

Drivers\WINXP\32 BIT

 from the DUB E-100 Ethernet to USB      

     adaptor installation CD onto the 

C:

 drive of the Backup PC 

5.  Plug the USB connection of the DUB E-100 USB network adapter into the Backup  
     PC.  Windows will automatically detect and start to install it.  When prompted, select  
     

Install from a specific location

 and browse to the location the drivers were copied  

     to in the previous step.  Follow the on-screen prompts to complete the installation

6.  Once the DUB E-100 has been successfully installed, go to 
     

Start>Control Panel>Network Connections

, right click on the connection          

     which uses the DUB E-100 and choose Rename.  Rename the connection to       
     

CalrecDeskConnection

 (case sensitive) and click 

OK

.

7.  Right click on 

CalrecDeskConnection

 and select 

Properties

, this will open the    


Network Properties

 window.  Scroll down the list to find 

Internet Protocol (TCP/ 

     IP)

 and double click on it.  Select 

Use the following IP address

.  In the IP address  

     field enter 

xxx.yyy.135.0

 (where xxx.yyy match the first two bytes of the console IP  

     address.  If uncertain, open the Calrec program updater application which will list all  
     the IP's in the system.  They all have the same first two bytes).  In the 

Subnet Mask


     field enter 

255.255.0.0

, leave all other fields blank.  Click on 

OK

.     

You will be returned to the Network Properties window

8.  Select the 

Advanced

 tab and click on the 

Windows Firewall Settings

 button.  Turn  

     the firewall off and click 

OK

 to confirm, then 

OK

 again to exit Network Properties.

9.  Navigate to

 C:\Calrec\WindowsService

 on the Backup PC and double click on  

     install.bat.

10. Go to 

Start>Control Panel>Administrative Tools>Services

.  Right click on         


CalrecService

 and click 

Start

.

11. Go to 

Start>Control Panel>System

 and open the Computer Name tab and make  

      a note of the full computer name.  Go to 

Start>Run

 and type 

cmd

 then press        


<enter>

.  This will open a DOS command prompt. At the prompt type

 c:

 and press  


<enter>

, then type 

Calrec\Utils\setcacls

 then press 

<enter>

.  When prompted  

      enter the full computer name and press 

<enter>

.

12. Connect the DUB E-100 to the console using a spare panel port (P1–P6) on one of  
      the POE switches.

13. Navigate to 

C:\Calrec\ConsolePC

 on the Backup PC and double click on 

run.bat

.  

      This will open the Main Application.  Note that the Main Application and Program  
      Updater should not be running on the Console PC whilst the Backup PC is in use.

BACKUP PC

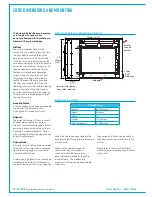
MINIMUM PC SPEC

CPU

HDD

RAM

OS

Ports

1.6 GHz Dual Core

160 GB

1GB

Windows XP Pro

1 x USB or 1 x POE protected Ethernet port

Содержание Artemis

Страница 1: ...calrec com Putting Sound in the Picture ARTEMIS INSTALLATION TECHNICAL MANUAL Digital Broadcast Production Console Shine Beam Light...

Страница 2: ...onal usage Calrec Audio Ltd reserve the right to change specifications without notice E O E The established policy of Calrec Audio Ltd is to seek improvements to the design specifications and manufact...

Страница 3: ...ply 32 Processing Core Light 33 Core Dimensions and Mounting 34 Airflow 34 Support 34 Connections 35 Card layout 35 Installing removing cards 35 Card types Layout 35 Reset sync interface card 36 Stand...

Страница 4: ...ration Parameters 74 Security Considerations 75 Assist Application Configuration 75 RS232 422 Conversion 76 Perle IOLAN Configuration 77 Telnet IP configuration 77 Main configuration Web Manager 77 Se...

Страница 5: ...calrec com Putting Sound in the Picture ARTEMIS INFORMATION...

Страница 6: ...c sensitive parts are exposed In order to protect these devices from damage and to protect your warranty please observe static handling procedures for example use an appropriately grounded anti static...

Страница 7: ...not allow ventilation slots to be blocked Do not leave the equipment powered up with the dust cover fitted Cleaning For cleaning the front panels of the equipment we recommend using a soft anti static...

Страница 8: ...engineer visits On site on air support for complete peace of mind providing operational guidance and technical engineering support for new installations or high profile events Operational training Ma...

Страница 9: ...calrec com Putting Sound in the Picture ARTEMIS CONTROL SURFACE...

Страница 10: ...stand options Several floor stand types are available The standard Studio type as shown in Figure 2 has adjustable feet for levelling The OB version shown in Figure 3 allows for the stand to be bolte...

Страница 11: ...he option of securing the control surface to the floor by its stand as required when fitted in mobile or outside broadcast units the OB style stand replaces the adjustable feet with extra support and...

Страница 12: ...2 5 3 5 A standard Artemis layout consists of a number of fader panels and a monitor panel The standard fader panel is 260mm 10 24 wide and is fitted with eight faders across its width The monitor pa...

Страница 13: ...n be fitted in place of the standard 18mm 36mm 1 42 trims Typical surface measurements Measurements for typical surface widths are shown in Figure 9 Fader Count Section Make Up Total Width Standard tr...

Страница 14: ...fitted within the surface Connector and pin out information is provided in the Console Connection section of this document Access to internal surface components Removing up stand meter panels and cont...

Страница 15: ...ts removed as long as the cross beam between the stand legs is fitted the stand will be stable however care needs to be taken whilst the surface is not fixed to the stand If the cross beam is not fitt...

Страница 16: ...simply as POE ports 1 6 See Figure 1 When a surface reset command is received by a POE switch it momentarily cuts the power on ports P1 P6 Control surface panels are reset by cycling power to them Eac...

Страница 17: ...2 1 POWER GOOD A B AC IN 1 AC IN 2 P1 P2 P3 P4 P5 P6 S1 S2 Panel Surface switch Ancillary Power Surface switch Power Reset Reset Serial number AP Connections to upstand TFT moving coil meters power on...

Страница 18: ...roughout the system irrespective of the functioning state of each piece of hardware FIGURE 4 POE RESET CONNECTIONS Cat5e Reset Cable D25 Reset Cable FIGURE 3 RESET CONNECTION Function Pin Control Rese...

Страница 19: ...x POE system On each POE port S1 connects to the primary Surface switch port S2 to the secondary LEDs 1 6 show activity on these ports and should display a regular flashing pattern once booted and co...

Страница 20: ...y Power Surface switch Power Reset Reset Serial number P1 P2 P3 P4 P5 P6 S1 S2 USB YZ5706 POE SWITCH P S AP SPR RST AP1 AP2 AP3 AP4 SPR1 SPR2 RST RST A B 2 1 POWER GOOD A B AC IN 1 AC IN 2 P1 P2 P3 P4...

Страница 21: ...for this situated in the bottom row of connectors The headphone driver can be powered from an SPR port or an AP depending on whether or not power needs to be maintained during surface reset SURFACE PO...

Страница 22: ...s to port P1 Blue SPR connections use a suffix to identify the device being powered by the POE switch The table to the right lists the functions with prefix and suffix by colour ID Figures 2 3 give ex...

Страница 23: ...the adjacent unit which also contains the headphone drivers The PC power supply inputs POE DC voltage via RJ45s and outputs 12V DC on a 9 pin D type connector Two input connections provide redundancy...

Страница 24: ...x 1080 will display the Calrec software correctly but the content will not scale up higher than the 1280x1024 monitor size it was designed for Accessible PC USB port The USB port on the up stand rese...

Страница 25: ...a specific location and browse to the location the drivers were copied to in the previous step Follow the on screen prompts to complete the installation 6 Once the DUB E 100 has been successfully inst...

Страница 26: ...26 ARTEMIS Digital Broadcast Production Console...

Страница 27: ...calrec com Putting Sound in the Picture ARTEMIS PROCESSING CORE BEAM SHINE...

Страница 28: ...quately supported to prevent stress on the front racking angles This is particularly important when the units are mounted in mobile installations Calrec will not accept liability for damage caused by...

Страница 29: ...mber of Hydra2 I O ports available Both PSU cards when fitted are active and share the load of the whole core Only one PSU is required to power the core however we recommend that both are fitted and f...

Страница 30: ...are in the open position and push the card POK MA RST NOK ST2 PRI MOK ST1 fully into the core whilst closing the card handles to lever the module into place A click should be heard when the module is...

Страница 31: ...network administrator GUI USB ports keyboard mouse and VGA connections are for use only by or under the guidance of Calrec engineers As well as the standard status indicators front panel LED s are al...

Страница 32: ...tional router modules of the same type to double the number Hydra2 I O ports in the core The Artemis Shine Beam router card has 16 SFP ports that can be fitted with copper or fibre SFP s to allow conn...

Страница 33: ...calrec com Putting Sound in the Picture ARTEMIS PROCESSING CORE LIGHT...

Страница 34: ...ted to ensure air can flow through the card frame No clearance is required above or below the core for cooling Support The weight at the rear of the core should be adequately supported to prevent stre...

Страница 35: ...pe of processing card for redundancy Slots to the left of the central reset card are for primary and normally active router DSP and control processors The slots to the right mirror this layout and are...

Страница 36: ...Surface 2 ports are only used for very large consoles with a second pair of surface switches or for sidecars containing their own surface switches Any of the 3 LAN ports can be used for CSCP mixer rem...

Страница 37: ...spare router module The Artemis Light router card has 8 SFP ports that can be fitted with copper or fibre SFP s to allow connection of Hydra2 I O boxes and connections to other consoles or standalone...

Страница 38: ...ted with copper or fibre SFPs and are the data connection point for the control surface The left hand MAC7 port of the left hand primary control processor card connects to the primary surface switch w...

Страница 39: ...bstructed to ensure air can flow through the card frame No clearance is required above or below the core for cooling Support The weight at the rear of the core should be adequately supported to preven...

Страница 40: ...40 ARTEMIS Digital Broadcast Production Console...

Страница 41: ...calrec com Putting Sound in the Picture ARTEMIS CONNECTION INFORMATION...

Страница 42: ...I F RESET WCLK OUT 1 2 HB1 SOFT CTRL2 AUD2 PSU2 H_ACT HB2 CTRL1 AUD1 PSU1 FAN1 FAN2 FAN 12V MODULAR I O BOX SFPS Modular I O controller card SFPs are both orientated the same way around Button releas...

Страница 43: ...buttons To remove depress the button using a small flat blade screwdriver or similar tool The SFP module will then be free to be removed SFP slot covers Dust covers should be fitted to all SFP slots...

Страница 44: ...e can seriously impact upon this The following are general good rules of practise please refer to the cable manufacturer s information for comprehensive installation rules When running Cat5e Cat6 netw...

Страница 45: ...cores should not be used as they will be unreliable Termination pin out Hydra2 network cables use the standard gigabit Ethernet pin out Performance relies on the positive and negative leg of each sig...

Страница 46: ...r both singlemode and multimode fibre types It is important to select the correct SFP for the type of fibre being used in the installation If using a mixture of singlemode and multimode fibre it is im...

Страница 47: ...nd excessive bends in the fibre When routing through angled conduit provide enough clearance around corners to avoid the fibres being pulled sharply around the inside of the angle Pulling observe the...

Страница 48: ...e back into the previously cleaned receptacle for immediate use Additional notes Do not tip the can of Clean Dry Air whilst aerosol spraying as liquid may be released contaminating the surface of the...

Страница 49: ...reference source or free running It is also recommended that backup sync sources and paths are considered to maintain full functionality in the event of the loss of any part of the facilities sync di...

Страница 50: ...rface switches should be easily identifiable on the rear cover The left hand unit when viewed from the front is the primary Surface Switch the right hand unit is the secondary Surface Switch In the pr...

Страница 51: ...tremely large control surface s would require 2 pairs of surface switches fitting in the single chassis surface in order to be able to communicate with the high number of control panels In such a case...

Страница 52: ...to sidecars console chassis can also be split using extended control surfaces This can be to allow multiple operators the comfort of more space to create a wrap around surface for small rooms or larg...

Страница 53: ...rk Fixed format I O box IDs The 8 way DIP switch is set as an 8 bit binary representation of the HID value with the left hand switch used for the most significant bit and the right hand switch for the...

Страница 54: ...to a front panel Hydra2 port on the main router card or the expansion router card if fitted Each I O box has two Hydra2 ports to provide redundancy Port 1 should always connect to a primary main or e...

Страница 55: ...OK NOK ST1 ST2 POK MA PRI RST MOK NOK ST1 ST2 POK MA PRI RST MOK NOK ST1 ST2 POK MA PRI RST MOK NOK ST1 ST2 D1 D2 D3 D4 D5 D6 D7 D8 D1 D2 D3 D4 D5 D6 D7 D8 9 11 13 15 10 12 14 16 1 3 5 7 2 4 6 8 10 9...

Страница 56: ...er between different manufacturers hardware and is shown in the example below GP INPUT WIRING EXAMPLE 0V IN IN 5V Trigger GP Input External Closure Calrec GPIO card 5V Dry External wiring GP outputs T...

Страница 57: ...2 1 Function Pin Relay 1 Common 1 Normally Open 14 Normally Made 2 Relay 2 Common 15 Normally Open 3 Normally Made 16 Relay 3 Common 4 Normally Open 17 Normally Made 5 Relay 4 Common 18 Normally Open...

Страница 58: ...UT CHANGEOVER GPIO Function Pin GPI 1 1 34 GPI 2 18 2 GPI 3 35 19 GPI 4 3 36 GPI 5 20 4 GPI 6 37 21 GPI 7 5 38 GPI 8 22 6 Supply 5V 17 Supply 0V 50 GPO 1 NO 39 NO 23 NC 7 NC 40 GPO 2 NO 24 NO 8 NC 41...

Страница 59: ...rmally Open relay Calrec GPIO card NO NO Closes when activated Function Pin GPI 1 1 34 GPI 2 18 2 GPI 3 35 19 GPI 4 3 36 GPI 5 20 4 GPI 6 37 21 GPI 7 5 38 GPI 8 22 6 Supply 5V 17 Supply 0V 50 GPO 1 NO...

Страница 60: ...r master slave status Each processing core is configured with an IP address range unique within the network it is to be connected to It is important to ensure that the IP address range does not confli...

Страница 61: ...omote can be used to specify which routers in a Hydra2 network can automatically take over the master router status in the very unlikely event of a master router failure Please contact Customer Suppor...

Страница 62: ...this document for more detail on each panel type All D type audio connectors on the interface panel are 25 pin female requiring male terminated cabling Analogue Inputs Pins Left 1 1 14 Ground 2 Right...

Страница 63: ...15 3 Ground 16 8 1 14 Ground 2 RTW meters RTW meters can be supplied with either balanced or unbalanced AES I O Unbalanced versions are wired out to BNC connectors on the rear interface Balanced versi...

Страница 64: ...ixed providing 2 analogue inputs and one AES input per card wired to female D25 connectors on the console s rear interface Analogue only providing 8 balanced analogue inputs per card wired to a female...

Страница 65: ...ctual quantity in use is dependent on the number of headphone jack sockets fitted requested at order Loudspeaker panels Each loudspeaker panel fitted has 4 stereo balanced analogue inputs LOUD SPEAKER...

Страница 66: ...66 ARTEMIS Digital Broadcast Production Console...

Страница 67: ...calrec com Putting Sound in the Picture ARTEMIS EXTERNAL CONTROL...

Страница 68: ...rd s front panel If supported by the 3rd party controller a secondary connection can also be made to the secondary router card in the same core providing additional redundancy against cable port and e...

Страница 69: ...ard will take over and continue EMBER communications via the connection made to the primary card s front panel If supported by the 3rd party controller a secondary connection can also be made to the s...

Страница 70: ...r any higher number CSCP would only have access to faders on the first panel ensuring faders in the remaining surface area cannot be remotely controlled by third parties Using this example of exposing...

Страница 71: ...ts via a corporate LAN it is important that the Calrec DHCP servers are disabled and the connections are manually configured as appropriate Configuration Please discuss your installation requirements...

Страница 72: ...nt must be configured individually This can be done from the local PC by opening Google Chrome and entering localhost in the address bar as shown here SNMP agents can also be configured remotely by en...

Страница 73: ...sole functions can be controlled using CSCP Console Configuration From software version 1 14 7 onwards Calrec consoles are pre configured with a basic Assist CSCP configuration which is disabled by de...

Страница 74: ...server The IP Start address or IP Pool address should be configured to be 192 168 1 100 and the IP or DHCP pool size should be set to 4 This allows up to four wireless devices to be connected to the...

Страница 75: ...passphrase before access is allowed Assist Application Configuration Assist applications should be configured with a CSCP IP address of 192 168 1 1 to connect to the primary control processor or 192 1...

Страница 76: ...ers can route the normally active port to the Calrec primary card and the backup to the secondary For 3rd party controllers that operate on RS422 Calrec can also supply in line RS232 422 cable convert...

Страница 77: ...s greeted with the unit s model number SCS8 Enter the following to set the IP address for the Perle Ethernet port 1 set server internet eth1 xxx xxx xxx xxx substituting xxx xxx xxx xxx with the desir...

Страница 78: ...number to match the protocol being setup 61000 for SW P 08 62000 for EMBER The CSCP port is selectable as defined by Calrec StudioSetup the default value being 49200 Select Initiate Connection Automat...

Страница 79: ...d in the Picture 79 PERLE WEB MANAGER SERIAL SERIAL PORT PAGE PERLE WEB MANAGER SERIAL SERIAL PORT PORT 1 HARDWARE PAGE PERLE WEB MANAGER SERIAL SERIAL PORT PORT 1 GENERAL PAGE ADDITIONAL HOSTS 192 16...

Страница 80: ...80 ARTEMIS Digital Broadcast Production Console...

Страница 81: ...calrec com Putting Sound in the Picture ARTEMIS SETUP CONFIGURATION...

Страница 82: ...hin the main application are protected and to make changes the user must be logged in as a Technician Technician access is gained from the Tech page by clicking on Technician If no users have been set...

Страница 83: ...hows can contain multiple user memories which save normal I O patching fader assignment and path parameter settings To create a new show go to the Mem page and select New Show Choose the Calrec Defaul...

Страница 84: ...ader knob without even moving the fader will activate its touch sensor and bring the surface out of dark mode straight away without changing control parameters A Dark button LED on the monitor panel f...

Страница 85: ...s fixed as internal The first 5 sources can be selected by highlighting the chosen source on the left highlighting the chosen priority list entry on the right and clicking patch When selecting a video...

Страница 86: ...been added is offline it is displayed in the list in red font and denoted as Offline IO boxes no longer required or added by mistake can be removed by highlighting them in the right hand required lis...

Страница 87: ...fader label row of any panel Assigning paths A or B layer faders with a blank label field have no DSP path assigned Path assignment is achieved from the Tools Fader Assignment menu see the highlighted...

Страница 88: ...lear button in this menu will cancel all tone to path selections across the console Select the Send Route panel mode to route the currently assigned fader to bus outputs from the TFT touch screen abov...

Страница 89: ...ist and select the list containing the I O ports that the monitor speakers are physically connected to from the Output Ports group Select the specific port a speaker is connected to within that list b...

Страница 90: ...aved as a Meter Layout Preset for later use note that the meter layout is now saved with the show rather than a seperate file The Meter Presets can be reloaded back into the layout screen and applied...

Страница 91: ...ttons To select a different source on a pre selector press its Sel button to make it the focus of the selector panel on the TFT screen above Selectable sources are separated into categories chosen fro...

Страница 92: ...election LS pre selectors 1 4 Press Hear to listen press Sel to select a different source LS output level control and cut Individual LS channel cuts Select to control Mon1 or Mon2 output Select Monito...

Страница 93: ...s from the My Desk Inputs group The destinations field now displays the faders on the console From the Select Source button the Input Ports contains the input port lists If the port lists have not ye...

Страница 94: ...connected should be patched to the talkback input from the System Settings Fixed I O Select Destination My Desk Inputs Tone TB screen The top entry in this list is the Talkback mic input The same scr...

Страница 95: ...filtered by I O box using the Filter button To make an assignment highlight the function and the relay and then click patch The Test button allows each relay to be triggered to check wiring GP inputs...

Страница 96: ...ue is 1 second if commented out missing or too low it will default to 1 sec Note that this also affects the refresh period of the shaft and fader level logging so if you want more resolution on fader...

Страница 97: ...e F Input RB Input LB Input Leg Routing LBRB Input MS Input Patch disabled Input Select Input Tone Input Trim Input Trim Link Master Input Gain Master Nudge Input Gain Master Input Phantom Power Maste...

Страница 98: ...hain Listen Dyn Automix Link Select F Dyn Automix Weight F Dyn Comp Attack F Dyn Comp Knee F Dyn Comp Ratio Fine F Dyn Comp Ratio F Dyn Comp Recovery F Dyn Comp DSP Threshold U F Dyn Comp Threshold F...

Страница 99: ...s are saved as txt files and has a naming convention that allows easy sorting of oldest to newest e g if started at 30th September 2015 at 15 14 39 then this becomes 150930_151439_UserControlLog txt O...

Страница 100: ...100 ARTEMIS Digital Broadcast Production Console...

Страница 101: ...calrec com Putting Sound in the Picture ARTEMIS PANEL OPTIONS...

Страница 102: ...the fader path is active when On is lit and muted when it is not If On buttons are required this should be specified at the time of order Connections This panel has a single RJ45 POE connection for it...

Страница 103: ...anel fitted directly below providing assignable panel display and control for EQ routing output control etc This panel will not be functional without a fader panel to drive it Connections The panel re...

Страница 104: ...ltiple operators multiple monitor panels can be fitted Each can switch between controlling monitor 1 and monitor 2 as well as having access to miscellaneous monitor headphone outputs Connections An RJ...

Страница 105: ...s If required for example on a large console or for multiple operators multiple monitor panels can be fitted Each can switch between controlling monitor 1 and monitor 2 as well as having access to mis...

Страница 106: ...Users who prefer this style of meter should order RTW TM7 s requesting that moving coil emulation is enabled This package provides accurate VU and PPM response with appropriate scaling on a clear wid...

Страница 107: ...processing cards in the processing core Control resets the Master Control processors the console s overall controller in the processing core Surface resets the control surface panels More than one res...

Страница 108: ...ton LED to light appropriately for the chosen function Another DIP switch is used to set the cut on status at power up All four inputs can simultaneously be remotely cut or dimmed by applying a ground...

Страница 109: ...ON ON ON ON ON ON 1 2 ON ON 1 2 ON ON 1 2 ON ON 1 2 ON ON 1 2 ON ON RJ45 POE power in SW1 SW2 SW3 SW4 ON 1 OFF 0 SW14 SW10 SW9 Input Enables Options SW8 SW7 SW6 SW5 Color Select D25 Audio inputs REAR...

Страница 110: ...110 ARTEMIS Digital Broadcast Production Console...

Страница 111: ...calrec com Putting Sound in the Picture ARTEMIS OBSOLETE PANELS...

Страница 112: ...needs to be made in the quantity of Hydra2 outputs being ordered with the console As standard the TM7 has 8 analogue inputs and 4 stereo balanced 110 Ohm AES inputs As an option unbalanced 75 Ohm AES...

Страница 113: ...to A B 3 using DIP switch 6 SWITCH 5 L R M S SWITCH 6 A B 6 3 Resets Three reset buttons along with an enable button are located in the centre of this panel As a safety precaution to activate a reset...

Страница 114: ...114 ARTEMIS Digital Broadcast Production Console...

Страница 115: ...calrec com Putting Sound in the Picture ARTEMIS SPECIFICATIONS...

Страница 116: ...channels Pool of 256 channels Pool of 128 channels Input Delay Up to 2 73s per input from pool of 256 channels Up to 2 73s per input from pool of 128 channels Up to 2 73s per input from pool of 128 ch...

Страница 117: ...nt can be specified for any size of console There is a peak operating current when the motorised faders move The worst case is if all the faders move end to end where the peak power will be 4 Watts pe...

Страница 118: ...is monitored and System Status warnings generated if any fan slows or stops The 8U Artemis Beam Shine core is fitted with 6 x 120mm low power low speed and low noise fans mounted inside the top of th...

Страница 119: ...upply voltage and loading Typically it is 0 55 times the RMS VA Volts x Amperes at 230V and 0 7 times the RMS VA at 115V Heat output figures are available for all types of I O box The low power PSU ef...

Страница 120: ...re details on modular I O Heat Output Efficiency The Heat output from modular Hydra2 I O units depends upon the quantity and card types fitted please refer to the Hydra2 installation manual for more d...

Страница 121: ...z SRC THD N 117dB 1kHz 0 00014 Format AES EBU AES3 24 bit Interface 110 Ohm balanced XLR or D Type Jitter 0 015UI 2 5ns peak Analogue Digital Conversion 24 Bit Input Electronically Balanced Input Impe...

Страница 122: ...Output 20Hz to 20kHz 0 5dB 48KHz Synchronisation NTSC PAL Video Tri Level Internal Crystal Reference TTL Wordclock 48kHz AES EBU AES3 Digital Input 48kHz LATENCY 48KHZ SAMPLE RATE From To Via Samples...

Страница 123: ...dBFS off 117 dB on 117 dB from Analogue Inputs with 0 dB gain N A N A 118 dB DYNAMIC RANGE FOR ANALOGUE AND AES3 OUTPUTS HYDRA2 AES3 UNBALANCED DIGITAL OUTPUTS system set for SRC on I P SRC on I P fr...

Страница 124: ...926 149 Iss25 Calrec Audio Ltd Nutclough Mill Hebden Bridge West Yorkshire England UK HX7 8EZ Tel 44 0 1422 842159 Fax 44 0 1422 845244 E mail Enquiries calrec com calrec com...

Отзывы: