49-1000491 Rev. 3
7
USING THE BEVERAGE CENTER:
Appliance Communication
APPLIANCE COMMUNICATION
WiFi (for customers in the United States, its territories, and Canada)
Using the Beverage Center
REGULATORY INFORMATION
FCC/IC Compliance Statement:
This device complies with Part 15 of the FCC Rules. Operation is subject to the following two conditions:
1. This device may not cause harmful interference, and
2. This device must accept any interference received, including interference that may cause undesired operation.
This equipment has been tested and found to comply with the limits for a Class B digital device, pursuant to Part
15 of the FCC Rules. These limits are designed to provide reasonable protection against harmful interference in a
residential installation. This equipment generates uses and can radiate radio frequency energy and, if not installed
and used in accordance with the instructions, may cause harmful interference to radio communications. However,
there is no guarantee that interference will not occur in a particular installation. If this equipment does cause harmful
interference to radio or television reception, which can be determined by turning the equipment off and on, the user
is encouraged to try to correct the interference by one or more of the following measures:
• Reorient or relocate the receiving antenna.
• Increase the separation between the equipment and receiver.
• Connect the equipment into an outlet on a circuit different from that to which the receiver is connected.
• Consult the dealer or an experienced radio/television technician for help.
Labelling:
Changes or modifications to this unit not expressly approved by the manufacturer could void the user’s
authority to operate the equipment.
Ŷ
Download the
SmartHQ
app.
• Available for iPhone from the Apple Store or from
link at
GEAppliances.com.
• Available for Android from Google Play or from link
at
GEAppliances.com.
Ŷ
Select
Create Account
on app.
• Enter information, and select
Register
. An e-mail
will be generated.
• When you receive the e-mail, select
Verify
Account
.
• Sign in with your credentials and select
Authorize
to allow the app to communicate with your beverage
center.
Ŷ
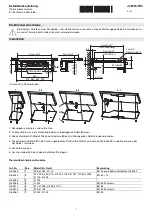
Set up the app.
• Press the
at the top of the screen..
• Choose
Cafe > Refrigeration > Beverage Center
.
• The info button will show a picture of the touch
display on the appliance. Select
OK
.
• Select
Next
.
Ŷ
Press
WiFi Connect
on the control. The WiFi symbol
will start flashing on the display.
• Select
Next
in the app.
Ŷ
Find the password inside the beverage center door on
WKH³&RQQHFWHG$SSOLDQFH,QIRUPDWLRQ´ODEHO
• Enter the password into the app.
Ŷ
Connect to the refrigerator’s WiFi Module in the
phone’s WiFi settings, then return back to the
SmartHQ
App and select
Next
.
•
7KH:L)LZLOOKDYHWKHIRUPDW³*(B02'8/(B
;;;;´7KHPRGXOHQXPEHUFDQDOVREHIRXQGRQ
the Connected Appliance Information label inside
the fridge door.
• Connect to the home WiFi network and type in the
home WiFi password.
• If all check marks appear and the user gets a
screen that says the device is connected, the device
has been successfully connected.
- If the app fails to connect, the app will display the
³2RSV6RPHWKLQJ:HQW:URQJ´VFUHHQ7KHXVHU
will be given possible reasons why connection
failed and the option to retry.
Содержание CCP06BP Series
Страница 1: ...Owner s Manual...
Страница 19: ...18 49 1000491 Rev 3 Notes...
Страница 39: ...18 49 1000491 Rev 3 Notes...
Страница 59: ...18 49 1000491 Rev 3 Notas...