5
I Englsih
secuENTRY HOME 5000 CYL
Create user – User code
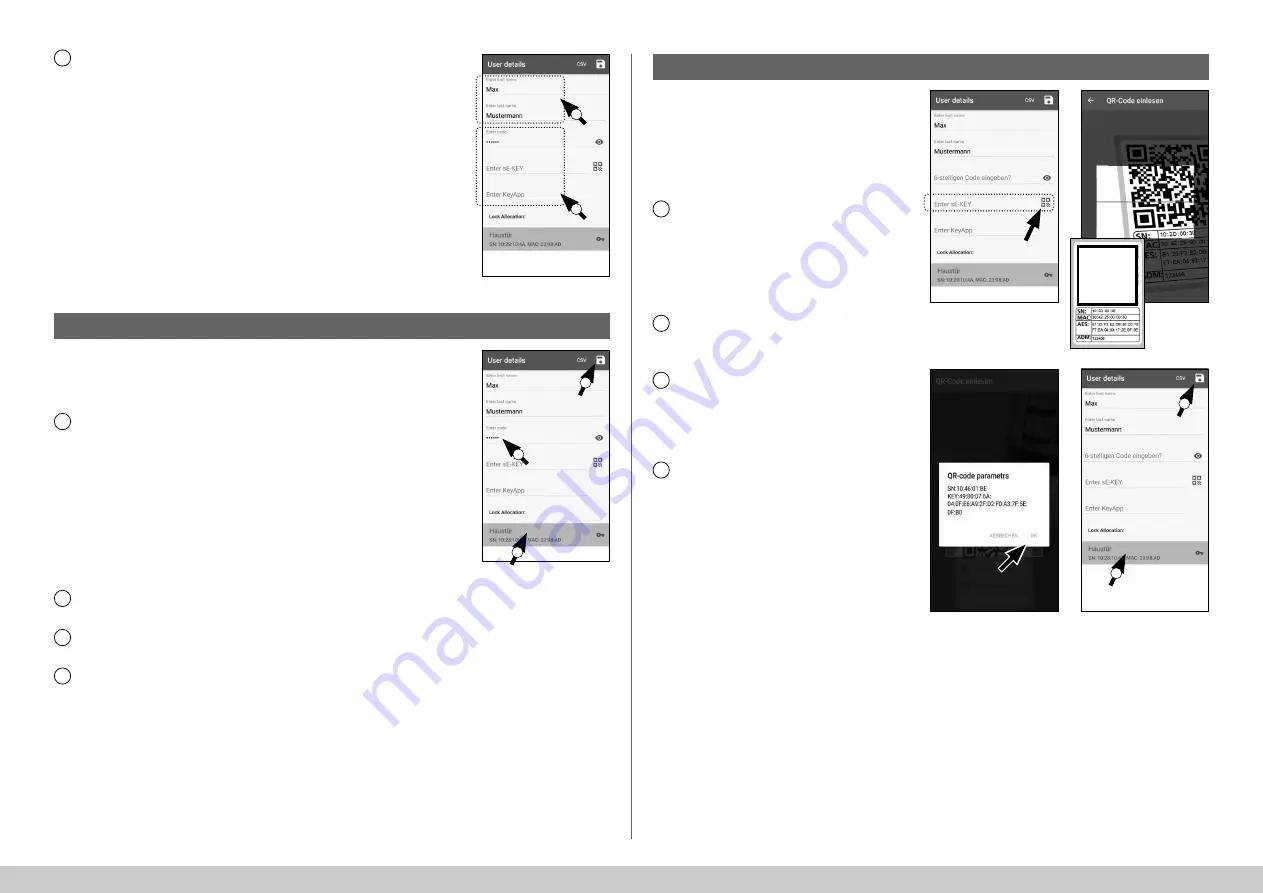
Enter the first name and surname of the
user you wish to register (I) (Fig. 30).
This section allows you to set up a user
code, a radio key sE-Key or another
smartphone as an electronic key (II)
(Fig. 30).
Proceeding from this menu view, look
at the following chapters and continue
with the desired access medium.
Note:
Only one access medium is
possible per user.
1
2
3
4
5
Fig. 30
Fig. 31
Note:
A user code can only be used as an
opening medium in conjunction with the
ENTRY 7711 Keypad PIN
, which is available as
an option.
Enter a user-defined code (I) (Fig. 31).
Tip:
The entry is concealed. Tap the eye
symbol on the right side to visualise and
check the entry.
Attention:
Do not select simple codes that
are easy to guess (e.g. 1-2-3-4-5-6). Also, do
not select any personal information (e.g.
birthdays) or other information that can be
easily be deduced by persons who know
the user.
Next, assign a cylinder by tapping it in the list
of cylinders already registered (II) (Fig. 31).
Save your settings by tapping the disk
symbol in the top right-hand corner (III).
The user has now been assigned the user
code and the selected lock within the
KeyApp (Fig. 31).
The programming process must be started
so that the cylinder also receives this
information. The corresponding description
can be found in the chapter
"Programming/
Updating the cylinder"
on page 9.
!
I
I
II
II
III
!
!
!
Create user – Radio key sE-Key
1
2
3
4
Fig. 32
Fig. 34
Fig. 33
Fig. 35
Note:
The radio key
"ENTRY sE-Key 7713"
is available separately from specialist
retailers. You can connect a maximum
of five radio keys.
A radio key is connected by scanning
the QR code enclosed with the sE-Key.
Tap the QR code symbol in the
"Enter
sE-KEY"
line in the user menu (Fig. 32).
You may be asked to confirm the app's
access to the camera. The camera's
picture window will then open (Fig. 33).
Scan the QR code.
A message appears containing data
about your radio key, confirm this with
"
OK
" at the bottom right (Fig. 34).
Next, assign a cylinder by tapping it in
the list of cylinders already registered
(I) and save your settings by tapping
on the disk symbol at the top right (II)
(Fig. 35).
The user has now been assigned the
radio key and the selected lock within
the KeyApp. The programming process
must be started so that the cylinder
also receives this information. The
corresponding description can be
found in the chapter
"Programming/
Updating the cylinder"
on page 9.
!
QR
I
II


