3
I Englsih
secuENTRY HOME 5000 CYL
Fig. 9
Fig. 11
Fig. 13
Fig. 10
Fig. 20
Fig. 19
Fig. 12
Fig. 14
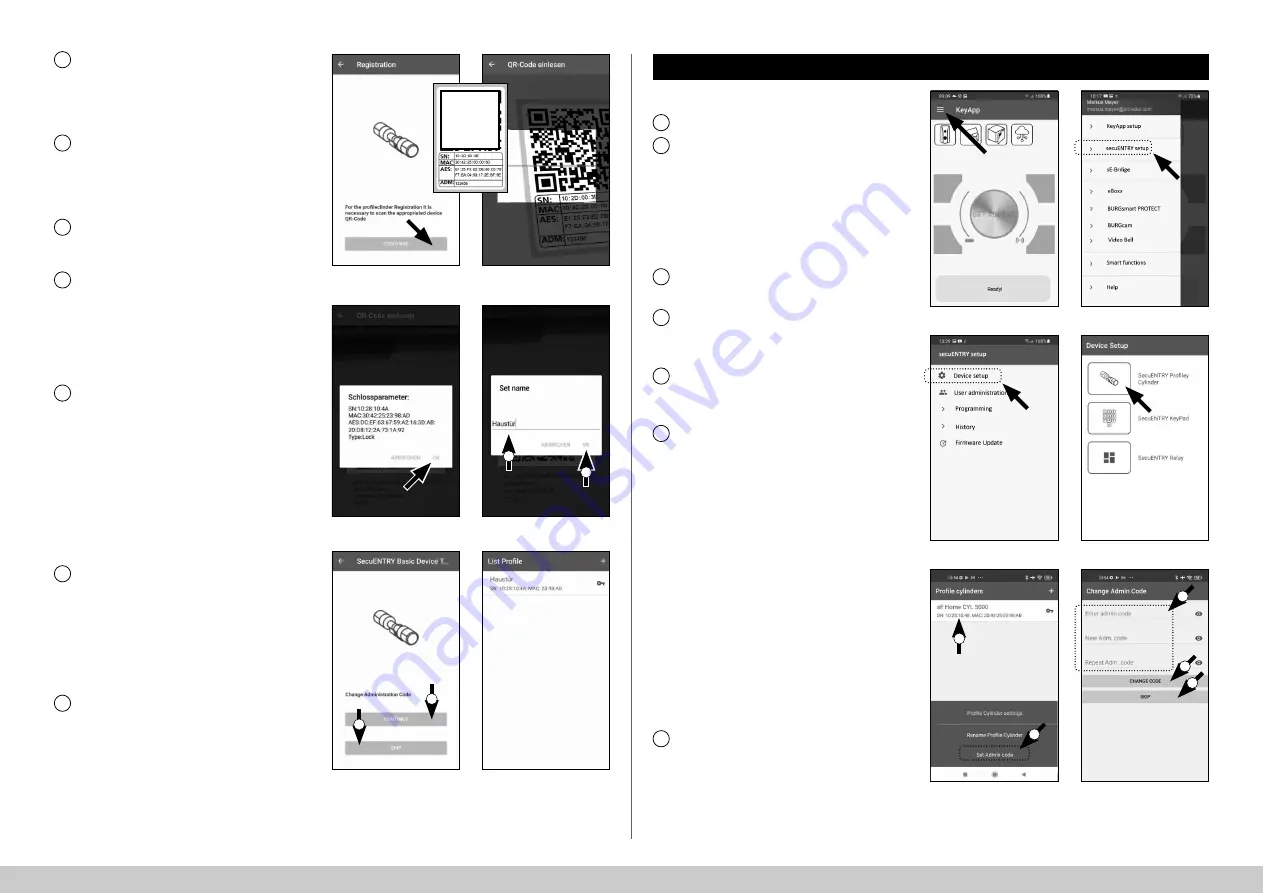
A prompt will appear asking you to
scan the QR code provided using your
smartphone camera. The QR code is on
the sticker enclosed in the packaging
(see small fig.).
Tap on
"Continue"
(Fig. 9). You may be
asked to confirm the app's access to the
camera. The camera's picture window
will then open (Fig. 10). Scan the
QR code.
A message appears containing data
about your cylinder, confirm this with
"OK"
at the bottom right (Fig. 11).
The following window gives you the op-
tion of assigning a name to the cylinder.
If several cylinders are used, it is recom-
mended to name the cylinder in a way
that you can directly recognise where
the cylinder is located or attached.
Confirm the name with
"OK"
(Fig. 12).
A message appears informing you that
you can change your administrator
code. As you received a randomly gen-
erated administrator code at the time of
delivery, this step is optional. Use
"SKIP"
to bypass it (I), (Fig. 13).
Note:
The administrator code can be
changed at any time at a later date.
Instructions on how to do this can be
found in the chapter
"Change adminis-
trator code"
on page 3.
Should you wish to change the admin-
istrator code immediately during setup,
tap on
"CONTINUE"
(II) (Fig. 13) for the
corresponding request. This then leads
directly to the
"Change administrator
code"
function, which is also described
in the following chapter on page 3, at
point 5.
Your secuENTRY cylinder is now fully
setup. It will now appear in the list of
setup cylinders (Fig. 14).
8
9
10
11
12
13
14
P
QR
I
I
II
II
!
Proceed as follows to delete a cylinder:
Open the main menu (Fig. 15).
Tap on the menu item
"
secuENTRY setup
" (Fig. 16).
1
Change administrator code
Fig. 15
Fig. 16
2
Fig. 17
Fig. 18
In the following menu, tap on
"Device Setup"
(Fig. 17).
Use the selection menu displayed and
tap on
"secuENTRY Profily Cylinder"
(Fig. 18).
A list with setup cylinders is displayed.
Select the required cylinder (I) and tap
on
"Set Admin Code"
(II) (Fig. 19).
Enter the pre-existing administrator
code, followed by entering your desired
administrator code twice (I). Confirm
the entries with
"CHANGE CODE"
(II)
(Fig. 20).
Tip:
The entry is concealed. Tap the eye
symbol on the right side to visualise
and check the entry.
Attention:
Do not select simple codes
that are easy to guess (e.g. 1-2-3-4-5-6).
Also, do not select any personal infor-
mation (e.g. birthdays) or other infor-
mation that can be easily be deduced
by persons who know the user.
Press the
"SKIP"
button to cancel the
process, the administrator code will not
be changed (III) (Fig. 20).
A message is displayed if the change
has been made successfully.
3
5
7
6
4
I
II
I
II
III
!
!


