29
Creating Embroidery Patterns
Cr
eat
ing Embroide
ry Pat
ter
ns
■
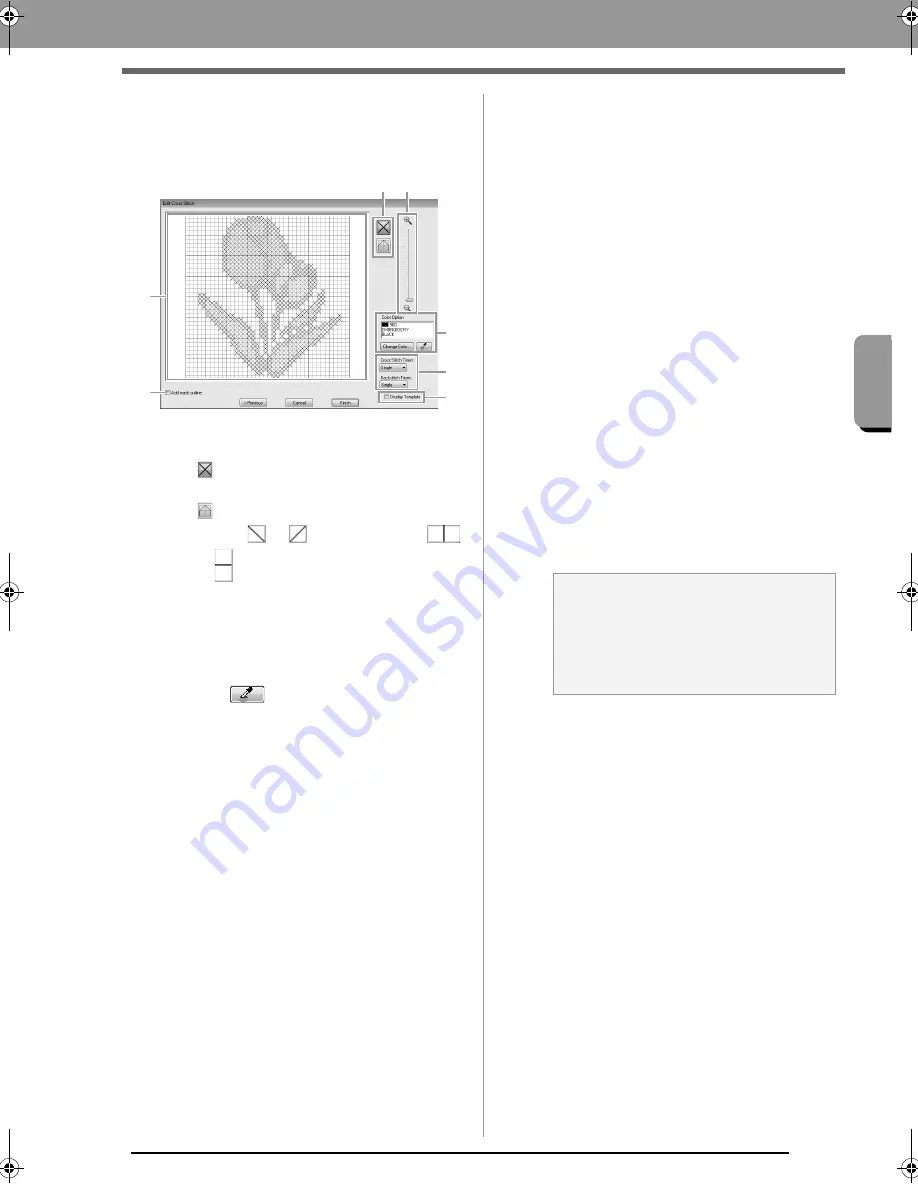
Edit Cross Stitch dialog box
Click a button in (1) to select the type of stitch,
select a thread color in (2), and then click or
drag in (3) to edit the stitches.
(1)
Selecting stitches
Selecting stitches to be added/deleted
(cross-stitches): Specifies a cross-
stitch inside a box.
(backstitches): Specifies a back stitch
inside (
or
) or on the edge (
or
) of a box.
(2)
Color Option
To change the color, click
Change Color
to display the
Thread Color
dialog box,
and then click the desired color.
To select the color to be used for a stitch,
click
, and then click the stitch to be
sewn with that color.
(3)
Editing area
For cross-stitches
Clicking a box: Adds one stitch.
For backstitches
Clicking an edge of a box: Adds one
stitch at the edge.
Clicking a diagonal line in a box: Adds
one stitch on the diagonal.
For both cross-stitches and backstitches
Dragging the pointer: Adds consecutive
stitches.
Right-clicking/dragging with the right
mouse button held down: Deletes one
stitch/deletes consecutive stitches.
(4)
Zoom
(5)
Display Template
To display the imported image, click
Display Template
.
(6)
Add mask outline
If this check box is selected, line data is
created from the mask outline.
(7)
Cross Stitch Times/Backstitch Times
For the number of times each stitch is to
be sewn, select
Single
,
Double
or
Triple
.
(6)
(7)
(2)
(3)
(4)
(1)
(5)
a
Note:
If
Previous
is clicked to return to the
Cross
Stitch Parameters
dialog box after the
stitches have been edited, the edited
stitches are reset to their previous
arrangement.
XE8656-001.book Page 29 Thursday, June 30, 2011 2:56 PM
Содержание PEDESIGN PLUS
Страница 80: ...English Printed in China XF0606 001 ...


