VII-21
4.11
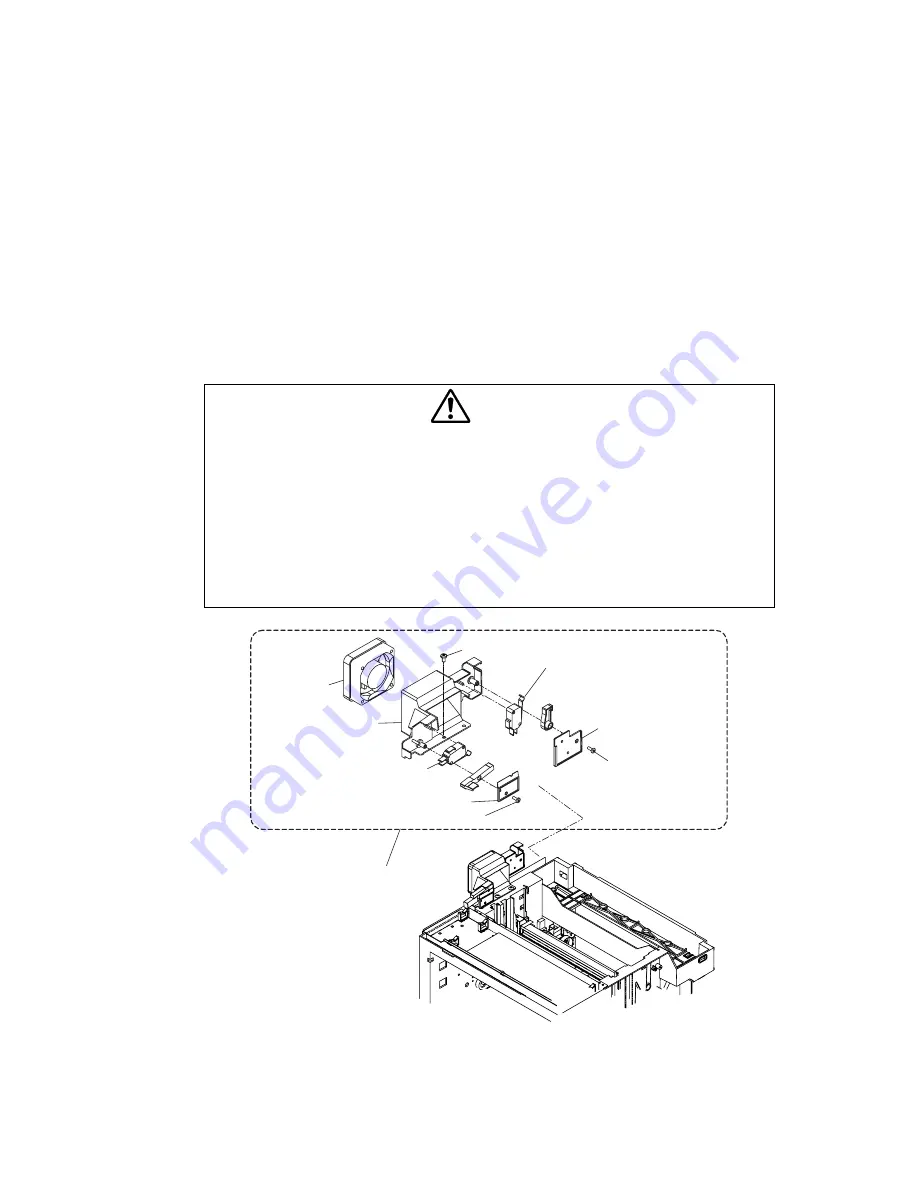
Power Supply Fan PU / Interlock Switch PU (Top, Paper Exit) / Power Supply Fan
Duct PU
1) Remove the setscrew (BT4x10, 1 piece) of the power supply fan assy PU.
2) Remove the power supply fan assy PU from the frame.
3) Disconnect the connector connecting to the power supply fan assy PU.
[Interlock switch PU (top, paper exit)]
4) Remove the power supply fan PU from the power supply fan duct PU.
5) Remove the setscrew (BT3x8, 1 piece) of the switch cover (top).
6) Remove the switch cover (top) from the power supply fan duct PU.
7) Remove the interlock switch PU (top) from the power supply fan duct PU.
8) Remove the setscrew (BT3x8, 1 piece) of the switch cover (paper exit).
9) Remove the switch cover (paper exit) from the power supply fan duct PU.
10) Remove the interlock switch PU (paper exit) from the power supply fan duct PU.
CAUTION
•
Do not have the fan duct assy step on the harness.
•
Interlock Switch is the important part in terms of the safety. The replacement work of
the interlock switch should be done by the skilled personnel having the sound
knowledge on the product safety.
•
This interlock switch PU is the part of unique specification. Do not use any switch
other the specified.
•
Each interlock switch PU (3 kinds) at the front, top and paper exit is the same
specification.
•
After the replacement, confirm the normal operation of the interlock switch.
•
Confirm that the message "Door Open" is indicated on the operator panel when the
front door is open.
Fig.7-17
Power supply fan
dact PU
Switch cover (top)
Power supply fan assy PU
Interlock switch PU (top)
BT3x8
BT3x8
Interlock switch PU (paper exit)
Switch cover (paper exit)
BT4x10
Power supply
fan PU
Содержание HL-2700CN Series
Страница 16: ...viii 3 Rating Label 6 0A 11 0A For Europe For US ...
Страница 18: ...CHAPTER I PRODUCT OUTLINE ...
Страница 27: ...CHAPTER II SPECIFICATIONS ...
Страница 39: ...III 1 CHAPTER III INSTALLATION ...
Страница 53: ...CHAPTER IV STRUCTURE OF SYSTEM COMPONENTS ...
Страница 84: ...IV 31 Layout of Clutches and Solenoids 1 2 3 4 5 6 7 8 9 10 Fig 4 30 ...
Страница 90: ...IV 37 ...
Страница 93: ...IV 40 c Interface Circuit Printer side Table 4 1 Interface Circuit ...
Страница 102: ...IV 49 Main PCB circuit Diagram 1 7 IV 49 CODE B512168CIR 1 7 LJ9515001 NAME ...
Страница 103: ...IV 50 Main PCB circuit Diagram 2 7 IV 50 CODE B512168CIR 2 7 LJ9515001 NAME ...
Страница 104: ...IV 51 Main PCB circuit Diagram 3 7 IV 51 CODE B512168CIR 3 7 LJ9515001 NAME ...
Страница 105: ...IV 52 Main PCB circuit Diagram 4 7 IV 52 CODE B512168CIR 4 7 LJ9515001 NAME ...
Страница 106: ...IV 53 Main PCB circuit Diagram 5 7 IV 53 CODE B512168CIR 5 7 LJ9515001 NAME ...
Страница 107: ...IV 54 Main PCB circuit Diagram 6 7 IV 54 CODE B512168CIR 6 7 LJ9515001 NAME ...
Страница 108: ...IV 55 Main PCB circuit Diagram 7 7 IV 55 CODE B512168CIR 7 7 LJ9515001 NAME ...
Страница 110: ...IV 57 Layout of Connector Pin Assignment Power Supply Unit Fig 4 40 ...
Страница 118: ...IV 65 1 MCTL P W B I1CN IOD P W B DCN1 2 MCTL P W B I2CN IOD P W B DCN3 ...
Страница 124: ...IV 71 30 Duplex Connector 31 Lower Feeder Connector 32 DCN2 IOD 33 DCN8 IOD LaserFan ...
Страница 125: ...CHAPTER V CONTROL PANEL OPERATION ...
Страница 171: ...CHAPTER VI PERIODIC MAINTENANCE ...
Страница 197: ...CHAPTER VII DISASSEMBLY ...
Страница 200: ...VII 3 Table 7 1 Table of Applicable Screws ...
Страница 257: ...CHAPTER VIII TROUBLESHOOTING ...
Страница 316: ...VIII 59 5 IMAGE FAILURE 1 2 3 4 5 6 7 8 9 10 11 12 13 14 ...
Страница 317: ...VIII 60 15 a 15 b 16 17 18 19 20 21 22 23 24 25 Fig 8 2 ...
Страница 346: ...A 4 6 Transfer Unit X X X X X X 7 1 2 3 Location DATE MONTH SERIAL NO YEAR ...


