background image

Connect the Camera to the Network

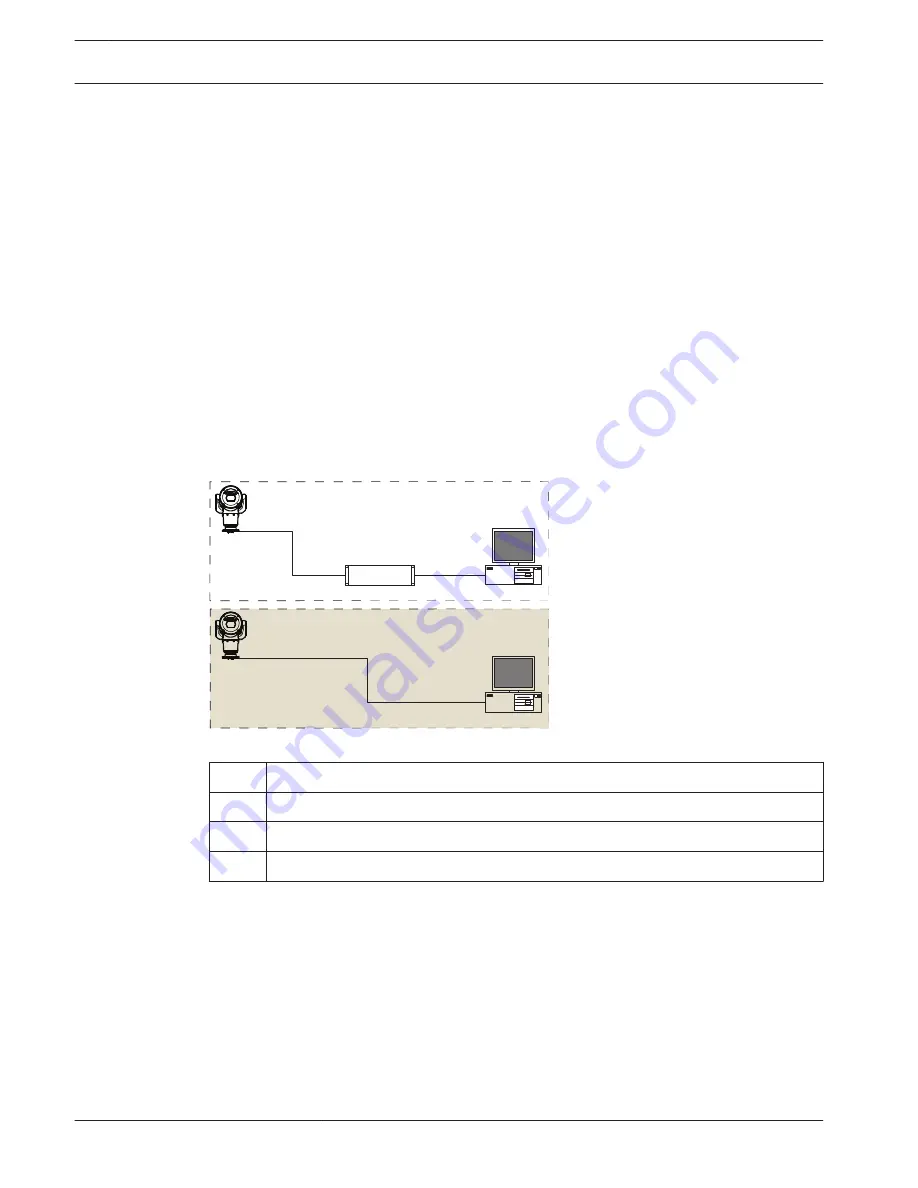
Note: Refer to the following figure for an illustration of both options.
Option A:
1. Connect an Ethernet cable (Cat5e/Cat6) from the RJ45 connector of the camera to a
network switch attached to the Local Area Network (LAN).
2. Connect the dedicated network switch to the RJ45 connector on the computer.
3. Connect the 24 VAC wires to the power source.
4. Connect the RS-485 wires to the MIC-ALM-WAS-24 (optional).
5. Attach the green ground wire (item 3 in the figure above) from the camera to an earth-
ground connection on the mounting surface using the supplied screw or a suitable user-
supplied fastener.
Option B:
1. Connect an Ethernet crossover cable from the RJ45 connector of the camera directly to a
networking device such as a computer, a DVR/NVR, etc.
2. Attach the green ground wire (item 3 in the figure above) from the camera to an earth-
ground connection on the mounting surface using the supplied screw or a suitable user-
supplied fastener.

1

2

3

4

1

2

2

A

4

B

Figure 10.2: MIC7000 IP System Configuration

1 MIC7000 camera

2 IP connection

3 Network switch

4 Networking device (computer, DVR/NVR, etc.)

10.5

28

en | Make Connections - Power and Control

MIC IP starlight 7000 HD, MIC IP

dynamic 7000 HD

2014.09 | 1.3 | F.01U.291.520

Operation Manual

Bosch Security Systems

Содержание MIC-71 series

Страница 1: ...MIC IP starlight 7000 HD MIC IP dynamic 7000 HD MIC 71xx MIC 72xx en Operation Manual ...

Страница 2: ......

Страница 3: ...urce Options 25 10 3 Ethernet Connections 26 10 4 Camera Connections 27 10 5 Connect the Camera to the Network 28 11 Cant the Camera 29 12 Typical System Configurations 34 12 1 Typical IP Configuration with 95 W midspan no I O connections 34 12 2 Typical Configuration with MIC ALM WAS 24 35 12 3 Typical IP Configuration with VJC 7000 90 36 13 Configuration 37 13 1 System Requirements 37 13 2 Confi...

Страница 4: ...el Counter 65 15 24 Advanced Mode Recording 65 15 25 Storage Management 65 15 26 Recording Profiles 67 15 27 Maximum Retention Time 68 15 28 Recording Scheduler 68 15 29 Recording Status 69 15 30 Advanced Mode Alarm 69 15 31 Alarm Connections 70 15 32 VCA 72 15 33 Virtual Masks 76 15 34 Audio Alarm 76 15 35 Alarm E Mail 77 15 36 Alarm Task Editor 78 15 37 Alarm Rules 78 15 38 Advanced Mode Interfa...

Страница 5: ... 16 1 5 System Log Event Log 94 16 1 6 Audio 94 16 1 7 Saving snapshots 94 16 1 8 Recording 95 16 1 9 Playback 95 16 2 Using Intelligent Tracking 97 16 3 Recommended Use of Your MIC Camera 100 17 Troubleshooting 101 18 Maintenance 103 19 Decommissioning 104 19 1 Transfer 104 19 2 Disposal 104 20 Technical data 105 21 Keyboard Commands By Number 106 MIC IP starlight 7000 HD MIC IP dynamic 7000 HD T...

Страница 6: ... risk This symbol indicates an imminently hazardous situation such as Dangerous Voltage inside the product If not avoided this will result in an electrical shock serious bodily injury or death Caution Medium risk Indicates a potentially hazardous situation If not avoided this may result in minor or moderate injury Alerts the user to important instructions accompanying the unit Caution Low risk Ind...

Страница 7: ... it can fall over easily Place the canted camera on its side Do not open the camera unit Doing so will invalidate the warranty Use common sense safety precautions especially in situations where there could be risk of injury if any part of the assembly becomes detached and falls Bosch recommends using the hinged DCA which allows installers to hang the MIC camera temporarily on the DCA to make elect...

Страница 8: ...MOS MOS FET handling precautions to avoid electrostatic discharge NOTE Wear required grounded wrist straps and observe proper ESD safety precautions when handling the electrostatic sensitive printed circuit boards Fuse rating For security protection of the device the branch circuit protection must be secured with a maximum fuse rating of 16A This must be in accordance with NEC800 CEC Section 60 Gr...

Страница 9: ...onditions this device may not cause harmful interference and this device must accept any interference received including interference that may cause undesired operation NOTE This equipment has been tested and found to comply with the limits for a Class A digital device pursuant to Part 15 of the FCC Rules and ICES 003 of Industry Canada These limits are designed to provide reasonable protection ag...

Страница 10: ...es nuisibles Le cas échéant l utilisateur devra remédier à ces interférences à ses propres frais Au besoin l utilisateur consultera son revendeur ou un technicien qualifié en radio télévision qui procédera à une opération corrective La brochure suivante publiée par la Commission fédérale des communications FCC peut s avérer utile How to Identify and Resolve Radio TV Interference Problems Comment i...

Страница 11: ...erated torch flashlight Exposure Hazard Value EHV is a ratio of the Exposure Level distance exposure time to Exposure Limit Value ELV When EHV is greater than 1 the device has exceeded the Exposure Limit Values for a particular Risk Group The ELV is the level where optical radiation to the eye or skin is not expected to result in adverse biological effects The Hazard Distance HD is the distance fr...

Страница 12: ...e 585 421 4220 Fax 585 223 9180 or 717 735 6561 Email security repair us bosch com Canada Telephone 514 738 2434 Fax 514 738 8480 Europe Middle East Africa Region Please contact your local distributor or Bosch sales office Use this link http www boschsecurity com startpage html europe htm Asia Pacific Region Please contact your local distributor or Bosch sales office Use this link http www boschse...

Страница 13: ...cause of their weight 6 7 kg 14 7 lb Parts List Camera One 1 MIC71xx or MIC72xx Camera One 1 Quick Installation Guide One 1 Document DVD One 1 spanner tool to remove and to attach the yoke caps in order to cant the camera if desired and to remove the access plug from the camera head when installing the optional illuminator accessory sold separately One 1 base gasket One 1 RJ45 coupler Four 4 MAC a...

Страница 14: ...l regions Accessories Description Accessories Description MIC DCA H MIC DCA HB MIC DCA HW MIC DCA HG Hinged Deep Conduit Adapter in Black White Grey MIC SCA MIC SCA BD MIC SCA WD MIC SCA GD Shallow Conduit Adapter in Black White Grey MIC CMB MIC CMB BD MIC CMB WD MIC CMB GD Corner Mount Bracket in Black White Grey MIC SPR MIC SPR BD MIC SPR WD MIC SPR GD Spreader Plate in Black White Grey MIC WMB ...

Страница 15: ...amera Refer to Section 11 Install cabling between power source and camera mounting site Install MIC Camera Refer to Section 9 Power supply source or PoE device Connect and configure camera in box or on table top stand Refer to Sections 5 6 Install optional accessories Refer to individual installation manuals Select mounting location and orientation Refer to Section 7 Install mounting accessories a...

Страница 16: ...d then returns to parked position 3 Configure the camera Refer to Configuration page 37 for details Note Do not change the camera orientation to Inverted while the camera is still in the box The camera head must be free to rotate If you must change the camera s orientation to Inverted remove the camera from the box and configure it by following the steps in Configuration Programming on a Temporary...

Страница 17: ...page 28 Note that the wiper moves one time across the camera window and then returns to parked position 5 Configure the camera Refer to Configuration page 37 for details Notice If you change the camera orientation to Inverted from the Settings page of the web browser Advanced Camera Installer Menu Orientation then the camera head will rotate automatically into inverted position 180 Note that the v...

Страница 18: ...here lightning strikes may occur then Bosch recommends installing a separate lightning conductor within 0 5 m 1 6 ft of the camera and at least 1 5 m 4 9 ft higher than the camera A good earth bonding connection to the camera housing itself will provide protection against damage from secondary strikes The camera housing itself is constructed to cope with secondary strikes If the correct lightning ...

Страница 19: ...om working properly if mounted ball down See the figures below for illustrations of the correct and the incorrect mounting orientations of MIC cameras Correct mounting orientation upright inverted Correct mounting orientation canted Incorrect mounting orientation Note the position of the visor when the camera is installed in inverted orientation The visor is close to the top of the pan shaft the b...

Страница 20: ...ilt range of the camera in upright orientation 55 55 90 90 A u t o P i v o t Figure 7 2 MIC7000 Tilt Range 145 each direction 290 if AutoPivot enabled 20 en Mounting Location and Mounting Orientation MIC IP starlight 7000 HD MIC IP dynamic 7000 HD 2014 09 1 3 F 01U 291 520 Operation Manual Bosch Security Systems ...

Страница 21: ...ion The camera can also be mounted on the side of a lamp post pole or similar column using the Pole Mount Bracket MIC PMB Be aware that lamp posts can often be subject to movement and are not suitable platforms in all conditions or for all applications The figure below identifies the three mounting brackets each sold separately that are necessary to mount the MIC camera on the side of a pole Note ...

Страница 22: ...rner of a building and under the eave of a building MIC SPR BD WD GD MIC SCA BD WD GD MIC WMB BD WD MG Figure 8 3 Typical Wall mount configuration MIC CMB BD WD MG MIC SCA BD WD GD MIC WMB BD WD MG Figure 8 4 Typical Corner mount configuration 22 en Overview of Mounting Options MIC IP starlight 7000 HD MIC IP dynamic 7000 HD 2014 09 1 3 F 01U 291 520 Operation Manual Bosch Security Systems ...

Страница 23: ...zation Connector Kit Notice Observe all appropriate safety precautions and local building regulations Refer to the MIC Series Mounting Brackets Installation Guide for installation instructions MIC IP starlight 7000 HD MIC IP dynamic 7000 HD Overview of Mounting Options en 23 Bosch Security Systems Operation Manual 2014 09 1 3 F 01U 291 520 ...

Страница 24: ...it before moving the camera before installing any accessories and before mounting the camera You can install the camera onto a MIC DCA or a MIC wall mount or directly to a mounting surface using the optional IP67 Weatherization Connector Kit MICIP67 5pk sold separately Refer to the manual provided with the mount or with the kit for installation instructions Notice To maintain the NEMA 6P rating wh...

Страница 25: ...d User supplied wiring must be in compliance with electrical codes Class 2 power levels For maximum reliability the camera can be connected simultaneously to a High PoE Midspan and a separate 24 VAC power source If High PoE and 24 VAC are applied simultaneously the camera usually selects auxiliary input 24 VAC and will draw minimal power from the High PoE Midspan If the 24 VAC power source fails t...

Страница 26: ... Ethernet Connections Caution Ethernet cables must be routed through earth grounded conduit capable of withstanding the outdoor environment Note Consult the National Electrical Code NEC for cable bundling requirements and limitations Cable Type Cat5e Cat6 Ethernet directly to the camera or to a network switch between the camera and the network Maximum Distance 100 m 330 ft Bandwidth 100 Base TX Hi...

Страница 27: ...cation to from the MIC ALM WAS 24 Purple Yellow GND Brown 5 Liquid tight cordgrip in the base of the camera 6 RJ45 coupler female to female Note If the MIC camera will be installed directly to a mounting surface instead of onto a MIC DCA or a MIC wall mount bracket Bosch recommends using the optional IP67 Weatherization Connector Kit MICIP67 5pk sold separately to protect the connections against m...

Страница 28: ...n the mounting surface using the supplied screw or a suitable user supplied fastener Option B 1 Connect an Ethernet crossover cable from the RJ45 connector of the camera directly to a networking device such as a computer a DVR NVR etc 2 Attach the green ground wire item 3 in the figure above from the camera to an earth ground connection on the mounting surface using the supplied screw or a suitabl...

Страница 29: ...ilt downward unexpectedly after the Torx screws are removed from the yoke arms and pinch fingers or other body parts Notice Risk of damage to the camera Do not under any circumstances cant the camera while the camera is on its side Cant the camera from an upright position only in order to prevent screws or other objects from falling into the open spaces in the arms when the yoke caps are removed F...

Страница 30: ...the yoke cap item 3 in the figure below on one yoke arm of the camera using a Torque wrench with in drive item 1 not supplied with the spanner tool item 2 supplied Repeat for the second arm 1 4 Figure 11 2 Remove yoke caps with spanner tool 2 Remove the two 2 T27 Torx screws at the bottom of one yoke arm using a T27 Torx wrench not supplied 30 en Cant the Camera MIC IP starlight 7000 HD MIC IP dyn...

Страница 31: ...for the second arm 4 Carefully rotate the arms and head assembly forward Notice Risk of damage to the device Do not cant the camera or let it fall in the wrong direction The camera should cant only in the direction indicated in the figure directly below MIC IP starlight 7000 HD MIC IP dynamic 7000 HD Cant the Camera en 31 Bosch Security Systems Operation Manual 2014 09 1 3 F 01U 291 520 ...

Страница 32: ... the screws 4 3 N m 38 in lb T27 Torx Figure 11 5 Tighten yoke arm screws 6 Attach the yoke caps using the Torque wrench with in drive with the spanner tool 32 en Cant the Camera MIC IP starlight 7000 HD MIC IP dynamic 7000 HD 2014 09 1 3 F 01U 291 520 Operation Manual Bosch Security Systems ...

Страница 33: ... N m 12 in lb 1 4 Figure 11 6 Attach yoke caps 7 Canting is complete MIC IP starlight 7000 HD MIC IP dynamic 7000 HD Cant the Camera en 33 Bosch Security Systems Operation Manual 2014 09 1 3 F 01U 291 520 ...

Страница 34: ... Cat6 user supplied between camera and 95 W midspan NPD 9501A 4 95 W midspan NPD 9501A 5 Data only IP cable Cat5e Cat6 user supplied between midspan and head end network Note The total length of Cat5e Cat6 cable must be less than 100 m 328 ft between the camera and the head end system 12 12 1 34 en Typical System Configurations MIC IP starlight 7000 HD MIC IP dynamic 7000 HD 2014 09 1 3 F 01U 291 ...

Страница 35: ...e 3 conductor user supplied 8 Interface cable for washer control user supplied 4 MIC ALM WAS 24 enclosure 9 Alarm input output interface cables user supplied 5 Interface cable for 24 VAC user supplied for MIC ALM WAS 24 10 Monitored switch for Tamper Alarm user supplied 12 2 MIC IP starlight 7000 HD MIC IP dynamic 7000 HD Typical System Configurations en 35 Bosch Security Systems Operation Manual ...

Страница 36: ... and VJC 7000 90 8 Washer output 2 conductor user supplied 4 VJC 7000 90 9 Alarm input output interface cables user supplied 5 120 230 VAC 10 Data only IP cable Cat5e Cat6 or fiber to head end network Note The total length of Cat5e Cat6 cable must be less than 100 m 328 ft between the camera and the head end system 12 3 36 en Typical System Configurations MIC IP starlight 7000 HD MIC IP dynamic 70...

Страница 37: ... online Help in Internet Explorer If you choose to use a computer running Microsoft Internet Explorer or any of the Bosch software the computer must conform to the following minimum requirements Operating System Windows XP Service Pack 3 or Windows 7 32 or 64 bits Processor Intel Pentium Quad Core 3 0 GHz or comparable RAM 2048 MB Free Hard Disk Space 10 GB Video system NVIDIA GeForce 8600 or high...

Страница 38: ...over an IP connection configuring the IP network settings and accessing the camera images from a Web browser To change the IP address or any network settings you can use the Configuration Manager software or the MIC7000 Series server Using the Configuration Manager Configuration Manager is an optional network utility provided on the Bosch Security Systems Web site Use the Configuration Manager Man...

Страница 39: ...nges to Set and Reboot 8 Click Set and Reboot The camera will reset go through the homing sequence which usually takes 30 seconds to complete and then the LIVE page appears with updated video and the new IP address MIC IP starlight 7000 HD MIC IP dynamic 7000 HD Configuration en 39 Bosch Security Systems Operation Manual 2014 09 1 3 F 01U 291 520 ...

Страница 40: ...e unit such as firmware updates can only be altered in the advanced mode Caution The settings in the Advanced Mode should only be processed or modified by expert users or system support personnel All settings are backed up in camera memory so they are not lost even if the power fails The exception is the time settings which are lost after 1 hour without power if no central time server is selected ...

Страница 41: ...Advanced Mode and then click Camera The Camera menu expands 3 Click Audio The Audio page appears The page displays the current video image in the small window next to the slide controls to help you verify the audio source and improve the Peak levels 4 Select the protocol in the Audio field to activate audio over IP Change the option to ON Notice The audio signal is sent in a separate data stream p...

Страница 42: ...tion level is live It can only be used to view the live video image and switch between the different live image displays You can define and change a password for each authorization level if you are logged in as service or if the unit is not password protected Enter the password for the appropriate authorization level here Note Proper password protection is only guaranteed when all higher authoriza...

Страница 43: ...lable under the new addresses after the reboot DHCP If a DHCP server is employed in the network for the dynamic assignment of IP addresses you can activate acceptance of IP addresses automatically assigned to the camera Certain applications VIDOS Bosch Video Management Systems Archive Player Configuration Manager use the IP address for the unique assignment of the unit If you use these application...

Страница 44: ...le only if you have connected a VIDEOJET connect device VJC 7000 90 to your camera You can set the gain of the audio signals to suit your specific requirements The current video image is shown in the small window next to the slide controls to help you check the audio source and improve assignments Your changes are effective immediately If you connect via Web browser you must select the option Tran...

Страница 45: ...t be changed Keep a record of this information in case technical assistance is required Notice You can select all required text on this page with the mouse and copy it to the clipboard with the Ctrl C key combination for example if you want to send it via e mail 14 7 MIC IP starlight 7000 HD MIC IP dynamic 7000 HD Configuration via IP Basic Mode en 45 Bosch Security Systems Operation Manual 2014 0...

Страница 46: ...e all characters 5 Now click the OK button to apply the selected characters to the second line of the Camera 1 parameters The window will close Camera ID Each device should be assigned a unique identifier that can be entered here as an additional means of identification Initiator extension Add text to an initiator name to make identification easier in large iSCSI systems This text is added to the ...

Страница 47: ...urrent date Since the unit time is controlled by the internal clock there is no need to enter the day of the week it is added automatically 2 Enter the current time or click the Sync to PC button to copy your computer s system time to the camera Note It is important that the date time is correct for recording An incorrect date time setting could prevent correct recording Device time zone Select th...

Страница 48: ...tary information These overlays can be enabled individually and are arranged on the image in a clear manner After you set all necessary parameters click the View Control link to see how the stamping appears on the LIVE page Camera name stamping This field sets the position of the camera name overlay It can be displayed at the Top at the Bottom or at a position of your choice that you can then spec...

Страница 49: ...tion from the list 2 Specify the exact position Position XY 3 In the Position XY fields enter the values for the desired position Transparent stamping Check this box to make the stamp on the image transparent Video watermarking Choose On if you wish the transmitted video images to be watermarked After activation all images are marked with a green check A red check indicates that the sequence live ...

Страница 50: ...r motion detection are marked Show VCA trajectories When video content analysis VCA is activated check this item to show additional information that traces the path of objects Show overlay icons Select this checkbox to show overlay icons on the live video image Video player Select the desired video player from the list in the drop down box Options are Auto detect default Bosch Video SDK Bosch Auto...

Страница 51: ...pecify whether the icon for saving individual images snapshots should be displayed below the live image Individual images can only be saved if this icon is visible Allow local recording Here you can specify whether the icon for saving recording video sequences on the local memory should be displayed below the live image Video sequences can only be saved if this icon is visible I frames only stream...

Страница 52: ...dditional inputs and outputs from either device Otherwise select MIC 7x30 Base frame rate This option allows you to set the frame rate that the camera uses to transmit video Select either 25 ips or 30 ips If you select 25 ips the camera will stream video at 25 or 50 ips If you select 30 ips the camera will stream video at 30 or 60 ips depending on the option selected in the Encoder Stream Max fram...

Страница 53: ...for example one setting for transmissions to the Internet and one for LAN connections Pre programmed profiles are available each giving priority to different perspectives You can change individual parameter values of a profile and you can also change the name You can switch between profiles by clicking the appropriate tabs Note In the default setting Stream 1 is transmitted for alarm connections a...

Страница 54: ...works with low bandwidths The image rate in images per second ips appears next to the text field or slider Video resolution Select the desired resolution for the video image Expert settings If necessary use the expert settings to adapt the I frame quality and the P frame quality to specific requirements The setting is based on the H 264 quantization parameter QP GOP structure Select the structure ...

Страница 55: ...ty at the lowest bandwidth even in the case of increased movement in the picture configure the quality settings as follows 1 Observe the coverage area during normal movement in the preview images 2 Set the value for Min P frame QP to the highest value at which the image quality still meets your needs 3 Set the value for I P frame delta QP to the lowest possible value This is how to save bandwidth ...

Страница 56: ...justed to ensure that the bit rate is the priority SD Image Optimized For an SD image the video bit rate and frame quality are adjusted to ensure that the picture quality is the priority SD Balanced For an SD image the video bit rate and frame quality are adjusted to a median profile for everyday use SD Bit Rate Optimized For an SD image the video bit rate and frame quality are adjusted to ensure ...

Страница 57: ...to expand or shrink the privacy mask area 8 Click Set to save the privacy mask size and position An image window displays the privacy mask 9 To hide an individual mask select the mask number and clear the Enabled check box 10 To hide all masks from an image view click the Disable Masks check box Note If you choose to hide all masks you must enable each individual mask to show the mask in the scene...

Страница 58: ... original color Red Gain The red gain adjustment offsets the factory white point alignment reducing red introduces more cyan Blue Gain The blue gain adjustment offsets the factory white point alignment reducing blue introduces more yellow It is only necessary to change the white point offset for special scene conditions Saturation The percentage of light or color in the video image HD only Values ...

Страница 59: ...for all modes except Motion default 1 500 Backlight compensation Optimizes the video level for the selected area of the image Parts outside this area may be underexposed or overexposed Select On to optimize the video level for the central area of the image The default setting is Off High Sensitivity Adjusts the level of intensity or lux within the image HD only Select from Off or On Stabilization ...

Страница 60: ... again Auto Focus Auto Focus is always active Manual Auto Focus is inactive Focus polarity Normal default focus controls operate normally Reverse focus controls are reversed Focus speed Use the slider from 1 to 8 to control how fast the Auto focus will readjust when the focus becomes blurred Auto iris Automatically adjusts the lens to allow the correct illumination of the camera sensor This type o...

Страница 61: ...on of the image Set the Auto Pivot to On default to automatically rotate the camera 180º when following a subject traveling directly beneath the camera To disable this feature click Off Freeze frame Select On to freeze the image while the camera moves to a predetermined scene position Turbo mode Select On to set the camera in Turbo mode when an operator pans or tilts the camera manually In this mo...

Страница 62: ...om controls 4 Use the View Control dialog box to make the necessary camera movements 5 Click the Stop Recording button to save all actions North point Click the Set button to overwrite the existing North point Click the Defaults button to reset the North point to factory defaults Illumination Wiper IR Illuminators Controls IR illuminators When ON the camera gives a much better image at low light l...

Страница 63: ...an optional name for the scene up to 20 characters long 5 Click OK to save the scene to the Preposition list The asterisk to the left of the scene name indicates the scene is part of the preposition tour 6 To delete a scene from the list select the scene and click the Delete scene X button 7 To overwrite an existing scene Click the View Control link to access the PTZ controls Use the PTZ controls ...

Страница 64: ... you have connected a VIDEOJET connect device VJC 7000 90 to your camera You can set the gain of the audio signals to suit your specific requirements The current video image is shown in the small window next to the slide controls to help you check the audio source and improve assignments Your changes are effective immediately If you connect via Web browser you must activate the audio transmission ...

Страница 65: ...or further information please contact your local customer service at Bosch Security Systems Inc Device manager If you activate the Managed by VRM option in this screen the VRM Video Recording Manager will manage all recording and you will not be able to configure any further settings here Caution Activating or deactivating VRM causes the current settings to be lost they can only be restored throug...

Страница 66: ...elected Rec 1 stores Stream 1 Rec 2 stores Stream 2 This means that you can record the standard data stream on a hard drive and record alarm images on the mobile CF card for example 5 Check the boxes for the Overwrite older recordings option to specify which older recordings can be overwritten once the available memory capacity has been used Recording 1 corresponds to Stream 1 Recording 2 correspo...

Страница 67: ...lder recordings will automatically be overwritten If you select the Pre alarm option recording will only take place in the pre alarm time during the alarm and during the set post alarm time If you select Off no automatic recording takes place Caution You can specify limitations for overwriting older recordings in Continuous mode by configuring the retention time see Maximum Retention Time page 68 ...

Страница 68: ...ng Scheduler The recording scheduler allows you to link the created recording profiles with the days and times at which the camera s images are to be recorded in the event of an alarm You can link any number of 15 minute intervals with the recording profiles for each day of the week Moving the mouse cursor over the table displays the time below it This aids orientation In addition to the normal we...

Страница 69: ...g scheduler and start the recording Once recording is underway the Recording Profiles and Recording Scheduler pages are deactivated and the configuration cannot be modified You can stop the recording activity at any time and modify the settings 1 Click the Start button to activate the recording scheduler 2 Click the Stop button to deactivate the recording scheduler Running recordings are interrupt...

Страница 70: ...e to be possible for example when initiating connections via higher ranking systems such as VIDOS or Bosch Video Management System you can store a general password here The camera can use this general password to connect to all remote stations protected with the same password In this case proceed as follows 1 Select 10 from the Number of destination IP address list field 2 Enter the address 0 0 0 ...

Страница 71: ...selected has an impact on the position of the image in a split screen For example you can specify via a VIP XD that the upper right quadrant should be used to display the alarm image by selecting decoder 2 SSL encryption The data for the connection for example the password can be securely transmitted with SSL encryption If you have selected the On option only encrypted ports are offered in the Rem...

Страница 72: ... be useful if you want to test a number of different configurations Save a functioning configuration and test new settings You can use the saved configuration to restore the original settings at any time Notice If computing power becomes short the highest priority is always the live images and recordings This can lead to impairment of the video content analysis You should therefore observe the pro...

Страница 73: ...ured to suit the operating environment and the desired responses The sensitivity must be set to a value greater than zero Caution Reflections of light off glass surfaces etc switching lights on or off or changes in the light level caused by cloud movement on a sunny day can trigger unintended responses from the motion detector and generate false alarms Run a series of tests at different times of t...

Страница 74: ... Sensitivity Notice This and the following parameter are only accessible if the reference check is activated The basic sensitivity of the tamper detection can be adjusted for the environmental conditions to which the camera is subject The algorithm reacts to the differences between the reference image and the current video image The darker the observation area the higher the value that must be sel...

Страница 75: ...image and the selected areas are marked in yellow 4 Select the Disappearing edges or Appearing edges option to specify the reference check once again Disappearing edges The area selected in the reference image should contain a prominent structure If this structure is concealed or moved the reference check triggers an alarm If the selected area is too homogenous so that concealing and moving the st...

Страница 76: ...f you have connected a VIDEOJET connect device VJC 7000 90 to your camera The camera can create alarms on the basis of audio signals You can configure signal strengths and frequency ranges in such a way that false alarms for example due to machine noise or background noise are avoided Notice First set up normal audio transmission before you configure the audio alarm here see Audio page 64 Audio al...

Страница 77: ...EG E mail with attached JPEG image file SMS E mail in SMS format to an e mail to SMS gateway for example to send an alarm by cellphone without an image attachment Caution When a cellphone is used as the receiver make sure to activate the e mail or SMS function depending on the format so that these messages can be received You can obtain information on operating your cellphone from your cellphone p...

Страница 78: ...The physical input connection can be activated by dry contact devices such as pressure pads door contacts and similar devices Next specify up to two 2 rule outputs or the camera s response to the input Outputs include a physical alarm output an AUX command or a preposition scene 1 Click the Enabled check box to activate the alarm 2 Choose one of the following alarm Inputs Local Input 1 a physical ...

Страница 79: ... The settings on this page are used to integrate the camera into an existing network Some changes only take effect after the unit is rebooted In this case the Set button changes to Set and Reboot 1 Make the desired changes 2 Click the Set and Reboot button The camera reboots and the changed settings are activated Caution If you change the IP address subnet mask or gateway address the camera is onl...

Страница 80: ...is easier to access if the unit is listed on a DNS server If you wish for example to establish an Internet connection to the camera it is sufficient to enter the name given to the unit on the DNS server as a URL in the browser Enter the IP address of the DNS server here Servers are supported for secure and dynamic DNS Video transmission If the unit is operated behind a firewall TCP HTTP port shoul...

Страница 81: ...rk MSS Byte You can set the maximum segment size for the IP packet s user data This gives you the option to adjust the size of the data packets to the network environment and to optimize data transmission Please comply with the MTU value of 1 514 bytes in UDP mode iSCSI MSS Byte You can specify a higher MSS value for a connection to the iSCSI system than for the other data traffic via the network ...

Страница 82: ...d RTSP port is 554 Select Off to deactivate the RTSP function Authentication If a RADIUS server is employed in the network for managing access rights authentication must be activated here to allow communication with the unit The RADIUS server must also contain the corresponding data To configure the unit you must connect the camera directly to a computer using a network cable This is because commu...

Страница 83: ... Notice To use the UPnP function on a computer both the Universal Plug and Play Device Host and SSDP Discovery Service must be active in Windows XP and Windows 7 Quality of service The camera offers Quality of Service QoS configuration options to ensure fast network response to PTZ data and images Quality of Service QoS is the set of techniques to manage network resources QoS manages the delay del...

Страница 84: ...a streams in the unit The camera supports multi unicast connections for up to five simultaneously connected receivers Notice Duplication of data places a heavy demand on the unit and can lead to impairment of the image quality under certain circumstances Port Assign a different port to each data stream if there are simultaneous data streams at the same multicast address Enter the port address of t...

Страница 85: ...o which to save images Enable Click this checkbox to enable face detection File format Select the file format in which to save images Options are JPEG default YUV420 TIFF Target Select the target the name of the account on the server to which to save images Timeouts Select the number of timesouts for image posting The default is 0 no timeout Maximum image width Enter a number for the maximum width...

Страница 86: ...ware go to www boschsecurity com navigate to the product page for your camera and then download the software from the Software tab The preferred method to update your camera is through a direct connection between the camera and a PC This method entails connecting the Ethernet cable from the camera directly to the Ethernet port of a PC If the direct connect method is not practical you can also upda...

Страница 87: ...connecting in seconds The unit reboots automatically once the upload has successfully completed Download 1 Click the Download button A dialog box opens 2 Follow the on screen instructions to save the current settings Configuration You can save configuration data for the camera on a computer and then load saved configuration data from a computer to the unit SSL certificate To be able to work with a...

Страница 88: ...evel of acceleration forces was exceeded Total hours of camera operation Illuminator aging history homing events power cycles restarts video loss System Overview The data on this page are for information purposes only and cannot be changed Keep a record of this information in case technical assistance is required Notice You can select all required text on this page with the mouse and copy it to th...

Страница 89: ...o recorded Watermarking not valid Watermarking flag set on media item Motion flag set on media item Discovery of storage not completed If the information about recorded video is not cached a discovery procedure is started in order find all recorded video During this time the discovery symbol is shown While discovery is executed gaps might be shown in places which the discovery has not yet reached ...

Страница 90: ...iew Control View Control The View Control tab allows you to control camera functions pan tilt zoom focus and iris navigate through on screen menus and to view preset scenes shots Ref Description Ref Description 1 Tilts the camera up 8 Focus far 2 Tilts the camera down 9 Focus near 3 Pans the camera to the left 10 Iris close 4 Pans the camera to the right 11 Iris open 5 Pans and tilts the camera in...

Страница 91: ... drop down list Refer to Scenes and Tours page 63 to define a preset scene and to specify a title for the preset Figure 16 1 View control tab preset scene list AUX Control Aux Control Tab The AUX Control tab is used to enter pre programmed keyboard control commands These commands are composed of a command number plus the appropriate function key Show scene Set scene AUX on AUX off A valid combinat...

Страница 92: ...scenes are camera positions that are saved in memory for future use 1 Move your cursor over the live image and wait for the area to display a directional arrow 2 Click and hold a mouse button to pan to the desired position that you want to save 3 Click any number combination from 1 256 from the on screen keypad to identify the scene number 4 Click the Set scene button The image area displays a mes...

Страница 93: ...Save presets using One Push Spot Focus Refer to Lens Settings page 60 Find home Click the Find home button to recalibrate the home position for the camera Show home Click the Show home button to display the current home position Refocus Click the Refocus button to issue the One Push focus command One Push activates the Auto Focus feature after the camera stops moving Digital I O The alarm icon is ...

Страница 94: ...1 On the LIVE page click anywhere next to the video image to remove the focus from the ActiveX 2 Hold down the F12 key to establish a voice connection to the camera The browser s status bar displays the message Send Audio ON 3 Release the F12 key when you want to stop sending audio signals to the camera The status bar displays the message Send Audio OFF Notice When the voice contact connection to ...

Страница 95: ...ed To play back recorded video sequences 1 Select Recording 1 or 2 in the drop down menu The contents for 1 and 2 are identical only the quality and location may be different 2 Use the arrow buttons to browse the list 3 Click a track The playback for the selected sequence starts Export to FTP Click Export to FTP to send the current track to the FTP server If required change the times within the se...

Страница 96: ...rks and jump directly to these These bookmarks are indicated as small yellow arrows above the time interval Use the bookmarks as follows Jump to the previous bookmark Set bookmark Jump to the following bookmark Bookmarks are only valid while in the Recordings page they are not saved with the sequences All bookmarks are deleted when leaving the page 96 en Operation MIC IP starlight 7000 HD MIC IP d...

Страница 97: ...H D To activate the Intelligent Tracking feature one of the following conditions must be met The Silent IVA option must be selected in the VCA page on the Settings tab Refer to VCA page 72 IVA must be active for at least one preset scene in the VCA page on the Settings tab If IVA is configured for one scene then all other scenes have Intelligent Tracking enabled by default If a scene has Motion of...

Страница 98: ...ligent Tracking The Intelligent Tracking feature behaves in one of the following ways Camera detects an object in motion and automatically tracks the object User actions always take precedence over Intelligent Tracking If the camera is actively tracking an object and a user takes control the camera will attempt to track the object after a period of inactivity An IVA alarm can trigger Intelligent T...

Страница 99: ...re of the camera to start following the object person that triggered the alarm This allows the camera to track moving objects of interest without getting distracted by other moving objects in the scene To activate this mode you must enable IVA by selecting either IVA 5 6 or IVA 5 6 Flow in the Analysis type field of the VCA page from the SETTINGS page select Advanced Mode Alarm VCA Refer to the IV...

Страница 100: ...e Illumination and Focus Settings Your camera uses a high sensitivity image sensor and a high quality lens with a precise drive train control to maintain the best focus of the image The Autofocus mechanism tries continuously to make the image details appear sharp Under low light and low contrast scenarios the Autofocus algorithm may not be able to find the correct focus points because of the lack ...

Страница 101: ...ehind a firewall ensure that the Video Transmission mode is set to UDP Camera does not operate at all or does not operate as expected after being subjected to extreme low temperatures below 40 40 F Allow the camera to warm up The camera requires a 60 minute warm up prior to PTZ operations If camera does not operate after this warm up period then reset the camera In the URL line of your web browser...

Страница 102: ...anager to identify the correct IP address If O K then Check that there is 24 V output from the transformer If O K then Check the integrity of all wires and mating connectors to the camera Picture is dark Check that the Gain Control is set to High If O K then Check that the Auto Iris Level is set to the appropriate level If O K then Check that the camera lens cover is removed If O K then Check that...

Страница 103: ...of practice for example EN 60097 17 Information about cameras with illuminators The text in this section applies only to cameras which have the optional illuminator accessory When servicing the device disconnect power to the device to avoid possible exposure to the eyes If disconnecting power to the device is not possible use appropriate shielding to block the LED arrays or wear appropriate eye pr...

Страница 104: ...eparately and sent for environmentally compatible recycling in accordance with the European Waste Electrical and Electronic Equipment Directive To dispose of old electrical or electronic devices you should use the return and collection systems put in place in the country concerned 19 19 1 19 2 104 en Decommissioning MIC IP starlight 7000 HD MIC IP dynamic 7000 HD 2014 09 1 3 F 01U 291 520 Operatio...

Страница 105: ...heet for your camera available on the appropriate product pages of the Online Product Catalog at www boschsecurity com 20 MIC IP starlight 7000 HD MIC IP dynamic 7000 HD Technical data en 105 Bosch Security Systems Operation Manual 2014 09 1 3 F 01U 291 520 ...

Страница 106: ... the dwell adjustment slide bar On Off 18 AutoPivot Enable Enables disables AutoPivot On Off 20 Backlight Comp Turns Backlight Compensation on or off On Off 23 Electronic Shutter Enters the Shutter Speed slide bar On Off 24 Stabilization Turns Electronic Stabilization on or off On Off 26 Wide Dynamic Range Activates deactivates Wide Dynamic Range WDR On Off 35 White Balance Mode Enters the White B...

Страница 107: ...itle menu Refer to Specifying a Shot or a Sector Title On 63 Zone Sector Title Menu Enters the Zone Title menu Refer to Specifying a Shot or a Sector Title On 64 Alarm Status Enters the Alarm Status menu Off 65 Alarm Acknowledge Acknowledges alarm or deactivates physical outputs On 66 Display Software Version Displays the number of the software version On Off Auto 67 IR Focus Correction On two tim...

Страница 108: ...On Off 91 Zoom Polarity On Reverse Off Normal On Off 92 Focus Polarity On Reverse Off Normal On Off 93 Iris Polarity On Reverse Off Normal On Off 94 Set Azimuth Zero Point Recalibrate Azimuth Compass Sets the zero degree pan position Refer to Azimuth Elevation and Compass Directions On Off 95 Display Azimuth Elevation Readings On Displays azimuth elevation readings Off Hides azimuth elevation read...

Страница 109: ... Pre position menu Set Shot 101 Autopan Left Limit Set Programs left limit Shot Shows limit Set Shot 102 Autopan Right Limit Set Programs right limit Shot Shows limit Set 110 Factory P T Home Position Set Recalibrate home position Set 802 Edit Password Enters the Edit Password menu Set 899 Reset ALL Restores all settings to original defaults and clears all user programmed settings Set 900 Edit Tou...

Страница 110: ......

Страница 111: ......

Страница 112: ...Bosch Security Systems Inc 850 Greenfield Road Lancaster PA 17601 USA www boschsecurity com Bosch Security Systems Inc 2014 Bosch Sicherheitssysteme GmbH Robert Bosch Ring 5 85630 Grasbrunn Germany ...

Отзывы: