pad to enter the setting;
2)
After completing one setting, move the joystick left to exit the
setting. If there is other setting repeat the above steps.
3)
If there is no need to edit any item, move the joystick left to
return to higher level menu; Input 0 by using the numeric
keypad or move the flashing cursor to 0.EXIT and move the
joystick right to exit SYSTEM MENU.
1. Keyboard to control the monitor
Enter the KEY/MON CONTROL MENU as picture 9-5-2 shows. It
is to se t the monitors that c an be controlled by a certain
keyboard.
The setting is as follows:
1)
Move the joystick up and down to selectkeyboard no., and
turn the joystick clockwise to enter the setting of the control-
lable keyboards.
2)
Move the joystick up and down to adjust the control status of
the key boards (Y or N). Turn the jo ystic k cloc kwise o r
anticlockwise to select monitor numbers. Ymeans the moni-
tors can be co ntrolled by the keyboard and N means the
monitors cannot be controlled by the keyboard.
3)
After completing turn the joystick anticlockwise to return to the
keyboardselectionmenu. If there is setting to other keyboards,
repeat the above steps.
4)
If there is no other item to be set, move the joystick left to return
to higher level menu.
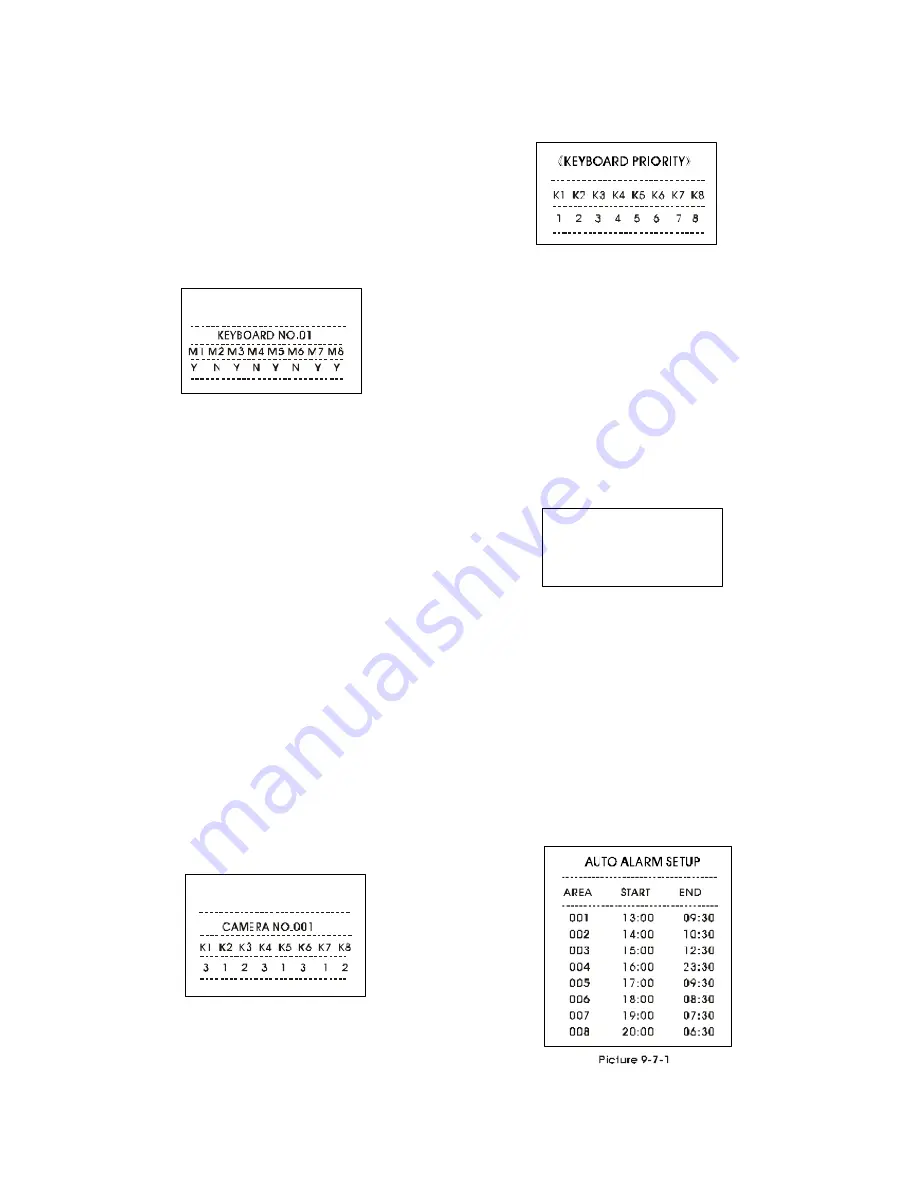
Picture 9-5-2: Keyboard No. 01 has the rightto control Moni-
tor #1,3,5,7, 8, and has no right to control Monitor #2,4,6.
2. Keyboard to control the dome
It is to se t the keyboards that c an control a c ertain dome
camera. The setting procedure is similar to that mentioned in
the above section. Picture 9-5-3 designates that for a certain
came ra No.1, key boards # 1,4,6 have the right level 3 to
control, keyboards # 2,5,7 have the right leve l 1 to control,
and keyboard # 3,8 have the right level 2 to contro l.(1. No
right of access to the dome camera; 2. Has right of access
to the video only; 3. Has right of acc ess to the video and
control of the dome camera.)
3. Keyboard priority setup
Enterthe KEYBOARD PRIORITY submenu as picture 9-5-4 shows.
The priority level of each keyboard limit the functions of it.
The setting procedure is as follows:
1)
Move the joystick up and down to adjust priority level. Turn the
joystick clockwise or anticlockwise to select keyboard.
2)
If there is no other item to be set, move the joystick le ft to
return to higher level menu.
Picture 9-5-4 shows that the priority levels of keyboard #1-8
are 1-8 (highest level is 8 and lowest level is 1).
9.6 Alarm Mode
Enter AUTO ALARM MODE submenu as picture 9-6-1 shows to
set alarm arming mode: MO DE1: MANUAL ; MODE2: AUTO.
Move the joystick up and down to select. Move the joystick
left to exit and return to higher level menu.
9.7 Auto Alarm Setup
Enter the AUTO ALARM SETUP submenu as picture 9-7-1 shows.
There are two modes to arm alarms: AUTO or MANUAL. When
AUTO mode is selec ted, the system will process the alarm
information automatically as per the programm ed A UTO
ALARM SETUP commands, and the system will process manual
commands sent throughthe keyboard; When MANUAL mode
is selected, the system will only process manual commands
to arm/disarm alarms and the AUTO ALARM SETUP isnot useful
now. Refer to the following for details.
《
》
KEY/COM CONTROL
Picture 9-5-3
Picture 9-5-4
------------------------------
------------------------------
《
》
AUTO ALARM MODE
Picture 9-6-1
ALARM MODE: MANUAL
《
》
KEY/MON CONTROL
Picture 9-5-2


