


24
TERMINAL ELIMINATOR PLUS
3.5 Expansion-Board Installation (Optional)
The 4-Port Expansion Board (part number TL483-C) comes with the
following hardware, which you will use to mount the board:
• 2 spacers (standoffs)
• 8 screwlocks
• 1 screw
Proceed as follows and refer to Figure 3-4, on the next page, to install the
4-Port Expansion Board:
(If you have already set the port switches, be careful not to bump them. If
you are performing this expansion on a previously installed and operated
Terminal Eliminator Plus, rather than at initial installation time, unplug
the TEP and remove its cover as described in
Section 3.1
.)
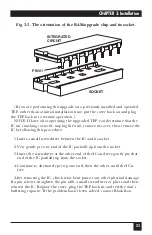
1. Remove the screw located near IC chip U23 on the motherboard. Do not
discard this screw.
2. Insert one of the spacers in the hole from which you took the screw.
3. Insert the other spacer in the hole located near IC U20 on the
motherboard.
4. Line up the port connectors on the 4-Port Expansion Board with the
holes in the back cover. Make sure the pin connector on the bottom
of the Expansion Board is aligned properly with the pin socket on the
motherboard. Carefully press the pin connector into the pin socket.
CAUTION!
DO NOT FORCE THE CONNECTOR AND SOCKET TOGETHER. Excessive
force may damage the pins. If the connector and socket don’t fit together
easily, realign them and try again.
5. The four RS-232 connectors on the Expansion Board line up with four
cutouts in the back panel of the TEP. Each cutout has a bulge on either
side to allow access to the corresponding connector’s screwlock holes.
Screw the eight screwlocks into these holes.


