


Selftest and calibration check
If you feel that your programmer does not react according to your expectation, please run the
programmer (ISP connector) selftest using Diagnostic POD (Diagnostic POD for ISP
connectors #2), enclosed with the standard delivery package.
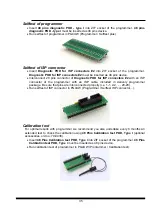
Selftest of programmer
•
Insert
48 pins diagnostic POD - type I
into ZIF socket of the programmer.
48 pins
diagnostic POD - type I
must be inserted as 48 pins device.
•
Run selftest of programmer in PG4UW (Programmer / Selftest plus).
Selftest of ISP connector
•
Insert
Diagnostic POD for ISP connectors #2
into ZIF socket of the programmer.
Diagnostic POD for ISP connectors #2
must be inserted as 48 pins device.
•
Interconnect 20 pins connector of
Diagnostic POD for ISP connectors #2
with an ISP
connector of the programmer with an ISP cable, included in delivery programmer
package. Be sure that pins are interconnected properly (i.e. 1-1, 2-2, ..., 20-20).
•
Run selftest of ISP connector in PG4UW (Programmer / Selftest ISP connector…).
Calibration test
For optimal results with programmer we recommend you also undertake every 6 months an
extended test to check the calibration using
48 Pins Calibration test POD, Type I
(optional
accessories, ord.no. 70-0438).
•
Insert
48 Pins Calibration test POD, Type I
into ZIF socket of the programmer.
48 Pins
Calibration test POD, Type I
must be inserted as 48 pins device.
•
Run calibration test of programmer in PG4UW (Programmer / Calibration test).
22
Содержание 844USB
Страница 7: ...Introduction 7 ...
Страница 12: ...Quick Start 12 ...
Страница 14: ...4 check if the device is blank click on 5 program device click on 6 additional verify of device click on 14 ...
Страница 15: ...Detailed description 15 ...
Страница 16: ...859 16 ...
Страница 28: ...866B 28 ...
Страница 41: ...844USB 41 ...
Страница 50: ...848A 50 ...
Страница 56: ...Setup 56 ...
Страница 60: ...Step 6 Check your setting and then click on Install button Step 7 Installation process will start 60 ...
Страница 65: ...Step 6 Click on Continue Anyway button For Windows Vista Click Install this driver software anyway 65 ...
Страница 67: ...Pg4uw 67 ...
Страница 116: ...About When you choose the Info command from the menu a window appears showing copyright and version information 116 ...
Страница 117: ...Pg4uwMC 117 ...
Страница 127: ...Common notes 127 ...
Страница 134: ...Troubleshooting and warranty 134 ...


