


PICmicro
®
microcontrollers
This interface corresponds with Microchip application notes TB013, TB017, TB016: How to
Implement ICSP
TM
Using PIC16CXXX OTP (PIC12C5XX OTP)(PIC16F8X Flash) MCUs.
These application notes describes requirement for target system with In-system programming
device and ISP programmer.
Following signals are use for In-system programming of PICmicro
®
microcontrollers.
•
MCLR\ / VPP reset / switch to programming mode
•
RB6 (GP1) clock
•
RB7 (GP0)
data input / output
•
VDD power supply
•
GND ground
When PICmicro
®
device is programmed, pin MCLR\ / VPP is driven to approximately 12 V.
Therefore, the target system must be isolated from this voltage provided by programmer.
RB6 and RB7 signals are used by the PICmicro
®
for In-system programming, therefore target
system mustn’t affect these signals during In-system programming to avoid programming
errors.
Marginal verify is used after programming. Programmer must verify the program memory
contents at both minimal and maximal power supply, therefore VDD pin of PICmicro
®
must be
isolated from rest of target system during programming.
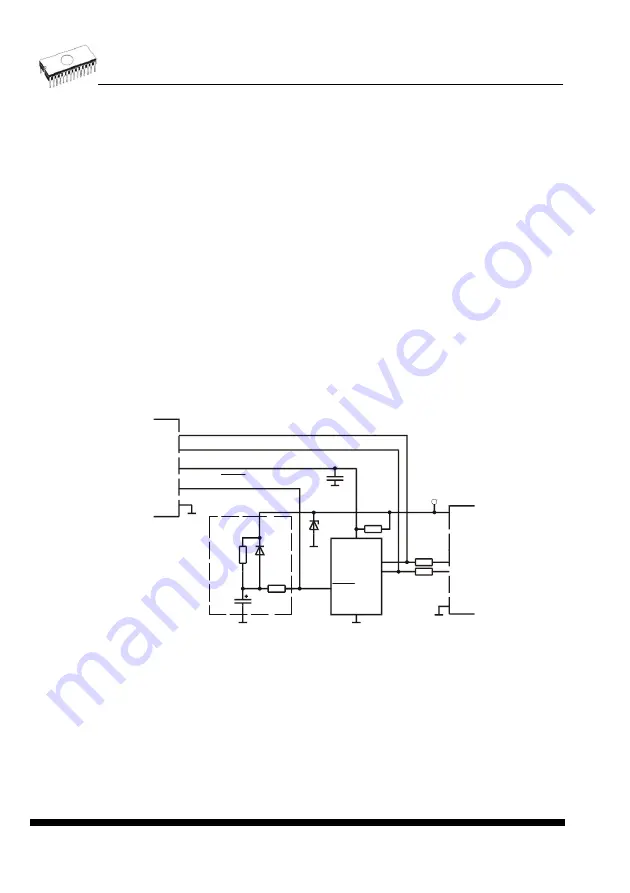
B+K PRECISION’s recommended circuit for PICmicro:
R1
R2
VSS
C1
22n
VSS
R7
47R
D1
VSS
VDD
VSS
R6 1k
D2
1N4148
VSS
R11
22k
C2
1u/25V
VDD
RB6
RB7
MCLR/VPP
VSS
I1
PICxxxxx
DATA
CLK
VDD
MCLR/VPP
ISP connector
target device
target system
reset circuit
VSS
*1
Note: External reset circuit is necessary only if VDD power-up slope is too slow.
Other
Attention to multitasking OS's (Windows 95/98/Me/NT/2000/XP). There is needful for regular
running of control program for these B+K PRECISION programmer that printer port, on which
is programmer connected, must be reserved for this programmer only. Otherwise, any other
program must not simultaneously to use (or any way to modify) this printer port.
132
Содержание 844USB
Страница 7: ...Introduction 7 ...
Страница 12: ...Quick Start 12 ...
Страница 14: ...4 check if the device is blank click on 5 program device click on 6 additional verify of device click on 14 ...
Страница 15: ...Detailed description 15 ...
Страница 16: ...859 16 ...
Страница 28: ...866B 28 ...
Страница 41: ...844USB 41 ...
Страница 50: ...848A 50 ...
Страница 56: ...Setup 56 ...
Страница 60: ...Step 6 Check your setting and then click on Install button Step 7 Installation process will start 60 ...
Страница 65: ...Step 6 Click on Continue Anyway button For Windows Vista Click Install this driver software anyway 65 ...
Страница 67: ...Pg4uw 67 ...
Страница 116: ...About When you choose the Info command from the menu a window appears showing copyright and version information 116 ...
Страница 117: ...Pg4uwMC 117 ...
Страница 127: ...Common notes 127 ...
Страница 134: ...Troubleshooting and warranty 134 ...


