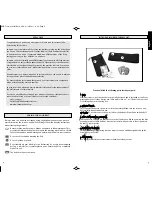

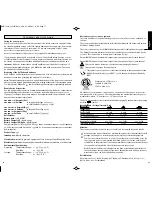


Step 1
-
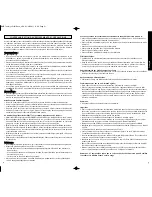
Charge the battery.
Insert the charger into an electrical
outlet and then connect your
ACTIVATOR
to it (Fig. a). It may take
approximately 2-3 hours to fully charge the battery. The
ACTIVATOR
is fully charged when all three sections of the battery icon are
full. This icon will flash when the battery is low and needs to be
recharged.
NOTE
:
Do not leave your
ACTIVATOR
connected to the charger when
the battery is fully charged.
Step 2
-
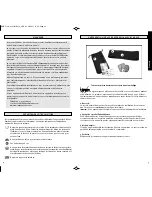
Remove the covers from the
patterned
side of the
GelPads and place the GelPads on the belt.
Turn the belt over so that the 3 silver studs are facing upwards.
Remove the three adhesive GelPads from their pack. There is 1
large square GelPad and 2 smaller oval GelPads. One side of
each GelPad has a grid pattern on it while the other side is plain
black.
NOTE
:
You should only use
BMR TUMMY LIFT
GelPads on your
BMR
TUMMY LIFT
belt.
(i)
Remove the covers from the
patterned side
of the large
GelPad (Fig. b).
(ii)
Place the
patterned side
of this GelPad over the middle stud
and between the white lines (Fig. c).
(iii)
Now remove the covers from the
patterned side
of the two
smaller GelPads.
(iv)
Place the
patterned side
of the smaller GelPads firmly onto the belt, either side of
the large GelPad .
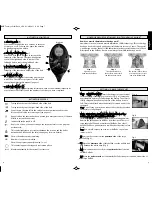
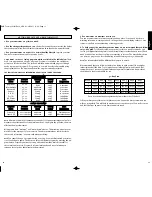
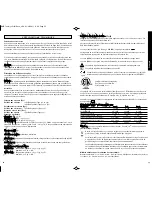
1. On/Off Button ( )
Press and hold this button for 2 seconds to turn your
ACTIVATOR
on or off. You may also pause the exercise
by briefly pressing this button.
2. Increase Toning Intensity ( )
Press and hold these buttons to increase the
intensity of the exercise. The right-hand button
controls the right-hand side of your belt. The
left-hand button controls the left-hand side.
3. Decrease Toning Intensity ( )
Press and hold these buttons to decrease the
intensity of the exercise on either side of the belt.
4. Program Button ( P )
Press this button to select the toning program you
wish to use. There are 10 programs in total, which
are explained later in this manual (page 10).
5. Information Button ( i )
Press this button to see your training information, such as the maximum intensity for
your current or last session and the number of sessions you have completed.
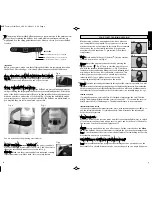
Toning intensity from the left-hand side of the belt.
Toning intensity from the right-hand side of the belt.
Counts down the time left in the current session in minutes and seconds.
Also used to display error messages (see page 12).
Appears when the exercise has been paused (you must press the on/off button
briefly to restart the exercise).
Indicates that the sound is off.
Keylock is active - you cannot change the intensity levels or the program
accidentally.
This symbol indicates a poor contact between the
ACTIVATOR
and the belt or
between the GelP ads and the skin (see page 15 for more details).
Shows the battery power remaining.
Number of sessions completed.
Shows the program currently running (1 - 10).
This symbol appears during each contraction phase.
Maximum intensity for the current/ last session.
setting up bmr tummy lift
Fig. a
Fig. c
Fig. b
6
7
1.
2.
3.
5.
4.
display
activator controls
activator display
English
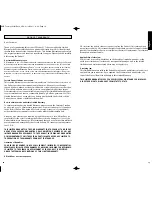
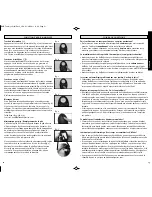
Step 1
Signals are sent
between the GelPads
Step 2
The signals switch on
the nerves which control
the abdominal muscles.
Step 3
The nerves, in turn, cause
your muscles to contract
and relax rhythmically.
how does muscle stimulation technology work?
How does muscle stimulation technology work?
BMR TUMMY LIFT
uses electronic muscle stimulation (EMS) technology. This technology
has been used in hospitals and by physical therapists for over 50 years. The special
3-pad design ensures that all of the abdominal muscles contract and not only those
directly under the GelPads. Here is a summary of how EMS technology works.
BMR Tummy Lift IM Rev 2_USA 21/03/2011 11:02 Page 7