215
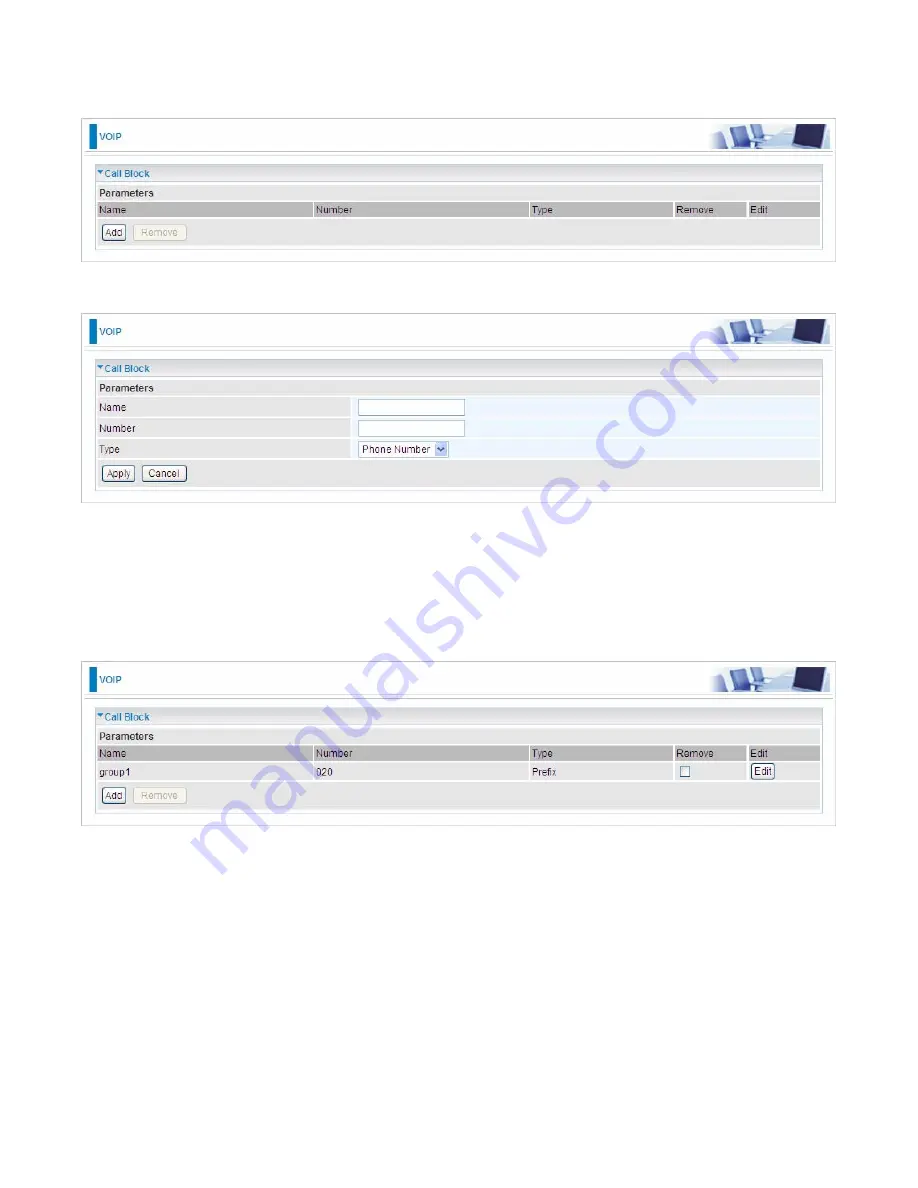
Call Block
Call block is for user to pre-set the unfavorable call numbers that user does not want to come in,
resembling the call blacklist.
Click
Add
to add the unfavorable call numbers to the list.
Name:
The identification for the call number(s).
Number:
Type the number, depending on the selected “Type” below. If “Phone Number” is selected,
please input the complete phone number; while if “Prefix” is selected, please input the prefix number
featuring a group of unfavorable call numbers.
Type:
Phone Number and Prefix.
Click
Apply
to save the call blacklist.
(Incoming calls with the prefix ‘020’ will all be abandoned.)
Содержание BiPAC 8700VAX(L)-1600
Страница 17: ...12 The Rear Ports 5 1 2 3 4 7 9 8 10 6 ...
Страница 22: ...17 3G 4G LTE mode Failover fallback mode ...
Страница 37: ...32 8 In the above page click finish to complete the EZSO settings ...
Страница 40: ...35 8 In the above page click finish to complete the EZSO settings ...
Страница 43: ...38 8 In the above page click finish to complete the EZSO settings ...
Страница 106: ...101 Configure AP as Enrollee Add Registrar with PIN Method 1 Set AP to Unconfigured Mode ...
Страница 113: ...108 III Advanced wireless configuration for Router A Channel 1 Bandwidth 20MHz 40MHz OBSS Coexistence Disable ...
Страница 121: ...116 III Advanced wireless configuration for Router A Channel 1 Bandwidth 20MHz 40MHz OBSS Coexistence Disable ...
Страница 126: ...121 Router C setup Refer to Router B setup ...
Страница 169: ...164 Accessing mechanism of Storage In your computer Click Start Run enter 192 168 1 254 ...
Страница 171: ...166 Access the folder public ...
Страница 174: ...169 Step 2 Click Add a Printer Step 3 Click Add a network wireless or Bluetooth printer ...
Страница 177: ...172 Step 8 Click Next and you are done You will now be able to see your printer on the Devices and Printers Page ...
Страница 185: ...180 How to disable set rule Rule inactive ...
Страница 233: ...228 ...
Страница 236: ...231 ...
Страница 245: ...240 2 Click Connect to a workplace and press Next 3 Select Use my Internet connection VPN and press Next ...
Страница 246: ...241 4 Input Internet address and Destination name for this connection and press Next ...
Страница 247: ...242 5 Input the account user name and password and press Create ...
Страница 248: ...243 6 Connect to the server ...
Страница 250: ...245 ...
Страница 261: ...256 2 Click Connect to a workplace and press Next 3 Select Use my Internet connection VPN and press Next ...
Страница 262: ...257 4 Input Internet address and Destination name for this connection and press Next ...
Страница 263: ...258 5 Input the account user name and password and press Create ...
Страница 266: ...261 9 Go to Network connections enter username and password to connect L2TP_IPSec and check the connection status ...
Страница 267: ...262 ...
Страница 276: ...271 3 Set the OpenVPN client s E mail address to receive trusted CA from server to establish a trusted OpenVPN tunnel ...
Страница 284: ...279 In listing table you can remove the one you don t want by checking the checking box and press Remove button ...
Страница 288: ...283 Primary IPv6 DNS Server Secondary IPv6 DNS Server Type the specific primary and secondary IPv6 DNS Server address ...
Страница 291: ...286 2 ipoe_eth4 with DDNS www hometest1 com using username password test test ...
Страница 300: ...295 in the system tray Step 6 Double click on the icon to display your current Internet connection status ...
Страница 302: ...297 Click Import Certificate button to import your certificate Enter the certificate name and insert the certificate ...
Страница 303: ...298 Click Apply to confirm your settings ...
Страница 310: ...305 HTTP Port The device equips user to change the embedded web server accessing port Default is 80 ...
Страница 312: ...307 Mobile Network User can press Scan to discover available 3G 4G LTE mobile network ...
Страница 318: ...313 Example Ping www google com ...
Страница 319: ...314 Example trace www google com ...


