


230
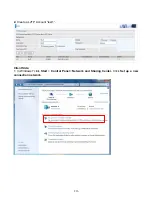
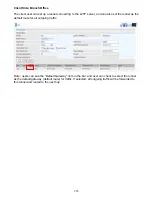
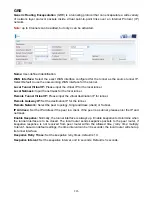
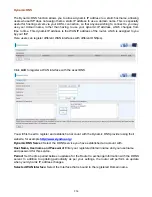
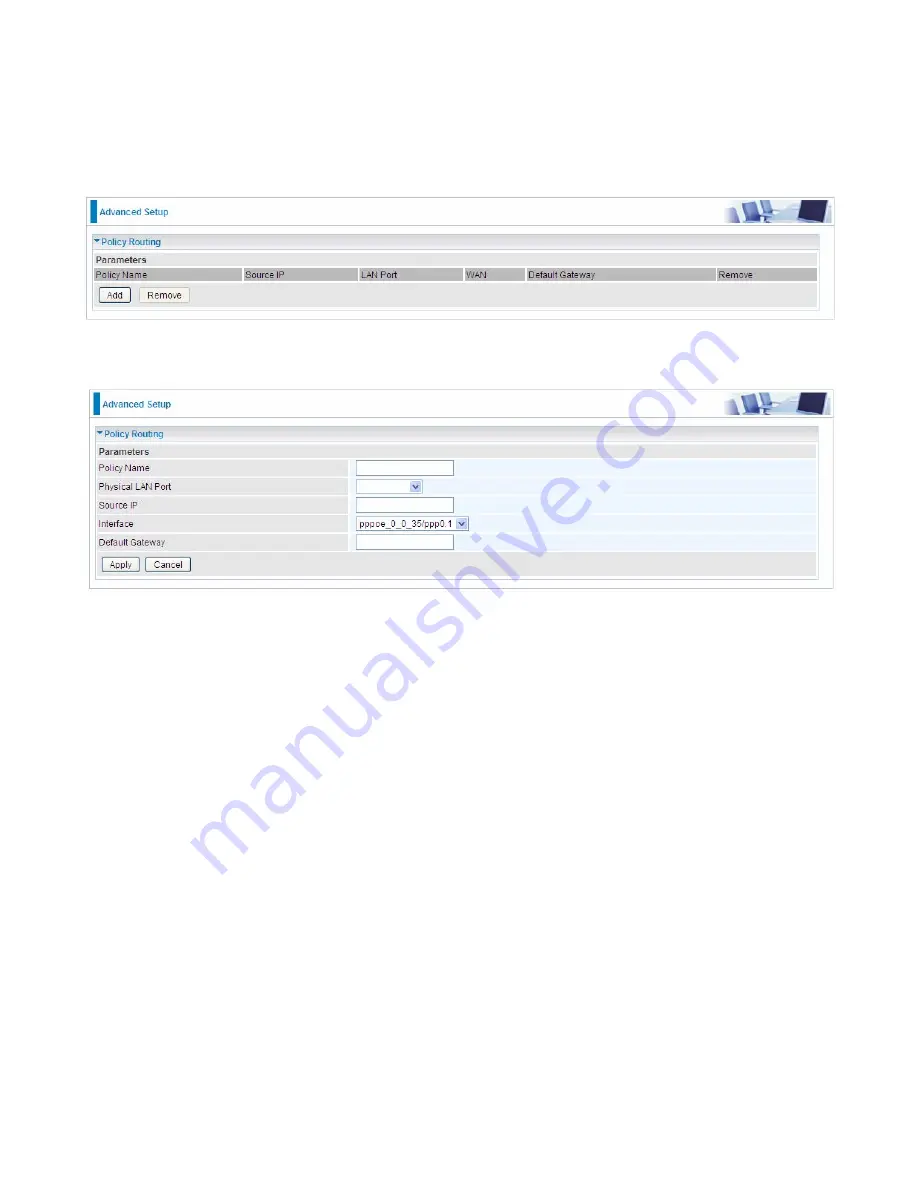
Policy Routing
Here users can set a route for the host (source IP) in a LAN interface to access outside through a
specified Default Gateway or a WAN interface.
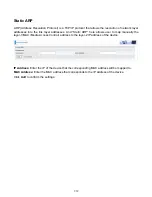
The following is the policy Routing listing table.
Click
Add
to create a policy route.
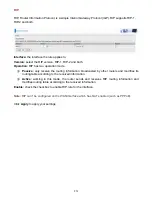
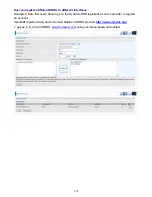
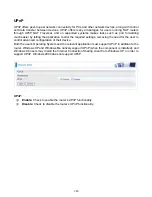
Policy Name:
User-defined name.
Physical LAN Port:
Select the LAN port.
Source IP:
Enter the Host Source IP.
Interface:
Select the WAN interface which you want the Source IP to access outside through.
Default Gateway:
Enter the default gateway which you want the Source IP to access outside
through.
Click
Apply
to apply your settings. And the item will be listed in the policy Routing listing table. Here
if you want to remove the route, check the remove checkbox and press
Remove
to delete it.
Содержание BiPAC 6900AX(L)-2400
Страница 20: ...15 3G LTE Router mode ...
Страница 66: ...61 7 Success ...
Страница 94: ...89 Configure AP as Enrollee Add Registrar with PIN Method 1 Set AP to Unconfigured Mode ...
Страница 144: ...139 Accessing mechanism of Storage In your computer Click Start Run enter 192 168 1 254 ...
Страница 146: ...141 Access the folder public ...
Страница 149: ...144 Step 2 Click Add a Printer Step 3 Click Add a network wireless or Bluetooth printer ...
Страница 152: ...147 Step 8 Click Next and you are done You will now be able to see your printer on the Devices and Printers Page ...
Страница 154: ...149 Take Windows media player in Windows 7 accessing the DLNA server for example for usage of DLNA ...
Страница 160: ...155 Rule inactive ...
Страница 196: ...191 ...
Страница 199: ...194 ...
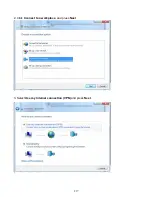
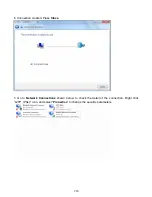
Страница 207: ...202 2 Click Connect to a workplace and press Next 3 Select Use my Internet connection VPN and press Next ...
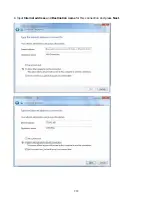
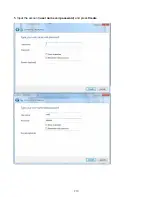
Страница 208: ...203 4 Input Internet address and Destination name for this connection and press Next ...
Страница 209: ...204 5 Input the account user name and password and press Create ...
Страница 210: ...205 6 Connect to the server ...
Страница 212: ...207 ...
Страница 222: ...217 2 Click Connect to a workplace and press Next 3 Select Use my Internet connection VPN and press Next ...
Страница 223: ...218 4 Input Internet address and Destination name for this connection and press Next ...
Страница 224: ...219 5 Input the account user name and password and press Create ...
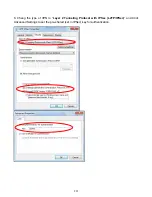
Страница 227: ...222 9 Go to Network connections enter username and password to connect L2TP_IPSec and check the connection status ...
Страница 241: ...236 2 ipoe_eth0 with DDNS www hometest1 com using username password test test ...
Страница 250: ...245 in the system tray Step 6 Double click on the icon to display your current Internet connection status ...
Страница 252: ...247 Click Import Certificate button to import your certificate Enter the certificate name and insert the certificate ...
Страница 253: ...248 Click Apply to confirm your settings ...
Страница 259: ...254 Http Port The device equips user to change the embedded web server accessing port Default is 80 ...
Страница 261: ...256 Mobile Network User can press Scan to discover available 3G LTE mobile network ...
Страница 267: ...262 Example Ping www google com ...
Страница 268: ...263 Example trace www google com ...


