background image

INSTALLATION MANUAL

ENGLISH

 -   Opening torque (

Op.Torque

) [ 50% ] 

  Set the numerical value of the motor’s opening torque in the range 1% to 99%.

-   Closing torque (

Cls.Torque

) [ 50% ]  

  Set the numerical value of the motor’s closing torque in the range 1% to 99%.

NOTE: In case of obstacle detection, the Ampere-stop function halts the 

leaf movement, reverses the motion for 1 sec. and stays in the STOP state.

WARNING: Check that the force of impact measured at the points 

provided for by standard EN 12445 is lower than the value laid down 

by standard EN 12453.

Setting sensitivity incorrectly can result in damage to property and injury 

to people and animals.

-  Partial opening (

part.open

) [ 1.0 m ]  

  Set the numerical value of partial opening in the range 10 cm (0.001) to 6 m 

(006.0)

-  Zone (

Zone

) [ 0 ] 

  Set the zone number between a minimum value of 0 and a maximum value 

of 127. See section 11 entitled “Serial connection”.

-  Running speed during opening (

op speed

) [99%] 

  Sets the maximum opening speed reached by the actuator at running speed. 

   The value is given as a percentage of the maximum speed the actuator can 

reach.

- Running speed during closing (

cl speed

) [99%] 

  Sets the maximum closing speed reached by the actuator at running speed. 

  The value is given as a percentage of the maximum speed the actuator can 

reach.

-  Slow-down distance (

dist.sloud

) [007] 

  Sets the slow-down distance travelled by the actuator during opening and 

closing. 

   The value is given in centimetres.

Editing one of the following parameters:

-  Running speed during opening

-  Running speed during closing

-  Slow-down distance

results in the actuator performing a complete opening/closing cycle with the 

anti-crush  feature  switched  off.  The “SET”  message  flashes  on  the  display  to 

warn that this cycle is in progress.

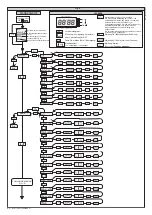
8.3) LOGIC MENU (

LOGIC

)

- Automatic Closing Time (

TCA

) [ OFF ]

ON:  Switches automatic closing on

OFF:  Switches automatic closing off

- 3 Step (3 Step) [OFF]

ON:  Switches to 3-step logic.    


A start pulse has the following effects:


door closed:...........................................................................................................opens


during opening:..............................stops and switches on TCA (if configured)


door open:..............................................................................................................closes


during closing:.....................................................stops and movement is reversed


after  stop: ................................................................................................................opens

OFF:  Switches off 3-step logic.

-  Block opening pulses (

ibl open

) [ OFF ]

ON:   The start pulse has no effect during opening.

OFF:  The start pulse has effect during opening. 

 Pre-alarm (

pre-alarm

) [ OFF ]

ON:  The flashing light comes on approx. 3 seconds before the motor starts.

OFF:  The flashing light comes on at the same time as the motors start.

-  Photocells during opening (

Photoc.open

) [ OFF ]

ON:  when beam is broken, operation of the photocell is switched off during 

opening. During closing, movement is reversed immediately.

OFF:  when beam is broken, photocells are active during both opening and 

closing. When beam is broken during closing, movement is reversed only 

once the photocell is cleared.

-  Photocell test (

test phot

) [ OFF ]

ON:  Switches photocell testing on (see fig. 17A)

OFF:  Switches photocell testing off

-  Gate open light or 2nd radio channel (

SCA 2Ch

) [ ON ]

ON:  The output between terminals 14-15 is set as Gate open light: in this case, 

the 2nd radio channel controls partial opening.

OFF:  The output between terminals 14-15 is set as 2nd radio channel.

-  Fixed Code (

fixed code

) [ OFF ]

ON:  Receiver is configured for operation in fixed-code mode, see “Radio 

transmitter cloning” section.

OFF:  Receiver is configured for operation in rolling-code mode, see “Radio 

transmitter cloning” section.

-  Remote control programming  (

radio prog

) [ ON ]

ON:  Enables wireless memorizing of transmitters (Fig.20):


1- Press in sequence the hidden key (P1) and normal key (T1-T2-T3-T4) of 

a transmitter that has already been memorized in standard mode via the 

radio menu. 


2- Press within 10 sec. the hidden key (P1) and normal key (T1-T2-T3-T4) 

of a transmitter to be memorized. 


The receiver exits programming mode after 10 sec.: you can use this time 

to enter other new transmitters. 


This mode does not require access to the control panel.

OFF:  Disables wireless memorizing of transmitters. Transmitters are memo-

rized only using the relevant Radio menu.

- START - OPEN setting  (

start-open

) [ OFF ]

ON:  Input between terminals 3-4 works as OPEN.

OFF:  Input between terminals 3-4 works as START.

- PED-CLOSE setting  (

ped-close

) [ OFF ]

ON:  Input between terminals 16-17 works as CLOSE.

OFF:  Input between terminals 16-17 works as PARTIAL OPENING.

- Master/Slave (

master

) [ OFF ]

ON:  Control panel is set up as the Master unit in a centralized connection system. 

OFF:  Control panel is set up as a Slave unit in a centralized connection system.

8.4) RADIO MENU (

RADIO

)

-  Add


Used to add a key on a remote control to the receiver’s memory.  

  Once memorized, it returns the number of the receiver in the memory loca-

tion (from 01 to 64).

- Add Start Key (

Add start

)


associates the desired key with the Start command 

- Add 2ch Key (

Add 2ch

)


associates the desired key with the 2nd radio channel command

- Read (

Read

  Checks a key of a receiver and, if memorized, returns the number of the re-

ceiver in the memory location (from 01 to 64) and number of the key (T1-T2-

T3 or T4).

- Erase List  (

erase 64

)

WARNING! Erases all memorized remote controls from the receiver’s 

memory.

- Read receiver code (

cod RX

) 


Displays the code entered in the receiver.

- W LINK (

uk

)


ON = 

  Enables remote programming of cards via a previously memorized W LINK 

remote control. It remains enabled for 3 minutes from the time the W LINK 

remote control is last pressed.


Refer to the W LINK remote control’s manual for the mapping of the relevant keys.


OFF = 


W LINK programming disabled.

Consult sections 8/9/10/11 for further information on the built-in Clonix 

receiver’s advanced features.

8.5) LANGUAGE MENU (

LANGUAGE

)

Used to set the programmer’s language on the display.

There are 5 language options:

-   ITALIAN (

ITA

)

-   FRENCH (

FRA

)

-   GERMAN (

DEU

)

-   ENGLISH (

ENG

)

-   SPANISH (

ESP

)

8.6) DEFAULT MENU (

DEFAULT

)

Restores the controller’s default factory settings. Following this reset, you will 

need to run the autoset function again.

8.7) DIAGNOSTICS AND MONITORING

The display on the VENERE D panel gives a certain amount of useful information 

both during normal operation and when faults are detected.

Diagnostics:

In the event of malfunctions, the display gives a message showing which device 

needs checking:

STRT 

= START input activated

STOP 

= STOP input activated

PHOT 

= PHOT input activated

SWO 

= OPENING LIMIT SWITCH input activated

SWC 

= CLOSING LIMIT SWITCH input activated

PED 

= PEDESTRIAN input activated

OPEN 

= OPEN input activated

CLS 

= CLOSE input activated

In the event the door encounters an obstacle, the VENERE D panel stops the door 

and commands it to reverse, while on the display the “AMP” message appears

Monitoring:

During opening and closing, the display shows four numbers separated by a 

decimal point, e.g. 

35.40

. The numbers are updated constantly during the door’s 

operation and stand for the instantaneous torque reached by motor 1 (

35

) and 

torque threshold (opening, closing, slow-down) set in the parameters menu (

40

). 

Via these values, we can correct the torque setting.  

If the value of the instantaneous torque reached during the door’s operation gets 

rather close to the threshold value set in the parameters menu, malfunctioning 

may occur in the future due to wear or the door becoming slightly misshapen. 

Consequently, it is advisable to check the maximum torque reached during a 

number of cycles at the installation stage and, where necessary, set a value ap-

prox. 5/10 percentage points higher in the parameters menu.

8.8) ERROR DIAGNOSTICS:

ER01 

Error in safety device (photocell) test

ER10 

Problems detected in motor’s control circuit

ER11 

Problems detected in motor’s current reading circuit

8.9) AUTOSET MENU

  Move the door to the closed position

•  Launch an autoset operation by going to the relevant menu on the VENERE 

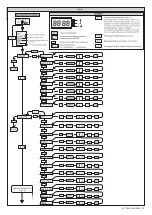
D panel (Fig.B).

•  As soon as you press the OK button, the “........ ....” message is displayed and the 

control unit commands the door to perform a full cycle (opening followed 

by closing), during which the minimum torque value required for the door 

to move is set automatically. 


During this stage, it is important to avoid breaking the photocells’ beams and 

not to use the START and STOP commands or the display. 

  Once this operation is complete, the control unit will have automatically set 

the optimum torque values. Check them and, where necessary, edit them as 

described in the programming section.

WARNING: Check that the force of impact measured at the points  

provided for by standard EN 12445 is lower than the value laid down 

by standard EN 12453.

Warning!! While the autoset function is running, the obstacle detection 

function is not active. Consequently, the installer must

BOTTICELLI VENERE D - 

17

D811493 00100_02

Содержание Botticelli VENERE D

Страница 1: ...CULANTES ET SECTIONALES GARAGENTORANTRIEB F R SCHWING UND SEKTIONALTORE AUTOMATIZACIONES PARA PUERTAS BASCULANTE Y SECCIONALES AUTOMATISERINGEN VOOR KANTEL EN SECTIEDEUREN Attenzione Leggere attentame...

Страница 2: ...se non stato sbloccato ilsistemadi blocco interno tirando con l apposita cordina collegata al carrello fig 1 oppure attivato lo sblocco esterno SM1 o SET S fig 2 fig 3 Non modificare i componenti dell...

Страница 3: ...hildren s reach in order to avoid any unintentional automation activation Do not intentionally oppose the leaf movement Do not attempt to open the door manually if the internal locking system has not...

Страница 4: ...s actionnements involontaires de la motori sation Ne pas contraster volontairement le mouvement de la porte Ne pas chercher ouvrir manuellement la porte si le syst me de blocage interne n a pas t d bl...

Страница 5: ...chtungen in Reich weite von Kindern liegen lassen Sie k nnten die Anlage ungewollt in Gang setzen Setzen Sie der Fl gelbewegung nicht willentlich Kraft entgegen Versuchen Sie nicht die T r von Hand zu...

Страница 6: ...ento involuntario del automatismo No contrastar voluntariamente el movimiento de la puerta No intentar abrir manualmente la puerta si antes no se ha desbloqueado el sistema de bloqueo interior tirando...

Страница 7: ...blokkeringssysteem niet gedeblokkeerd werd door te trekken aan het desbetreffend touwtje verbon den met het wagentje fig 1 of indien de externe deblokkering geactiveerd is SM1 of SET S fig 2 fig 3 De...

Страница 8: ...fisso in posizione tale da non causare pericoli e lontanodapartimobili Inparticolareicomandiauomopresentedevonoessere posizionati in vista diretta della parte guidata e a meno che non siano a chiave...

Страница 9: ...il motore se pi piccola necessario accorciare il piatto di trascinamento 12 Applicare gli adesivi forniti in prossimit dei punti pericolosi Fig 5 5 REGOLAZIONETENDICATENA BOTTICELLI L automazione vie...

Страница 10: ...isimpegno della fotocellula Test fotocellule test phot OFF ON Attiva la verifica delle fotocellule vedi fig 17A OFF Disattiva la verifica delle fotocellule Spia cancello aperto o II canale radio SCA 2...

Страница 11: ...are un trasmettitore significa generare un trasmettitore in grado di inserirsi automaticamente nella lista dei trasmettitori memorizzati nel ricevitore aggiun gendosi o sostituendo un particolare tras...

Страница 12: ...li utilizzatori dell automazione devono essere istruiti al comando e all uso 15 ACCESSORI SM1 Sblocco esterno da applicare alla cremonese esistente della porta bascu lante fig 22 SET S Sblocco esterno...

Страница 13: ...VENERE D OK 8888 ap parz zone vel ap vel ch spazio rall start open ped close master BOTTICELLI VENERE D 13 D811493 00100_02...

Страница 14: ...o vk 14 BOTTICELLI VENERE D D811493 00100_02...

Страница 15: ...l and mechanical parts must be suitably protected Install any fixed controls in a position where they will not cause a hazard away from moving parts More specifically hold to run controls must be posi...

Страница 16: ...ll Fr Receiver photocells T 1 2 4 channel transmitter Arrange for the connections of accessories and safety and control devices to reach the motor unit keeping the mains voltage connections clearly se...

Страница 17: ...en terminals 16 17 works as CLOSE OFF Input between terminals 16 17 works as PARTIAL OPENING Master Slave master OFF ON Control panel is set up as the Master unit in a centralized connection system OF...

Страница 18: ...is required to subsequently clone the radio transmitters 9 4 CLONING RADIO TRANSMITTERS Cloning with rolling code Cloning with fixed code Refer to the UNIRADIO instructions and CLONIX programming guid...

Страница 19: ...Wait message enter value or function Simultaneously press the and keys Simultaneous pressure of the and keys allows you to exit the active menu and return to the preceding menu if this takes place at...

Страница 20: ...P1 on radio control device ADD start hidden button release desired button 01 PRG READ OK OK OK ERASE 64 Press P1 pushbutton on radio control device Press the required T key on radio control device se...

Страница 21: ...du d verrouillage manuel de l automatisation S assurer que soient vit s pendant la man uvre les risques m caniques et en particulier l crasement l entra nement et le cisaillement par la partie guid e...

Страница 22: ...ssoires desdispositifsdes curit et de commande au groupe moteur en tenant nettement s par es les connexions tension de r seau des connexions tr s basse tension de s curit 24V en utilisant le passe c b...

Страница 23: ...fonctionne comme CLOSE OFF L entr e entre les deux bornes 16 et 17 fonctionne comme APERTURA PRAZIALE Master Slave master OFF ON Le tableau de commande est configur comme Master Ma tre dans une connex...

Страница 24: ...code fixe Consultez les instructions UNIRADIO et le Guide de programmation CLONIX 9 5 PROGRAMMATON AVANC E COMMUNAUT DE R CEPTEURS Consultez les instructions UNIRADIO et le Guide de programmation CLON...

Страница 25: ...RG Message Attente introduire la valeur ou la fonction Appuyer simultan ment sur les touches et L appui simultan sur les touches et permet de sortir du menu et de retourner au menu pr c dent si cela a...

Страница 26: ...de la commande radio adjouter start touche cachee relacher touche desiree 01 PRG lire OK OK OK effacer 64 Appuyer sur P1 de la commande radio Appuyer sur T d sir de la commande radio voir Fig B2 Rel...

Страница 27: ...ein Schild Achtung an der Struktur Bringen Sie einen Aufkleber der die Funktionsweise der manuellen Entsperrung der Automatisierung angibt in der N he des Man verorgans an StellenSiesicher dassw hrend...

Страница 28: ...oraggregat ankommenden Anschl sse der Zubeh rteile der Sicherheits und Steuervorrichtungen mit Hilfe geeigneter Kabelf hrungen so an da die Netzspannungsanschl sse und die Anschl sse mit sehr niedrige...

Страница 29: ...e wird in einer zentralisierten Steuerung als Master eingestellt 8 4 MEN RADIO RADIO Hinzuf gen Gestattet das Hinzuf gen einer Taste einer Fernbedienung im Speicher des Empf ngers nach der Abspeicheru...

Страница 30: ...CLONIX Bezug 9 5 ERWEITERTE PROGRAMMIERUNG EMPF NGERGRUPPEN Bitte nehmen Sie auf die Anweisungen UNIRADIO und die Programmierunsan leitung CLONIX Bezug 9 6 FERN PROGRAMMIERUNG DER SENDER Abb 20 1 Dr...

Страница 31: ...gano de maniobra Asegurarse de que durante la maniobra se eviten y se proteja de los riesgos mec nicos y en particular el impacto el aplastamiento arrastre corte entre la parte guiada y las partes fij...

Страница 32: ...ingeben Gleichzeitig die Tasten und dr cken Die gleichzeitige Bet tigung der Tasten und gestattet das Verlassen des Men s mit dem man gerade arbeitet und die R ckkehr zum voranggehenden Men Werden die...

Страница 33: ...uerung loslassen zufueg start verst taste loslassen 01 PRG lesen COD RX OK 1A9C OK 22FD OK 01 OK OK OK OK Loeschen 64 01 t1 gevUe TASTE Auf Fernsteuerung P1 dr cken Gew nschtes T auf Fernsteuerung dr...

Страница 34: ...grupo motor manteniendo claramente separadas las conexiones con tensi n de red de las conexiones de baj sima ten si n de seguridad 24 V utilizando el pasa cables expresamente asignado fig 8 ref 5P1 S...

Страница 35: ...radiomando en la memoria del receptor Despu s de la memorizaci n la pantalla visualiza la posici n de la memoria ha sido memorizado el radiomando de 01 a 64 A adir Tecla start Anad start asocia la tec...

Страница 36: ...X 9 6 PROGRAMACI N DE LOS TRANSMISORES A DISTANCIA Fig 20 1 Pulsar en secuencia la tecla oculta P1 de un transmisor ya memorizado en modo est ndar a trav s de la programaci n manual 2 Pulsarlateclanor...

Страница 37: ...PRG Mensaje Espera introducir valor o funci n Presione simult neamente las teclas y La presi n simult nea de las teclas y permite salir del men en el que se est operando y volver al anterior si se pr...

Страница 38: ...g B2 Suelte P1 del radiomando ANADIR TECLA ESCONDIDA SUELTE TECLA DESEADA 01 PRG LEER OK OK OK CANCELAR 64 cod rx OK OK 01 t1 Presione P1 del radiomando Presione T deseada del radiomando v ase la Fig...

Страница 39: ...gen Zorg ervoor dat tijdens de manoeuvre de mechanische risico s vermeden en bevei ligd worden en dan met name de botsing de pletting het meeslepen het snijden tussen geleide deel en omliggende delen...

Страница 40: ...2 4 kanalen De aankomst van de verbindingen van de accessoires van de veiligheids en bedieningsinrichtingen naar de motorgroep voorinstellen en hierbij de verbin dingen naar de netspanning goed gesche...

Страница 41: ...Het bedieningsbord wordt ingesteld als Slave in een gecentraliseerde verbinding 8 4 RADIO MENU RADIO Voeg bij Staat toe een toets van een afstandsbediening bij te voegen in het geheu gen van de ontvan...

Страница 42: ...radiotransmitters te kunnen uitvoeren 9 4 KLONERING VAN DE RADIOTRANSMITTERS Klonering met rolling code Klonering met vaste code Beroep doen op de instructies UNIRADIO en op de Gids programmering CLON...

Страница 43: ...de of functie PRG Melding Wachttijd waarde of functie invoeren Gelijktijdig drukken op de toetsen en De gelijktijdige druk van de toetsen en staat toe het menu te verlaten waarin men aan het werken is...

Страница 44: ...ning Drukken op gewenste T van de afstandsbediening zie Fig B2 Drukken op gewenste T van de afstandsbediening zie Fig B2 Drukken op gewenste T van de afstandsbediening zie Fig B2 P1 van de afstandsbed...

Страница 45: ...146 253 16 65 378 35 3380 2780 3760 3160 1 2 250 E14 24V 25W max BOTTICELLI VENERE D 45 D811493 00100_02...

Страница 46: ...template scale 1 1 Gabarit de coupage chelle 1 1 Schneidschablone Ma stab 1 1 Plantilla para corte escala 1 1 Kaliber voor snijden schaal 1 1 88 3 5 C1 P1 A 4 C C D D B A D Tassello Plug Cheville D b...

Страница 47: ...erung Befestigung Configuraci n de fijaci n Configuratie van bevestiging 1 DFBBFD 2 DCFFCD 3 DCGGCD 4 FBBF 5 EAAE 6 EBBE 7 GBBG 2 4 3 1 300 mm Fig 14A E C B Tassello Plug Cheville D bel Taco Plug D A...

Страница 48: ...Eventuele doorgangen voor kabels DIP TEST PHOT ON DIP TEST PHOT ON Fig 15 M Fr Ft T 17 24VSafe MAX 180mA SCA 2CH NO 24V MAX 180mA 3 1 2 4 5 6 7 8 9 10 11 12 13 14 15 16 17 ANT SHIELD JP2 JP10 Luce di...

Страница 49: ...OSET COPPIA APERTURA CHIUSURA OPENING CLOSING TORQUE AUTOSETTING R GLAGE AUTOMATIQUE COUPLE OUVERTURE FERMETURE AUTOSET DREHMOMENT FFNUNG SCHLIESSUNG AJUSTE AUTOMATICO DEL PAR EN FASE DE APERTURA CIER...

Страница 50: ...s gememoriseerde afstandsbediening Radiocomando da memorizzare Radio transmitter to memorise Radiocommande m moriser Zu speichernde Funksteuerung Radiomando que memorizar Te memoriseren afstandsbedien...

Страница 51: ...BOTTICELLI VENERE D 51 D811493 00100_02...

Страница 52: ......

Отзывы: