15
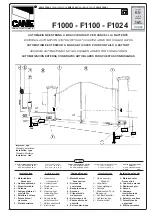
Keep the pitch of teeth between the two parts of the rack; the joining with another piece of rack would make
it easier to achieve (see Fig.8)
Secure the rack with the screws V making sure, once the actuator has been installed, that between rack and
the drive gear there is always approx. 1mm clearance (see Fig.9); to get this clearance use the slots on the rack.
5. Limit stop flask positioning (see Fig.10)
Open manually the gate and leave approximately of 1÷3cm, depending on gate weight, between gate and
positive mechanical stop A; tighten the limit stop flask S with the grains G to press the limit stop micro. Repeat
the sequence with closing gate.
6. Manual operation (see Fig.11)
In the event of power failure or malfunction, to manually operate the gate proceed as follows:
- After inserting the customized key C, turn it anti-clockwise and pull the lever L.
- The geared motor is unlocked and the gate can be moved by hand.
- To return to the normal operating mode, close the lever L again and manually activate the gate until it is
geared.
7. Wire diagram
For the wire connections of the system and to adjust the operating modes, please refer to the Instruction
Manual of the control unit.
In particular, the anti-crash device (encoder) should be adjusted according to regulations in force.
Please remember that the device
should be earthed
by means of the appropriate terminal.
The civil liability policy, which covers possible injuries to people or accidents caused by defects in construc-
tion, requires the system to be to existing standard and to use original Benincà accessories.
Intelligent Security & Fire Ltd.


