background image

96

>>>

NAVIGATION MODE

> D

> GB

> F

> I

> E

> PL

> CZ

> H

> RU

• Use 

Start guidance

 to start guidance 

for the selected stage.

• Define the expected loading time using 

Set loading time

.

Skipping destination 

If a planned route with several destina-
tions is active, you may delete the current
destination of the route. Route guidance
to the next destination is then started.
This may be necessary if a destination was
not driven to directly. The Navigation de-
vice otherwise tries to guide you to the
current destination.

>

Call up the options menu for the map
display.

>

Press the 

Next destination

 button.

Route guidance to the next destination is
started.

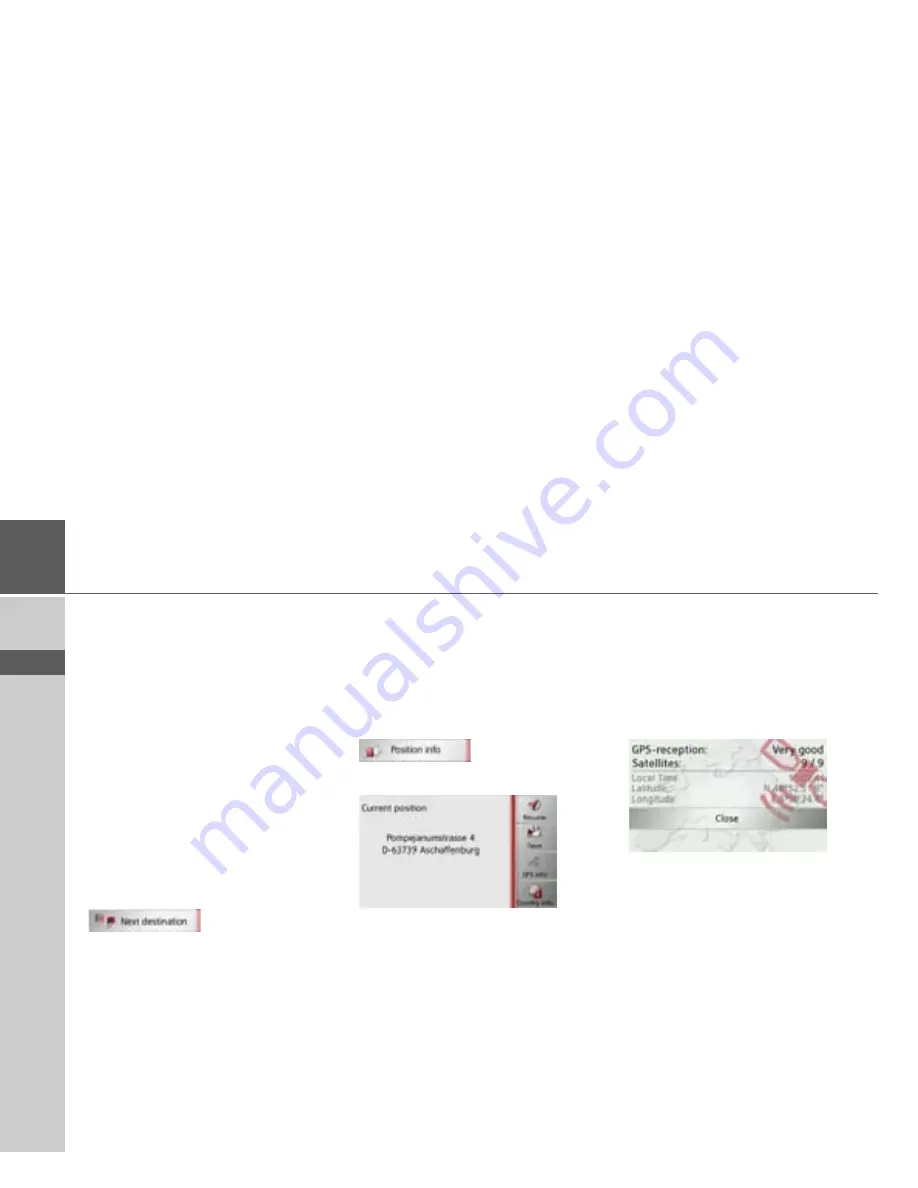
Displaying current position

You can display your current position and
store this position. You can also display
information concerning the current GPS
reception and the current country.

>

Open the options menu for the map
display.

>

Press the 

Position info

 button.

The current position is displayed. If possi-
ble, an address is displayed. If no address
is available for the current position, the
geographic coordinates are displayed.
You can return to the map using the

Resume

 button.

By pressing 

Save

 you can store your cur-

rent position in the fast access list.

By pressing the 

Country info

 button you

can display country-specific information
such as the maximum permitted speed for
the country you are currently in.

By pressing 

GPS info

 you can view infor-

mation regarding the GPS reception.

You can see how many satellites are being
received, and whether the satellite recep-
tion is good enough for navigation. The
current time and the geographic position
are also displayed.

Содержание Active 43 Series

Страница 1: ...OPERATING GUIDE ...

Страница 2: ...tion 17 Start up 17 Power supply 17 Using the battery 18 Connection for the cigarette lighter 18 Connection to the mains outlet 19 Connecting power supply 19 TMC antenna depending on the model 19 GPS antenna 19 Unit antenna 19 Connecting up external antenna 20 Cable for vehicle integration depending on the model optional 20 Memory card 21 Inserting memory card 21 Ejecting memory card 21 Unit brack...

Страница 3: ...te guidance 45 Entering address by language selected models 49 Points of interest 51 Point of interest in the vicinity 51 Point of interest near to an address 52 Point of interest near to destination 53 Entering a point of interest directly 53 Calling special destination phone number depending on the model 54 Additional point of interest information 54 Travel Guide 54 Route planning 55 Creating a ...

Страница 4: ...number 100 Phonebook 101 Text messages SMS only selected models 103 Incoming text message 104 Number lists 104 Icons used 105 Scrolling in the number list 105 Dialing an available number 105 Displaying or editing entries 105 Lists loaded from cell phone 106 Connecting Bluetooth telephones 106 Calling up a device list 106 Automatic connection 107 Searching for cell phones 107 Connecting from device...

Страница 5: ...4 MODEL OVERVIEW AND TECHNICAL SPECIFICATIONS 137 NOTICE 138 EU Declaration of Conformity 138 Disposal of the unit 139 Disposal of the battery 140 Duty to supply information according to battery legislation BattV 140 Removing the battery 140 The information and data contained in these documents are subject to change without prior notice No part of these documents may be dupli cated or transmitted ...

Страница 6: ...ollow the details given or not We accept no liability for the navigational system issuing incorrect details As a result of traffic routing changes and deviating data inaccurate or incorrect instructions may be given Drivers should always pay attention to the actual road signs and traffic control In particular the navigational system cannot be used as a means of orientation in cases of poor visibil...

Страница 7: ...ification to the unit is also impermissible and renders the type approval invalid Use only genuine BECKER original accessories This will ensure that all the relevant regulations are complied with and damage to health and property is avoided Dispose of defective units and the rechargeable battery according to the applicable legal requirements No warranty is granted in the case of improper use These...

Страница 8: ...unit and the accessories are to be protected against moisture and dirt Navigation Thanks to GPS Global Positioning Sys tem you no longer need to spend hours searching through road atlases Once outside buildings the receiver an tenna integrated in the unit gives you con tinuous access to navigational possibili ties Depending on reception you may not be able to use the navigational func tion inside ...

Страница 9: ...hone s address book or phonebook and received text messages read out UnpackingtheNavigationdevice Checking the delivery Before the Navigation device is started up the delivery should be checked to ensure that it is complete and in the correct condition see also page 13 Carefully unpack the content of the package and check it Delivery contents Navigation device Unit holder with carrier plate USB ca...

Страница 10: ...c device The basic unit contains all the electronics an integrated antenna a TMC receiver for receiving traffic messages depending on the model a touchscreen an integrated loudspeaker a microphone depending on the model On the side of the unit there are also various connections and ports You will find more details of the unit under See MODEL OVERVIEW AND TECHNICAL SPECIFICATIONS on page 137 Note T...

Страница 11: ... the vehicle using the unit bracket Accessories Mains power supply unit This power supply allows connection of the Navigation device to a mains outlet Requirements for power supply Alternating current 100 240 V 0 3 Amps 50 60 Hertz External GPSantenna forcertain modelsonly You can use an external antenna to im prove reception in vehicles where only limited GPS reception is available not in cluded ...

Страница 12: ...ing our software service we will then inform you of any new updates and other news You can register online on the Becker homepage www mybecker com The Software update menu item is located under SERVICE SUPPORT Repairs The unit must not be opened if damaged Please contact your local stockist Emissions and disposal Information on emissions electromagnet ic compatibility and disposal can be found in ...

Страница 13: ...LY Scope of supply 1 Basic device PND Personal Navigation Device 2 USB connection cable 3 Unit holder with carrier plate Design depending on the model 4 Cable for power supply via the vehicle cigarette lighter 12 24 Volt with integrated TMC antenna depending on the model 1 2 3 4 ...

Страница 14: ...ss Back function in most applications Press and hold Calls up the main menu 2 Touch screen showing the main menu selected 3 Touch screen key Press activates the corresponding key command 4 Microphone depending on the model Rear of unit 5 Connection available for external GPS antenna depending on the model external antenna not included 1 5 2 3 4 ...

Страница 15: ... RU Top of the unit 1 Switch on and Switch off standby Underside of the unit 2 Slot for Micro SD card 3 Mini USB connection connection for power supply 4 3 5 mm connection for headset depending on the model headset not included 5 On Off switch 1 2 3 4 5 ...

Страница 16: ...fe of electronic components in your unit damage the rechargeable batteries and cause certain plastics to warp or melt Do not store your mobile navigation system in cold environments During operation when the unit warms up to operating temperature moisture may form internally causing damage to elec tronic components Do not drop your mobile navigation system unit protect it from shocks and do not sh...

Страница 17: ...loured dots pixels may be visible on the display Some pixels may also appear brighter or darker However such in stances do not represent a product flaw Start up Once the Navigation device has been un packed and checked for damage the unit can be started up The individual start up stages are connect to power supply Switching on the unit Ensuring antenna reception if naviga tion is desired Power sup...

Страница 18: ...ng plate Insert the adapter into the cigarette lighter Note Note that if the battery is completely dis charged it may take up to a minute be fore the device can be switched on again Note In the event of a defective battery please contact your authorised dealer Please do not attempt to remove the battery your self Note If the cigarette lighter has recently been used and is still hot wait until the ...

Страница 19: ...garette lighter You can then use the supplied suction cup to attach the TMC antenna to the wind shield GPS antenna Unit antenna The GPS antenna is integrated into the housing Danger Ensure that you do not have wet hands and that the power supply unit is dry Only connect the power supply unit to a permissible mains power supply Note Remove the power supply unit when not using the Navigation device ...

Страница 20: ...tion depending on the model optional With the optional cable you can integrate your Navigation device seamlessly into your vehicle With this cable you can connect your Navigation device to the phone mute function of your audio sys tem If the cable is connected correctly your audio system will mute the car ra dio during navigation announcements connect your Navigation device to your audio system fo...

Страница 21: ...nderside of the unit The card slot is equipped with a spring actuated locking and ejector mechanism Inserting memory card Remove the memory card from its packaging without touching or soiling the contact bar Hold the memory card so that the con tact strip is facing towards the rear of the unit Guide the memory card into the card slot Exert a little pressure and slide the memory card into the card ...

Страница 22: ...o long periods of direct sunlight Temperatures inside the vehicle of 70 C and higher may damage parts of the bracket Note Fasten the unit holder such that your field of vision is not impaired when the Navigation device is installed and ensure that the unit is outside the deployment area of the airbag Ensure that the electrical connection ca ble does not hamper you from accessing the vehicle s cont...

Страница 23: ...using excessive force Move the carrier plate to the re quired position and hold it in this posi tion Tighten the fastening screws and sufficiently so that the Navigation device is held securely in place when the vehicle is in motion Attaching the Navigation device Position the Navigation device with the attachment point on the bottom of the housing onto the carrier plate Without using excessive fo...

Страница 24: ...irec tion of the relevant arrow Press the button for the required language The selection is confirmed by pressing OK Then select the desired voice A short example announcement is given Confirm your selection by pressing the OK button The following prompt appears shortly afterwards If you agree to the request contained in this prompt press the OK button Note for models with TTS Voices with a TTS ta...

Страница 25: ...e sounds Calibration If the touch screen starts responding im precisely and e g buttons have to be touched off centre in order to be actu ated calibration should be undertaken The calibration function is started from the Settings menu see also page 128 Note We recommend that you place the Navigation device in sleep mode in the event of short interruptions to operation of up to a week This signific...

Страница 26: ...ins further in formation and operating options You can tell whether a telephone is already connected by the symbol on the Phone button Telephone connected Telephone not connected A satellite symbol on the left hand side of the Select destination button indicates whether there is currently any GPS recep tion GPS reception No GPS reception If route guidance is already active the cur rent destination...

Страница 27: ...e key and the entry passed on to the Navigation de vice for processing When a navigation destination is entered the Navigation device compares the data with the stored data Only those letters that are still possible are available for selection Characters that cannot be selected are dis played greyed out Accepting proposals During entry the Navigation device makes proposals in the uppermost line Th...

Страница 28: ...OE and UE if necessary If for example you are looking for the location Würzburg then simply press WUERZBURG or WURZBURG Special characters can be useful when naming destinations and routes In order to switch to the special charac ters keyboard press the button marked with an arrow The special characters keyboard is dis played Enter the desired special character After you enter a character the Navi...

Страница 29: ...ess the button marked with an arrow Switching between upper and lower case During free text entry it is possible to switch between upper lower case and the automatic function Press repeatedly on the button in the top right hand corner of the display un til the desired method of entry is acti vated The inscription on the button symbolises the method of entry The button represents automat ic mode Th...

Страница 30: ...by pressing and holding the button Radio remote control You can control most functions and the main functions of the Navigation device using the remote control The remote control operates using radio frequency maximum range 5 metres and therefore does not need to be installed in sight of the Navigation device Attaching the remote control Take a coin and insert it into the slot in the base plate of...

Страница 31: ... position to install the remote control Position the base plate so that the word UP is pointing in the direction of travel Secure the base plate using the supplied screws or self adhesive film Press the remote control onto the base plate Hold the bottom part of the remote control and turn the remote control clockwise until it locks into place Centre console Armrest Note If you wish to stick the ba...

Страница 32: ...Navigation device is established Replacing the battery If the Navigation device stops responding to commands from the remote control the battery in the remote control is proba bly dead Remove the remote control as described above 2 3 1 1 Danger Keep the battery away from children Consult a doctor immediately if a child swallows a battery Batteries must not be dismantled short circuited or thrown i...

Страница 33: ...nu for the map dis play if the map is already active Starts the telephone mode The function is equivalent to pressing the Phone button in the main menu or the button in the options menu of the map display 1 3 2 5 4 6 1 2 Starts up the voice entry The function is equivalent to pressing the button e g in the input menu Press briefly Displays menu markings Selects and confirms menu entries Press and ...

Страница 34: ...ding on the model download current content from the In ternet and install it on the Navigation device To use the Content Manager you will need the USB cable provided as well as a computer that meets the following mini mum requirements Installing the Content Manager You can install the Content Manager on your computer with the following steps Connect the USB interface of the device directly to a US...

Страница 35: ...ick on Content Manager When the Content Manager is started the program executes a number of steps before you can start to manage your navigation software content Each time the program is called a connec tion is established to the Internet to check whether a new version of the Content Manager is available If a new software version is found the Content Manager gives you the option of installing it W...

Страница 36: ... be transferred via a card reader or a USB connection Faults Malfunctions in the operating system or in the unit are displayed accordingly If the function you want cannot then be ex ecuted you should restart the Navigation device using the On Off switch If the messages reappear or the unit does not function correctly for any other reason please contact your local stockist You can also try to find ...

Страница 37: ...ur height above sea level can be calculated if signals are received from four or more sat ellites The Navigation device determines the di rection and distance from the destination using a navigation computer and a digital street map held in its internal memory For safety reasons route guidance is given predominantly in spoken form This is supported by a direction indicator and a map display on the...

Страница 38: ...stination as de scribed under The New or New Destina tion Menu depending on device on page 43 If you have already entered your home ad dress you can start route guidance to your home address in the first line Smart Guess The two addresses that can be selected with the button is a selection of the addresses last visited Depending on the time of day and your current position the two most likely dest...

Страница 39: ...ed using the left icon Icons used The following icons are used in the desti nation list Note Up to 200 of the most recent destinations are automatically stored in the destina tion list If the storage capacity is reached the oldest destination is automatically de leted to make room for a new destina tion However important destinations can be protected If you select your home address and it has not ...

Страница 40: ...ired destination A selection menu appears Option Meaning Show details The data for the destina tion are displayed From this screen you can dis play the destination on the map display the route or start the route guidance Name entry The destination can be renamed If the destina tion is given a name it is automatically protected Delete entry The destination is delet ed from the fast access mode Prot...

Страница 41: ... guid ance to one In the main menu press the button My destinations Press the Personal destinations button A list of the available destinations will be displayed Press the arrow buttons to scroll through the list displayed Select the desired destination Route guidance to the selected destination will be initiated Editing Personal destinations In the list of your own destinations press the button i...

Страница 42: ...look contacts that have been imported into the Navigation device and start route guid ance to one In the main menu press the button My destinations Press the Contacts button An input menu appears if there are more than 10 contacts If there are fewer than 10 entries a list of contacts is displayed straight away Select the first letter of the desired entry in the input menu Press the button when the...

Страница 43: ...ing the but ton The New or New Destination Menu depending on device In the main menu press the button New destinationl The menu for new destinations appears Layout of the New destination menu Enter address The various steps from selecting an ad dress to starting route guidance can be car ried out using the Enter address button See Entering the address on page 44 Select Point of Interest Points of ...

Страница 44: ...button in the destina tion input menu opens the menu for en tering addresses In the destination input menu press the Enter address button The menu for entering addresses appears Selecting a country You can select a country from those avail able using the button for the country of destination A country is adopted auto matically in the address input menu after selection If a country of destination h...

Страница 45: ...can be entered by either using the name or ZIP code When you enter the letters of a place the navigation device displays suggestions See Accepting proposals on page 27 If you do not want to accept the proposal just enter the other letters of the location you want The Navigation device excludes all impos sible letter combinations and ZIP codes and activates only letter fields or numeri cal fields t...

Страница 46: ...reet and house number can be entered separately using a letter and number field The Navigation device excludes all impos sible letter combinations and activates only those letters that could give an exist ing street name A house number can only be chosen once the street has been selected and if house numbers are included in the data Enter the letters of the destination street consecutively When su...

Страница 47: ...ice Press the Intersection button The input menu for the name of the junc tion will appear Enter the name of the junction Once a few letters of the desired street have been entered a list will automatically be displayed Press the button for the desired street Selecting a house number After entering the destination town and street you can enter a house number so as to further limit the choice Press...

Страница 48: ... the destination is transferred to fast access mode and protected Starting navigation trace The Start button starts the route guidance All data entered thus far is processed when calculating the route Press Start to start the route guidance The route is calculated The map will then be displayed and the route guidance will begin If the route guidance is already running you will be asked whether the...

Страница 49: ...here is no GPS signal when the route is calculated the following will be dis played When a GPS signal is available the route calculation will start automatically When the Last position button is pressed the last known position is used and the route calculated from this posi tion Notes Only one address can be entered using the voice entry function Lists for more precise selection cannot be operated...

Страница 50: ...e was not able to uniquely as sign your entry you will be shown appropriate lists You can then select the address you want from these lists Depending on your entry lists with town names lists with street names or com bined lists with town and street names can be displayed The following example shows a list in which a town can be selected Notes If a number of languages are spoken in the destination...

Страница 51: ...ints of interest include airports and fer ry ports restaurants hotels petrol sta tions public buildings You can use points of interests as navigation destinations In the main menu press the button New destinationl Press the Select Point of Interest button You can choose between a point of interest in the vicinity a point of interest near to an address a point of interest near to a destination or e...

Страница 52: ... be displayed on the map On map saved in fast access mode Save used for displaying a route to the POI Show route if a telephone is connected and a phone number is available by pressing the but ton with the symbol depending on the model Point of interest near to an address Press POI near location Select the desired country In the City or Code field enter the town where you wish to search for a poin...

Страница 53: ...i tional information about the destination Point of interest near to destination Press the POI nearby button The categories available near to the desti nation are displayed Select the desired point of interest as de scribed under Point of interest in the vicinity on page 51 Entering a point of interest directly Press the POI search by name button Enter the desired point of interest or part of the ...

Страница 54: ...mbol shown at the bottom of the point of in terest information screen The call will be initiated Additional point of interest information Any additional information that is pro vided for a point of interest can also be displayed To display the additional information press the More button shown at the bot tom of the point of interest information screen You can scroll through the displayed text usin...

Страница 55: ...es are shown in a list below this Scrolling through stored routes Press the arrow keys on the right of the screen to scroll through the stored routes Editing stored routes You can add additional stages to a stored route change the name of the route or de lete it Press the button in front of the route you wish to edit By pressing Add stage you can now add a stage to the route After pressing Rename ...

Страница 56: ...ion by tapping the screen You can use the and buttons in the bottom line to scroll through the indi vidual stages in the route As you scroll each stage is shown Creating a new route In the route menu press Create new route You can now enter an intermediate desti nation as described under The New or New Destination Menu depending on device on page 43 Enter address Select Point of Interest Personal ...

Страница 57: ...l lowing options are available Option Meaning Show details The data relating to the intermediate destination is displayed From this screen you can display the intermediate destina tion on the map Set loading time You can define the ex pected loading time De fining the loading time is necessary in order that the estimated time of ar rival is as accurate as pos sible Move up The stage is moved for w...

Страница 58: ... from the map You can select a destination straight from the map Press Enter destination in fast access mode Press the Select on map button The map display appears Press the desired point lightly on the surface of the screen A flashing red cross will be displayed at this point Note You may need to make the area larger us ing the zoom buttons and in order to find the desired point You can also move...

Страница 59: ...ng select the value you wish to change Using the two buttons indicated by select the direction required for the geo graphic longitude and latitude east west or north south Then enter the desired values using the buttons to You can enter coordinates in three differ ent ways The following formats can be used Degrees Minutes Seconds Decimal sec onds e g 42 52 46 801 Degrees Minutes Decimal minutes e ...

Страница 60: ...pressing the and buttons The Guidance info button In the Guidance info settings window you can select which additional information you would like displayed during route guidance Press the Guidance info button in the settings menu The Guidance info settings window appears The following settings are available Note All your settings must be confirmed by pressing the OK button Using the button you can...

Страница 61: ...e options settings window appears Signposts When this function is ac tivated you receive addi tional important infor mation at traffic junc tions about the sign you should follow Country info When this function is en abled you will automati cally receive generally ap plicable traffic information for the rele vant country when you cross a national border e g speed limits Junction View If this funct...

Страница 62: ...selected profile only with truck and car profiles as described under Selecting setting the vehicle profile on page 88 Confirm the selected profile by selecting OK Selecting the route type After pressing the button next to Route type select one of the following options Note In the map display roads that cannot be used according to the settings of the lorry profile are displayed with a light red con...

Страница 63: ...next to Avoid you can exclude various types of road e g motorways ferries and toll roads from the route calculation You can set one of the following options for each of these road types Confirm your selection by pressing the OK button The TMC button You can configure settings for the recep tion of traffic announcements in the TMC settings window Press TMC in the settings menu The TMC settings wind...

Страница 64: ...ew settings window appears Setting Meaning Auto select station Choose whether to run an automatic search for the station with the best reception func tion switched on Press the arrow buttons to activate the auto matic station search The currently tuned TMC station is dis played in the adjacent field This can only be set if the Auto select station function is switched off Rerouting This button allo...

Страница 65: ...ode Switching 3D buildings on off You can select whether or not 3D build ings available in towns should be dis played in 3D mode Press the 3D Buildings button in the map mode menu and turn the function on or off Map with 3D buildings activated Confirm your setting by pressing the OK button To call up the extended settings press the Advanced button 4 5 1 2 Note This function is only available in 3D...

Страница 66: ...m Press the Auto zoom button in the ex tended settings Pressing the Auto zoom button switches the zoom function on or off When the zoom function is switched on you can select whether the autozoom ac tion should be weak medium or strong Setting POI categories You can select which POI symbols are to be displayed on the map Press the Select POI categories button in the extended settings Selecting Sho...

Страница 67: ...The following setting options are then available Driver alerts depending on the model You can have signs displayed for example for dangerous curves or steep gradients provided this information is stored in the map data Speed info You can select whether speed limits are displayed in parallel to the navigation You can also receive an audible warning about exceeding the speed limit Danger spots You c...

Страница 68: ...gs This category includes warning signs that relate to sharp curves General warnings This category includes all other warning signs such as steep gradients falling rocks Traffic regulations This category includes other traffic regulations such as no passing zones Informatory road signs This category contains the available information signs Confirm your settings by pressing the OK button The Speed ...

Страница 69: ...n select the voice that will make the navigation announcements for the language that has been set Setting Meaning Show signs Select whether speed lim its are never displayed al ways displayed or only displayed if the limit is exceeded In city Select the amount over the speed limit at which you would like to receive an acoustic warning within built up areas Out of city Select the amount over the sp...

Страница 70: ...gs menu The Voice settings window appears Select the desired voice A short example announcement is given Confirm your selection by pressing the OK button The Volume button With the Volume settings window you can set the standard volume for voice an nouncements for each start of the Naviga tion device or switch off voice announce ments completely Depending on the situation this setting can be fitte...

Страница 71: ... for your location in the Time settings win dow This setting is important for the cor rect calculation of the estimated time of arrival Press Time in the settings menu The Time settings window appears Using the button next to Time zone you can set whether the time zone should be set automatically by Navigation device or not automatic mode on automatic mode off If the automatic function is switched...

Страница 72: ... modify the block You can now set whether or not the road should be blocked for each day of the week Press the buttons with the days on which the road should not be blocked the clock symbol under the day disap pears Confirm your settings by pressing the OK button or Press the button under one of the days and set up to two times when the road should be blocked Using the buttons set the first peri o...

Страница 73: ... depending on the model Your Navigation device can receive traffic announcements TMC messages from radio stations The power supply with the integrated TMC antenna must be con nected to the carrier plate for this func tion Traffic announcements are transmitted by radio stations via the TMC Traffic Mes sage Channel in addition to the radio programme and are received and analysed by the navigation sy...

Страница 74: ... is affected by the traffic problem continue to be displayed In addition to the coloured mark a warn ing sign is displayed on the stretch of road affected Using TMC When the Navigation device has been at tached to the carrier plate power supply with the integrated TMC antenna con nected your Navigation device will re ceive up to date traffic announcements It is then possible to calculate dynamic r...

Страница 75: ...ion The road number motorway A road or district road and the section of road with traffic direction The duration of the problem Expected duration of the obstruction If a TMC message lies on your route the message is indicated by the sign Traffic announcements received via TMCpro are indicated by the sym bol Reading a message Press on the desired message in the list The message display appears Pres...

Страница 76: ... an expedient detour of the obstruction is pos sible If an expedient detour is possible then an alternative route is calculated and you are guided via the alternative route Manual recalculation If a traffic announcement affects your route a window with detailed informa tion on the traffic announcement appears If after displaying the traffic message the navigation system detects that a sensible alt...

Страница 77: ...l ly when you start route guidance Without route guidance you can call up the map display from the main menu In the main menu press Show map The map display will then appear and if GPS reception is available will show your current position If route guidance is already active the map will be displayed with route guid ance Structure of the map display The structure depends on the settings made in Sw...

Страница 78: ... to which the next driving manoeuvre leads Distance to next driving manoeuvre Next driving manoeuvre Calls up volume settings Displays TMC messages for the route depending on the model Displays POIs along the route Estimated time of arrival remaining journey time and remaining distance to the destination or if displayed ve hicle speed and altitude above sea level Your current position is displayed...

Страница 79: ... symbol displays the TMC messages along the route See TMC on the route depending on the model on page 84 You can display the points of interest located along your route On the left of the screen press the POI symbol The POIs are displayed Please re fer to the description in Point of interest on the route on page 83 Spilt screen with route guidance Speed limit on the road currently be ing driven on...

Страница 80: ...model Power level telephone status depending on the model Button for calling up the options Estimated time of arrival remaining journey time and remaining distance to next destination Calls up volume settings Speed limit on the road currently be ing driven on display not available for all roads Driver alerts depending on the model Traffic lane recommendation only appears on some multi lane roads b...

Страница 81: ...peated with updat ed information Press the speaker symbol in the preview area while route guidance is active The last announcement is repeated with updated information The volume is also displayed Changing the announcement volume The volume of announcements can be ad justed Press the speaker symbol in the preview area while route guidance is active The bar display indicates the volume Press or to ...

Страница 82: ... The map is then moved accordingly You can also select a point as a destination as described under Selecting a destina tion from the map on page 58 or block a road Map display options In the map display options you can change the settings for route guidance the map display and the route On the map display press the button on the bottom right This opens the options menu for the map display You see ...

Страница 83: ... Open the options menu for the map display Press the POI on route button The nearest points of interest for the three selected categories are displayed The first distance indicated shows the dis tance to the point of interest The indica tion on the right shows the detour re quired to reach the point of interest The symbols on the right let you see at a glance if the detour for driving to the re sp...

Страница 84: ...when route guidance is ac tive You can view and edit TMC messages lo cated on your route Open the options menu for the map display Press the TMC on route button The TMC messages located on your route are displayed Cancel route guidance Only available when route guidance is active You can cancel active route guidance Open the options menu for the map display Press the Stop guidance button This canc...

Страница 85: ...play Press the Block button Select the length of block you want by pressing one of the buttons You can then select whether this route section should be blocked permanently or only for the current route Subsequent operation corresponds to the description under The Blocked roads button on page 72 Notes The selected length of the block is only an approximation since the actual dis tance blocked depen...

Страница 86: ...description in The Map view button on page 64 Changing the map orientation You can view your surroundings in 3D mode When doing so you have the option to change the viewing direction the map an gle and the size of the map area Open the options menu for the map display Press the Map orientation button By pressing buttons you can change the viewing direction or turn the dis played map The compass in...

Страница 87: ...our ney Total distance Travel time without breaks in the journey Travel time with breaks in the jour ney Compass Calls up the stopwatch with lap re cording Press the Reset button to reset the values to zero To display the stopwatch with the lap re cording press the button in the data display Press the Start button to start the re cording Press the Lap button to stop the current recording and start...

Страница 88: ...button to delete the recorded laps Setting day night display You can switch the Navigation device dis play from day to night and vice versa Call up the options menu for the map display Press the Day Night button The display changes from day to night and vice versa Selecting setting the vehicle profile You can select or set the vehicle profile For the lorry profiles depending on the model you can d...

Страница 89: ...have the option of selecting various car profiles using the Slow car Normal car and Fast car buttons For the general lorry profile or saved lorry profiles depending on the model By pressing the buttons on the right hand side you can adjust the settings for the profile directly as described on the fol lowing pages Danger The information in the map data may be incorrect as a result of short term cha...

Страница 90: ...ize In the profile settings press the button for setting the size Press the button next to the dimension to be entered An input menu is displayed Enter the desired dimension Confirm the entry in the input menu by pressing Once you have performed the desired set tings confirm your settings by selecting OK Setting the trailer and axles In the profile settings press the button for the trailer and axl...

Страница 91: ...s goods category Select the required hazardous goods category Selecting the truck symbol and name If you have changed one of the saved truck profiles it is also possible to enter the truck symbol and name displayed Press the button to enter a different name The input menu is displayed Enter the desired name Confirm the entry in the input menu by pressing The name is changed Press the button to cha...

Страница 92: ...ion you can enter a way point or delete an entered waypoint Open the options menu for the map display Press the Add stopover button You can now enter a destination as a way point as described under The New or New Destination Menu depending on device on page 43 Enter address Select Point of Interest Personal destinations Contacts Select on map or Enter geo coordinates You also have the option of qu...

Страница 93: ...ton you can simulate the entire route quickly or slowly You can stop the simulation by tapping the screen Directions With the entire route displayed press the Sections button The first point in the directions is dis played on the map You can use the and buttons to scroll through all the directions You can also display a list version of the directions by pressing the List view but ton Press the arr...

Страница 94: ...e of the days and set up to two times when the road should be blocked Using the buttons set the first peri od when the road is to be blocked on this day Using the buttons set the second pe riod when the road is to be blocked on this day if necessary Confirm your settings by pressing the OK button Note If the route section is more than 10 kilo metres long you can choose in another menu whether to b...

Страница 95: ...entire route with all the destinations on the map or in a list Open the options menu for the map display Press the Itinerary button The planned route is displayed on the map By pressing the or button you can simulate the entire route quickly or slowly You can stop the simulation by tapping the screen You can use the and buttons in the bottom line to scroll through the indi vidual stages in the rou...

Страница 96: ...tore this position You can also display information concerning the current GPS reception and the current country Open the options menu for the map display Press the Position info button The current position is displayed If possi ble an address is displayed If no address is available for the current position the geographic coordinates are displayed You can return to the map using the Resume button ...

Страница 97: ...of the Navigation device you can switch off the display You will then only receive acoustic instructions during route guidance All overlays will however still be displayed Call up the options menu for the map display Press the Display off button To cancel switching off the display you can touch the display or press the button Defining fast access buttons The Navigation device has four freely as si...

Страница 98: ...PL CZ H RU Select the desired function from the displayed list Confirm your selection by pressing the OK button The map display is opened and the fast access button has the chosen assignment the next time the options menu is opened ...

Страница 99: ...ns menu of the map display If Bluetooth is activated and the Naviga tion device is already connected with a cell phone the telephone menu is displayed If Bluetooth is not activated upon calling the telephone function the system will prompt you to switch Bluetooth on Press the Yes button to activate Bluetooth Note For some cell phones equipped with Bluetooth wireless technology it is possible that ...

Страница 100: ...d from the phonebook Text messages SMS to be displayed edited and read out To call up number lists To search for Buetooth telephones To disconnect the connection to a cell phone If Bluetooth is activated and the Naviga tion device is already connected with a cell phone the telephone menu is displayed after you call up the telephone function In the upper area of the telephone menu if available the ...

Страница 101: ...button Press the Phone book button An input menu is displayed if there are more than 10 entries in the phonebook If there are fewer than 10 entries a list of en tries is displayed straight away Note Press the button to delete the characters entered Press Pause if you wish to pause the dial ling process Note Be aware that it may take several min utes to transfer the phonebook If the cell phone whos...

Страница 102: ...d by icons Select the phone number you want The Navigation device then attempts to establish a connection to the phone number selected You can find out how to continue operation in Telephone calls on page 109 Note For example if you entered the letters M and I the entries are displayed whose last names or first names start with MI That means Miller John or Bauer Michael You may enter the first let...

Страница 103: ...played if they are available Select the desired text message The selected text message is displayed Press the Read out button in order to have the message read out Press the Options button to display the editing options for the text message Call back By pressing the Call back button you can start a call to the sender s number Numbers By pressing the Numbers button you can display any numbers conta...

Страница 104: ...ts In the telephone menu press the Last calls button Using the buttons Missed Accepted and Dialled you may retrieve the lists loaded from the cell phone The number list of the numbers or names dialed accepted or not accepted at the Navigation device is shown in the lines be low Each line of the number list is divided into two fields Each list field is designed as a button On the right button the n...

Страница 105: ... entry is a standard entry without any special features This entry is protected If the number list is full this entry is not automatically deleted You have the option to do this manually For a protected entry you also have the option to set the position in the quick access Selection Significance Show details The data for the entry is displayed number and name time and date of call if available Pro...

Страница 106: ... The device list shows line by line all cell phones that were already connected to the Navigation device Each line of the device list is divided into two fields Each list field is designed as a button On the right button the device is named and its features are displayed with the left icon By pressing the icon you can call a menu where you can protect the device for in stance Note Press the button...

Страница 107: ...ound are displayed and you may cancel the search by pressing the Stop search button After the search or after you press the Stop search button a list of the devices found is displayed Selection Significance Protect entry The device is protected against automatic dele tion only available for unprotected devices Remove protection The protection of the de vice is canceled only available for unprotect...

Страница 108: ...already connected that connec tion is automatically disconnected and the new device is connected Call up the device list Select the cell phone you want in the list The connection is established to the cell phone selected With a successful connec tion the telephone menu will be dis played Connecting a mobile phone You can also attempt to establish a con nection to the Navigation device from the mob...

Страница 109: ...entry from the number list or phonebook The number is dialed If the call is accepted by the party called the display changes and you are connected to the other party Accepting a call For an incoming call a ringing tone will sound Also the following is displayed If available the telephone number and name of the caller are displayed For incoming calls you have several oper ating options Selection Si...

Страница 110: ... call display the signal strength of the cell phone the charging level of the cell phone the telephone name and the network provider are displayed if available in the upper area Beneath the call time and if available the phone number or name the name of the other party are displayed If route guidance is active then you will receive the navigation instructions with arrows on the call screen Note Th...

Страница 111: ...ree function is then ended After the call is ended the connection to the cell phone is automatically re es tablished Press the Private mode button The hands free function is ended Press the Hands free button to make and receive calls again via the Naviga tion deviceprior to ending the call DTMF tones You can send DTMF tones during a call e g to check an answering machine Press the DTMF tones butto...

Страница 112: ...ttom icon function off Automatic connection With the Auto connect button you can switch on or off whether an automatic connection to a cell phone is attempted af ter switching on the Navigation device In the settings menu press the Auto connect button Depending on the previous setting you can switch the function on or off Top icon function on Bottom icon function off Visibility With the Visibility...

Страница 113: ...ted is indicated with a checkmark Confirm your settings by pressing the OK button Telephone volume With this function you can set the vol ume of the ringtone and the volume of the call In the settings menu press the Volume button Select the desired volume with the and buttons Press the button to mute the volume Confirm your settings by pressing the OK button Updating phonebook With this function y...

Страница 114: ...vice should respond when a new text message is received Press the SMS signal button in the set tings menu Select the required setting No signal No notification is given Play tone only A signal tone will sound Show popup A menu is displayed in which you can select whether the message should be displayed read out or ignored See Incoming text message on page 104 Read out automatically An incoming tex...

Страница 115: ...l memory Press the Music button If a track is already playing the playback menu is displayed immediately If no track is playing the selection menu is displayed Selecting a track Tracks can be selected from the selection menu In the selection menu you have 6 ways of selecting tracks Artists When you select Artists the tracks on the memory card are listed sorted by artist Note In order to select tra...

Страница 116: ...sts the playlists on the memory card are listed Selection using Folders is described here as an example The other selection options are similar in functionality Press the Folders button The directories on the memory card are displayed By pressing the Play all folders button you can play all the tracks in the current directory level Press the arrow buttons on the right of the screen to browse throu...

Страница 117: ... and playback of the new track begins Playback To play the music track displayed in the track line press the following button Press the button with the play icon The MP3 player starts playback The but ton display changes to the pause icon At the top right of the display you can see the elapsed time Next to that the elapsed time is displayed in the form of a bar By pressing and moving the arrow at ...

Страница 118: ...ting the volume You can set the volume of the MP3 play back In the playback menu press the button Press or to increase or de crease the volume Press in order to mute the music Press again in order to cancel the mute function Closing the MP3 player Pressing the button closes the MP3 player and displays the media menu Warning Always adjust the volume so that you can still hear any ambient noise whil...

Страница 119: ...m the message by pressing the OK button The image viewer menu appears The image viewer menu In the image viewer menu you can select images start a slide show and call up the settings File containing images Thumbnails of the images in the cur rent folder View the previous page of images folders Go up one level in the directory hier archy View the next page of images folders Note The image viewer ca...

Страница 120: ...xt or previous image Press the centre of the image to hide the image menu Press the right or left hand side of the screen to move to the next or previous im age Press the centre of the image to show the image menu again Enlarging the image Show the image menu Press the Zoom button Move the control on the right of the screen to the desired level of magnifica tion The image can then be moved around ...

Страница 121: ...l The slide show will end once all images have been displayed Press the button to stop the show be fore the end Settings In the settings you can choose the speed at which the images are displayed wheth er certain effects are used when a new im age is shown and whether the images should be loaded at a higher quality Press Slide show settings in the image viewer menu You can use Interval time to set...

Страница 122: ...sed when driving Please observe this warning Confirm the message by pressing the OK button The selection menu is displayed In the selection menu all the folders on the memory card containing videos are displayed In the selection menu select the desired folder and then the desired video The selected video is played in full screen mode Note The video player cannot be called up when route guidance is...

Страница 123: ...yback The displayed video is played using the following button Press the button with the play icon The video player starts playback The but ton display changes to the pause icon At the top right of the display you can see the elapsed time Next to that the elapsed time is displayed in the form of a bar By pressing and moving the arrow at the end of the bar you can move to a different place in the c...

Страница 124: ...c information for numerous countries maximum permitted speed alcohol limits etc Press the Country information button The list of countries is displayed Press the button for the desired country The country specific information is dis played maximum permitted speed alco hol limits etc Below you will find a description of the symbols used Warning Always adjust the volume so that you can still hear an...

Страница 125: ...menu Symbol Meaning Speed limit in built up areas Speed limit outside built up areas Speed limit on motorways Alcohol limit Reflective jacket requirement Driving lights requirement during daytime Tow rope must be carried Spare bulbs must be carried Fire extinguisher must be carried ...

Страница 126: ...em settings menu You can select the various settings options from the system settings menu Operation Selection options Select the desired menu item by pressing the appropriate button The functionality of the buttons varies depending on the se lection and is described under The indi vidual menu items on page 127 You can go to the next or previous page of the settings by pressing the and buttons Clo...

Страница 127: ... by the mains socket symbol in the status display Closing the status display Pressing the OK button closes the status display and shows the settings menu Day night display You can set the Navigation device display to day night or automatic The automatic setting changes automati cally between day and night display de pending on the time the current position and the time of year You can call up the ...

Страница 128: ...y With the following button you may call the setting Press the Brightness button Use the and buttons to set the desired brightness for the day and night display Confirm your settings by pressing the OK button Language The texts on the touch screen can be dis played in a variety of languages Opening language selection You can choose between the various lan guages using the following button Press th...

Страница 129: ... also page 18 The cigarette lighter is de energized af ter the ignition is switched off The relevant function can be switched on at the Navigation device Switching the function on off Press the Automatic on off button Depending on the previous setting the function will be switched on or off The current setting is shown by the icon Top icon The function is switched on the Navigation device switches...

Страница 130: ...the home address telephone data images videos etc saved on the internal memory Press the Factory reset button Press the Yes button The Navigation device is reset to the fac tory settings Information The following button displays informa tion regarding the Navigation device Press the Information button The information display appears Note in particular the product designa tion and the software vers...

Страница 131: ...t that has already been updated the content that has been purchased and the content that can be additionally purchased via the Content Manager Press the XTRAS button Press the button with the information on the content you want The content is displayed You can display further information by pressing the various content ...

Страница 132: ... artist album year and genre JPG JPEG Joint Photographic Experts Group The JPEG is the most common type of storage format for dissipating picture compression i e when compressing de tails of the picture are lost Still provides good picture quality despite compression compression stages are selectable It is the most common format for representation and exchange of pictures on the internet MP3 Speci...

Страница 133: ...ge Channel Traffic announcements transmitted by most FM stations via RDS Basis for dy namic navigation USB Universal Serial Bus The Universal Serial Bus USB is a bus sytem for interconnection of a computer with external USB peripherals for the ex change of data ...

Страница 134: ...ap 58 Destination input menu Configuration 43 Destination list 39 Destination memory Change 105 changing 40 scrolling 40 Destinations Entering 43 Protected 106 protected 39 Standard 39 106 storing 48 Dialling 100 Directions 93 Displaying street names 66 Displaying the route 48 93 Displaying the speed 78 Displaying the vehicle speed 78 Driver alerts 68 DTMF tones 111 E Economical route 62 Entering ...

Страница 135: ...ting playback 117 playing 117 Track skip 117 N Navigation 37 cancelling 26 84 start 48 Number list Dialing a number 105 Editing 105 Scroll 105 Number lists 104 Numbers dialling 100 P Phonebook 100 101 Update 113 Photos 119 playback 117 123 Points of interest Call 54 entered directly 53 in the vicinity 51 near destination 53 near to an address 52 on the route 83 Position display 58 Q Quick access I...

Страница 136: ...111 Short route 62 Signs displaying 68 Simple route 62 Slide show 121 SMS 103 Speed limit 68 Stylus 132 Switching on the navigation device 24 System settings 126 T Telephone menu 100 Telephone mode 99 Text messages 103 Time format 71 Time of arrival 78 Time zone 71 TMC 63 73 Display on the map 74 on the route 84 Recalculating routes 76 TMC antenna 19 Toll roads 63 Track repeat 118 Traffic informat...

Страница 137: ...20 mAh 1200 mAh 1200 mAh 1200 mAh 1200 mAh 1200 mAh Headset output 3 5 mm see also page 12 z Radio remote control see also page 30 z TMC see also page 73 z z z z z z Cable for vehicle integration see also page 11 Bluetooth hands free device see also page 99 z z z z Dimensions W x H x D in mm 126 4 x 81 6 x 18 Screen 10 92 cm touch screen with 64000 colours reflection proof display resolution 480 h...

Страница 138: ... type approval mark E13 issued by Luxembourg s Road Traffic Registra tion Authority in accordance with European Directive ECE R10 governing the EMC of motor vehicles in its current version authorises installation and operation of the unit in motor vehicles classes L M N and O EU Declaration of Conformity The United Navigation GmbH hereby declares that the navigation device described here is in com...

Страница 139: ... these products to communal collecting points or recycling centres for processing and salvage of materials The units will be accepted there free of charge The proper disposal of this product helps protect the environment and prevents harmful ef fects on humans and the environment which could result from improper handling More detailed information on the nearest collecting point or the nearest recy...

Страница 140: ...cially equipped for this purpose statutory obligation to return It is the duty of the retail and of manufacturers to take back these batteries free of charge and to correctly recycle them or to dispose of them as hazardous waste statutory obligation to take back The lithium ion battery in the Navigation device is marked with the adjacent symbol consisting of a crossed out waste bin and the type of...

Страница 141: ...s from the screw holes Unscrew and remove the two housing screws using a small cross slot screwdriver Lever off the rear of the housing using a flat blade screwdriver placed at the slits on the sides of the housing Pull out the connector of the battery connecting cable Remove the battery Note Do not reconnect a unit that you have opened to the power supply 3 5 4 1 2 1 2 3 4 5 ...

Страница 142: ...3LGRCBÍ TGE RGMLÍ K J ͱ ͱEͱ LJ Á Á KL E JG Allemagne UUU KW CAICP AMK ...

Отзывы: