background image

6

Dry Cycling

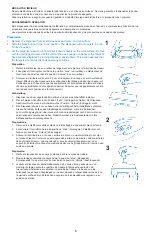
1.  Lift the dispenser and place it over an empty Petri dish.
2.  Depress the knob firmly until the sound of the tampers is heard. (If the dispenser 

will not dry cycle, tap the side of the unit against the side of the work surface and 

repeat the procedure.)

3.  Allow the knob to return to the upper position.
4.  Repeat steps 1, 2, and 3 several times to get the feel of the dispenser.

Cycle à blanc

1.  Soulever le distributeur et le placer par dessus une boîte de pétri vide.
2.   Enfoncer la manette jusqu’à ce que le bruit des applicateurs se fasse entendre. (Si le 

distributeur ne fonctionne pas à blanc, tapoter le côté de l’unité contre la surface de 

travail et répéter la procédure.)

3.  Laisser la manette revenir dans la position supérieure.
4.  Répéter les étapes 1, 2 et 3 plusieurs fois pour se familiariser avec le distributeur.

Leerdurchlauf

1.  Dispenser anheben und über eine leere Petrischale stellen.
2.   Fest auf den Andruckknopf drücken, bis die Andruckstempel zu hören sind. (Wenn der 

Dispenser beim Leerdurchlauf nicht funktioniert, die Seite des Geräts leicht gegen die 

Seite der Arbeitsfläche klopfen und den Durchlauf wiederholen.)

3.  Warten, bis der Andruckknopf nach oben in die Ausgangsposition zurück gekehrt ist.
4.   Schritte 1, 2 und 3 mehrere Male wiederholen, um sich mit der Bedienung des 

Dispensers vertraut zu machen.

Ciclo di prova

1.  Sollevare il distributore e posarlo su una piastra di Petri vuota.
2.   Abbassare bene il pomello a stantuffo, fino ad avvertire il rumore degli applicatori. (Se 

il distributore non effettua il ciclo di prova a vuoto, picchiettare il dispositivo sul lato, 

contro il lato del piano di lavoro e ripetere la procedura.

3.  Attendere fino a quando il pomello ritorna alla posizione iniziale.
4.   Ripetere le operazioni 1, 2 e 3 parecchie volte per familiarizzarsi con il dispositivo.

Ciclo sin cartuchos

1.  Levante el dispensador y colóquelo sobre una placa de Petri vacía.
2.   Empuje la perilla firmemente hacia abajo hasta escuchar el sonido de los 

apisonadores actuando. (Si el dispensador no realizara el ciclo sin cartuchos, golpee 

suavemente el costado de la unidad contra el costado de la superficie de trabajo y 

repita el procedimiento.)

3.  Deje que la perilla regrese a la posición inicial (hacia arriba).
4.   Repita varias veces los pasos 1, 2 y 3 para habituarse al funcionamiento 

del dispensador.

Inserting Cartridges

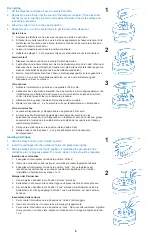
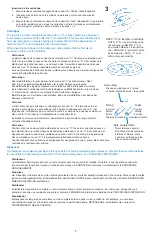
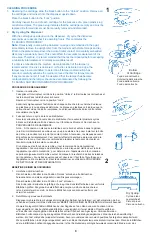
1.  Slide the black button to the “Unlock” position.
2.  Insert the cartridges into the numbered holes and press down lightly.
3.  Slide the black button to the “Lock” position. If resistance is encountered, the 

cartridges are not properly seated. To correct, steps 1 and 2 should be repeated.

Insertion des cartouches

1.  Faire glisser l’interrupteur noir dans la position “Unlock”.
2.  Insérer les cartouches dans les trous numérotés et presser légèrement dessus.
3.   Faire glisser l’interrupteur noir dans la position “Lock”. Si une résistance est 

rencontrée, les cartouches ne sont pas correctement installées. Pour rectifier 

l’installation, il faut répéter les étapes 1 et 2.

Einlegen der Kartuschen 

1.  Den schwarzen Schalter in die Position “Unlock” schieben.
2.   Kartuschen in die numerierten Löcher legen und diese leicht nach unten drücken.
3.   Den schwarzen Schalter in die Position “Lock” schieben. Bei Widerstand sind die 

Kartuschen nicht richtig eingelegt. Schritte 1 und 2 wiederholen, um den Fehler zu 

beheben.

Inserimento delle cartucce

1.  Far scorrere l’interruttore nero alla posizione “Unlock” (sbloccaggio).
2.  Inserire le cartucce nei fori numerati e premerle giù leggermente. 
3.   Far scorrere l’interruttore nero alla posizione “Lock”. Se si incontra resistenza, significa 

che le cartucce non sono state inserite nel modo dovuto. Correggere ripetendo le fasi 

1 e 2.

1

2

3

1

2

Содержание 260640

Страница 1: ...ements compl te avec un socle et un couvercle de protection et une bo te m tallique de d shydratant ein Ger t 12 Kan le komplett mit Schutzuntersatz und deckel sowie einem Trockenmittelbeh lter una un...

Страница 2: ...entra con cartuchos vac os Cartouches incassables se logent directement dans le distributeur pas de fixation requise Die bruchsicheren Kartuschen werden direkt in den Dispenser eingelegt keine Haltevo...

Страница 3: ...ered PRINCIPES DE LA METHODE Les disques sont distribu s lorsque la manette de fonctionnement est abaiss e Cette unit a t con ue de fa on laisser une distance de 33 mm entre les centres des disques Au...

Страница 4: ...e superior del recept culo se ha tornado color rosa Para regenerarla caliente el recept culo a 150 C en un horno con ventilaci n durante aproximadamente 3 h o hasta que la silicagel vuelva a tener un...

Страница 5: ...et d assurer que les applicateurs ont t remis dans leurs positions de fonctionnement Vorbereitung 1 Dispenser aus dem Lagerbeh lter nehmen und auf eine Arbeitsfl che stellen 2 Den schwarzen Schalter i...

Страница 6: ...1 2 e 3 parecchie volte per familiarizzarsi con il dispositivo Ciclo sin cartuchos 1 Levante el dispensador y col quelo sobre una placa de Petri vac a 2 Empuje la perilla firmemente hacia abajo hasta...

Страница 7: ...l primo disco venga centrato nell estremit della cartuccia Cartuchos El ltimo disco de cada cartucho est marcado con una X Todos los cartuchos poseen un tope pl stico de color verde despu s de cada di...

Страница 8: ...ESEITIGEN EINER BLOCKIERUNG 3 Warten bis der Knopf nach oben in die Startposition zur ckgekehrt ist und Dispenser von der Agarplatte heben 4 Die Agarplatte auf mit X gekennzeichnete Bl ttchen pr fen 5...

Страница 9: ...la g lose le retirer imm diatement du milieu avec une pince st rile et le poser plat sur la bo te de p tri en le centrant sur le point de contact initial A l occasion les disques peuvent tre enfonc s...

Страница 10: ...os telo plano sobre la placa centrado sobre el punto de contacto inicial A veces tambi n podr a suceder que se introduzca un disco en forma horizontal Esto podr a afectar la precisi n de la medida de...

Страница 11: ...peratur und Luftfeuchtigkeit erfordert dies jedoch zus tzlich Zeit PROCEDURA DI PULIZIA E DECONTAMINAZIONE Ogni volta che si cambiano le cartucce o in caso di contaminazione dell applicatore in fase d...

Страница 12: ...spenser nach der Verwendung m glichst schnell in den K hlschrank zur ckstellen Dispenser nicht im Gefrierfach aufbewahren MANUTENZIONE DEL DISTRIBUTORE 1 Se si desidera si pu pulire il distributore la...

Страница 13: ...ra est hacia ARRIBA 2 Verifique que la llave conmutadora est en la posici n Unlock desbloqueado 3 Observe si los cartuchos est n vac os o da ados 4 Observe si hay discos flojos Para quitar discos floj...

Страница 14: ...t wurde Au er der o g Garantie erteilt Becton Dickinson keine weiteren vertraglichen oder gesetzlichen Gew hrleistungen Beiliegende Antwortkarte ausf llen und innerhalb von 10 Tagen nach dem Erhalt ih...

Страница 15: ...A Vedere References nel testo inglese BIBLIOGRAFIA Ver References en el texto en ingl s Technical Information In the United States contact BD Technical Service and Support at 800 638 8663 or www bd co...

Страница 16: ...e made for repair replacement of the dispenser When the dispenser is returned a return address label complete with Building Room Person Responsible Purchase Order Number if needed etc must be included...

Страница 17: ...tic Systems 7 Loveton Circle Sparks MD 21152 USA BUSINESS REPLY MAIL FIRST CLASS MAIL PERMIT NO 25 SPARKS MD 21152 POSTAGE WILL BE PAID BY ADDRESSEE NO POSTAGE NECESSARY IF MAILED IN THE UNITED STATES...

Страница 18: ...c Designer Dispenser has been purchased by the undersigned who hereby requests a Warranty be placed on file for 2 years Signature Hospital Laboratory Address City State Zip Telephone Number Distributo...

Страница 19: ...entro i termini della presente garanzia rivolgersi al distributore locale Becton Dickinson che dar disposizioni in merito In caso di restituzione dell apparecchio questo deve essere accompagnato da e...

Страница 20: ...B...

Отзывы: