BarcodeGuy.com UnionNet SP2100 Скачать руководство пользователя страница 27

27

BarcodeGuy.com® - UnionNet SP2100 User’s Guide

Device is Ready to Use

” (

figure F5

). To check if you’ve missed the message, click on the arrow on the System

Tray. If the driver installed correctly, you’ll see the USB icon with a checkmark next to it not the moving green
ball on the computer which means Windows is still searching / installing the driver (

figure F5

).

9.3 Before continuing, press the “start” icon on the PC and type “Device Manager” into the search bar and start

Device Manager. Find the “Ports” icon in the System Tree and click on it. Verify the COM port assigned to the

AT91 USB to Serial Converter

” entry and make a note of the port number (

figure F5

) . You will need it when

you run the

SIMPLE TERM

 program installed in

Step 7

.

2

4

3

APPENDIX F

-

Updating SP2100 Firmware, con’t

figure F6

9.4 If the driver installed successfully, proceed to

Step 10

.

If

the driver did not install properly, you will see a System
Tray balloon down by the clock that says “

Device driver

software was not successfully installed

 (

figure F6

). The

driver will have to be manually installed from either the
SP2100 kits Resouce CD or from the BarcodeGuy web
site at http://www.barcodeguy.com/Downloads.htm. You

can check the internet to get instructions on how to install a driver manually for your Windows operating system.
What follows is a brief description of how to manually install the driver.

9.4.1 Unplug the SP2100 from the USB conector of your PC. The LED indicator will stop flashing and the SP2100

will be in Power-Off mode.

9.4.2 For Windows XP, go to the Control Panel and run the Add New Hardware Wizard. For Windows 7 and Vista,

create a desktop shortcut to “

Cmd.exe

”. Then right-click the shortcut and select “

Run as Administrator

”. From the

command prompt, run “

Hdwwiz.ex

e

” then click “

Next

”.

9.4.3 Select “

Advanced Options

” and then click “

Next

”. Click “

Show all Devices

” then click “

Next

”. Click on the

Have Disk

” option, and press the Browse button. Navigate to the “

\sp-2100\

” folder of the Resource CD or the

folder where you stored the downloaded driver, Select the file “

6119.inf

” and press “

Open

”, “

OK

”, then “

Next

” on

the next two wizard pages, then click the “

Finish

” button to complete the installation.

9.4.4

IMPORTANT!

 When you plug in the SP2100’s USB cable to the PC, be sure to either use a different USB

port than what you used originally, or reboot the PC!!!

9.4.5 Restart this procedure at

Step 8 of Appendix F

 of these instructions.

figure F7

2

1

4

3

5

6

7

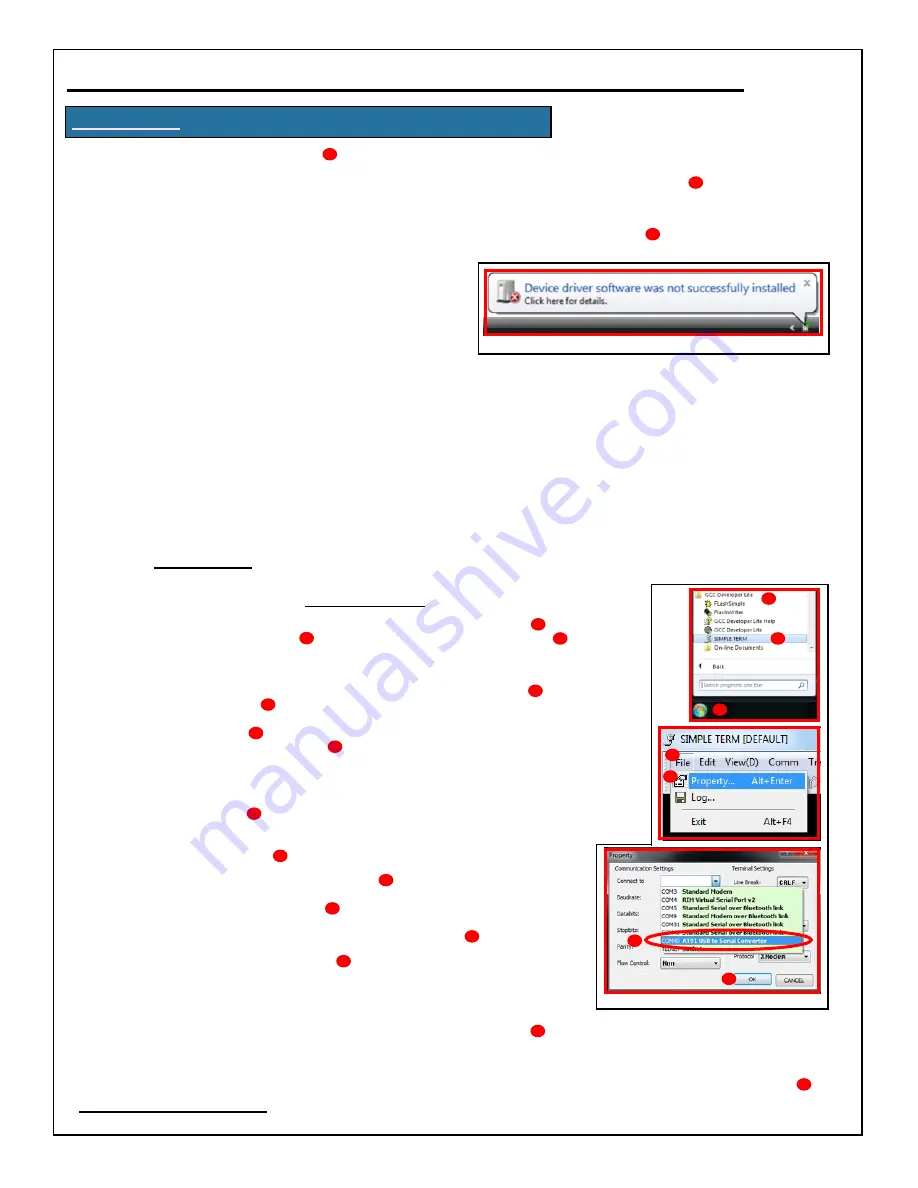
10. Start the Simple Term program. Press the Windows “

Start

” (

figure F7

) button, select

GCC Developer Lite

” (

figure F6

),  then select “

Simple Term

” (

figure F7

) from the

sub-programs.

10.1

When Simple Term opens, set the communications port and protocols. On the

menu bar at the top of the program window, press “

File

” (

figure F7

), then

Properties

” (

figure F7

) and select the COM port you noted from the Windows

Device Manager in

Step 9.3

 that will have the description ”

AT91 USB to Serial

Converter

” (

figure F7

). There is no need to set the default values, as they are

correct. Press the “

OK

” (

figure F7

) button.

Refer to

figure F8

for the following steps

10.2 Press the connect button, represented by a telephone icon in the icon bar under the

2

1

4

3

5

6

7

menu bar  (

figure F8

).  Simple Term will connect to the SP2100 and the

scanner will respond with the following message displayed on the Simple
Term screen:  “

[Unionnet SP-2100 Bootloader Version.1.0]

” and “

<Please

Downloader.>

” (

figure F8

)

10.3 Now press the “Transfer To” (

figure F8

) icon represented as the first

file folder on the left in the icon bar under the menu bar of Simple Term. A
dialogue box will open (

figure F8

), allowing you to navigate to the new

firmware file. Note that all firmware files have a file extension of “

bin

”.

Highlight the file and press the “

Open

” button (

figure F8

).

10.4 Note the Progress Bar (

figure F8

)at the bottom of the Simple Term

program window. It will show the firmware file being transferred into the
SP2100.

10.5 When the firmware transfer is complete, the SP2100 will display

<COMPLETED DOWNLOADER.> <NOW POWER OFF.>

(

figure F8

). There is no need to do anything. The

SP2100 will power off on its own.

10.6 Disconnect the USB cable from the SP2100 and power it on by pressing he Scan Button for 3-5 seconds. After the

new firmware version will be displayed on the Information Menu screen after the logo startup screen (

figure F8

).

END OF PROCEDURE

2

1

4

3

5

6

7

8

Содержание UnionNet SP2100

Страница 1: ...User s Guide Copyright 2012 2013 BarcodeGuy com Version 2 25RA 5 UnionNet SP2100 BLUETOOTH BARCODE SCANNER...

Страница 2: ...luetooth HID Setting Transmission Delays 3 8 HID Batch Data from SP2100 to Host 3 9 Other System Menu Options for Bluetooth 4 Managing Memory 4 1 Storage Transmit Modes 4 2 Display Memory Used 4 3 Sto...

Страница 3: ...kmanship under proper use during the warranty period UnionNet will not be liable in cases i in which the unit has been repaired or altered unless done or approved by UnionNet ii in which the unit has...

Страница 4: ...your pocket The SP2100 is in your hand quickly and conveniently You can even remove the steel clip and put velcro on the back by the way when the boss BarcodeGuy s lost SP2100 was found it was still f...

Страница 5: ...with the display s Status Bar visible Power On Power Saver The SP2100 is fully powered but the display and Scan Imager are in sleep mode If a Bluetooth connection was established the connection remai...

Страница 6: ...om left to right Signal Mode Strength This indicated the current connection strength and special connection types to the host Figure 2 8 shows that there is no connection although the SP2100 s bluetoo...

Страница 7: ...iew mode allowing you to see and delete the scanned data stored in its on board memory If you haven t scanned anything you ll see the Date ReView Completed screen as depicted in figure 2 12 If scanned...

Страница 8: ...est instrument equipment controller or data logger In the case of the SP2100 it s a keyboard 2 Serial Port Protocol SPP Also known as Serial Emulation In olden times anything other than a keyboard or...

Страница 9: ...Scan Button to select SHORTHAND SM 3 Bluetooth 3 MFI Mode Enable 0 Exit Sub Menu 0 Exit Main Menu 4 Select 0 Exit Sub Menu then 0 Exit Menu The SP2100 s LED Indicator will flash red NOTES If the SP210...

Страница 10: ...hid underneath There will be a keyboard icon to the right of the SP2100 listing 7 The SP2100 will beep and display HID in the Status Bar see figure 3 8 Your SP2100 is now connected to your Android de...

Страница 11: ...s the barcode The SP2100 is just like a keyboard but you don t have to type anything in 3 5 HID Tips Tricks with the SP2100 As you probably saw on the YouTube video or from our web site the SP2100 has...

Страница 12: ...p the Status Bar will change from MUX to HID and No Data Reconnection will be briefly displayed on the screen figure 3 13 The green LED Indicator flashes indicating an active bluetooth connection NOTE...

Страница 13: ...eiving them You will notice that full barcode strings are missing from the scanned data If your host application has this problem increase the delay before and after the barcode string is sent using H...

Страница 14: ...STORE This is the default memory setting When connected via bluetooth the SP2100 will send the scanned characters to the host and will store them in memory Great idea right It is but with the followin...

Страница 15: ...uding control characters that are put at the end of the barcode characters on each barcode decoded or read SHORTHAND SM 5 Memory Memory Info figure 4 3 4 3 Stored Data Review with Side Buttons Delete...

Страница 16: ...5 4 SP2100 System Menu for Pre Suffix The Carriage Return Suffix Let s take a quick look at the SP2100 s System Menu the CR setup The shorthand to get to the Suffix Menu within the System Menu is belo...

Страница 17: ...example we re going to assume a HID connection to a Microsoft Windows PC using Microsoft Excel but you can tailor your suffix to match whatever host application you re using In Excel when you scan a...

Страница 18: ...ging problems and all the BarcodeGuy s are experienced and love a challenge 6 0 SP2100 Factory Defaults There are many options accessible through the SP21000 s System Menu Each setting comes from the...

Страница 19: ...I TO Hex Decimal Conversion How to use this chart HexDecimal equivalents of ASCII or keyboard characters are 2 digits from 0 to E No matter what character or control code you re looking up it will alw...

Страница 20: ...UX HID SPP MUX Mfi for iOS HID Batch Enable N A Mfi Mode Enable Disable Enable Auto Reconnect Enable Disable Enable Disconnect Enable N A HID DateAdd Enable Disable Disable Trans Language Eng Fr Dan S...

Страница 21: ...GS1 Datarbar UCC EAN 128 Interleaved2 of 5 and etc 1D Barcodes Code128 EAN 13 EAN 8 Code39 UPC A UPS E Codabar Interleaved2 of 5 ISBN Code 93 UCC EAN 128 GS1 Datarbar etc 2D Barcodes AztecCode AztecRu...

Страница 22: ...reen Then press the search button on the soft keypad and select iPhone Apps 3 The UniLinker App will be displayed Press the FREE button to the right of the application name The button caption will cha...

Страница 23: ...your Apple mobile device Bundle ID Command ikr co unionnet unilinker App ID Command pkr co unionnet unilinker figure D3 figure D4 2 1 1 2 On the iPad iPhone iPod Touch Refer to figure D5 1 Select the...

Страница 24: ...24 BarcodeGuy com UnionNet SP2100 User s Guide APPENDIX E Android UniLinker and SP2100 in SPP Mode...

Страница 25: ...e BarcodeGuy website at http www barcodeguy com Downloads htm 3 If the version of your firmware not the current version listed you want to take advantage of the new improved firmware features download...

Страница 26: ...ugh Step 7 8 3 Refer to figure F4 Press and hold the Top Side button of the SP2100 8 4 While holding the Top Side button in press the SP2100 s Scan button The scanner will respond by rapidly flashing...

Страница 27: ...Open OK then Next on the next two wizard pages then click the Finish button to complete the installation 9 4 4 IMPORTANT When you plug in the SP2100 s USB cable to the PC be sure to either use a diff...

Страница 28: ...28 BarcodeGuy com UnionNet SP2100 User s Guide 4 5 2 1 3 8 6 7 figure F8 Intentionally LeftBlank APPENDIX F Updating SP2100 Firmware con t...

Отзывы: