


11
BarcodeGuy.com® - UnionNet SP2100 User’s Guide
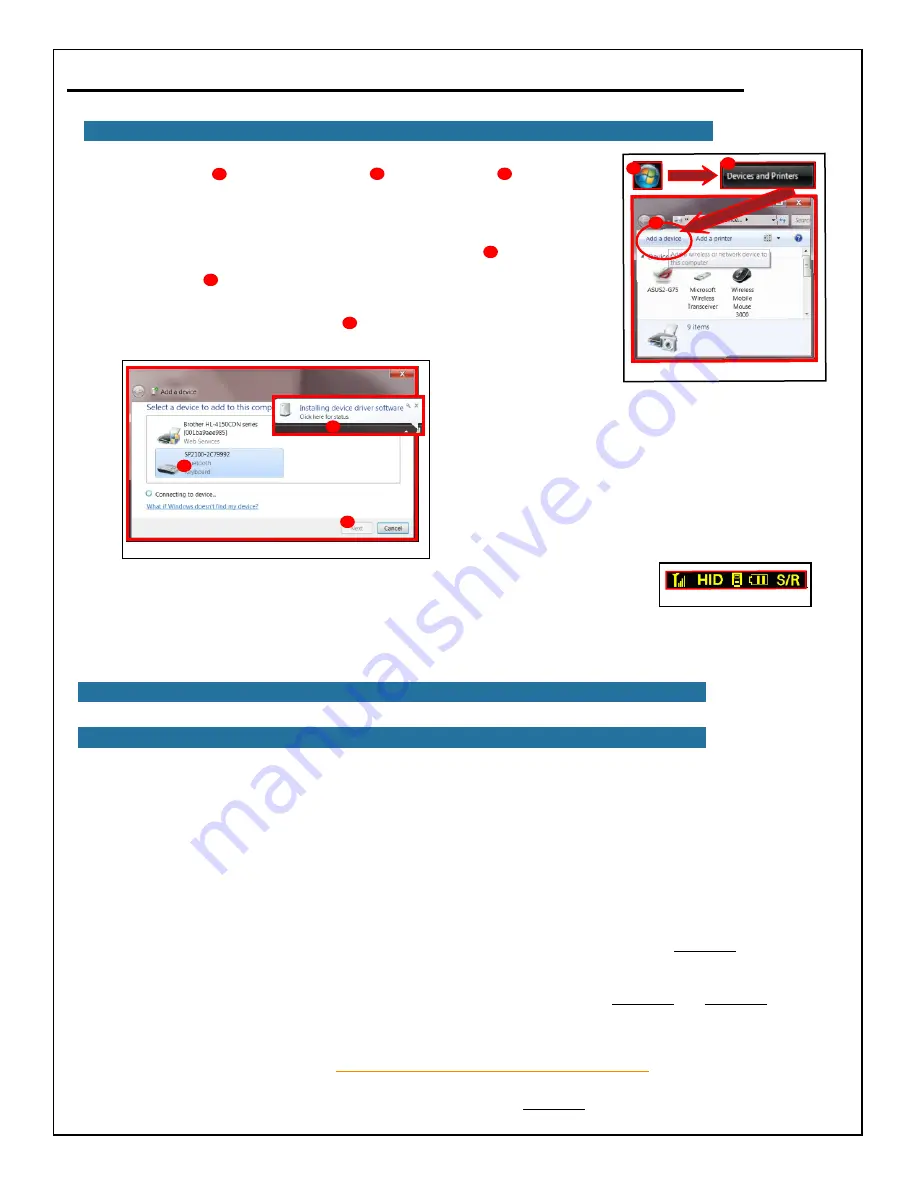
1. Press “Start” , “Devices & Printers” , “Add a Device”
(
figure 3.10)
2. The “New Device Wizard” will open. Windows will search for active
bluetooth devices in range (
figure 3.11’s window)
.
3. The SP2100 and the PC will find each other. The SP2100 will be displayed
with a keyboard icon identified as “SP2100-XXXXXXX” . Note that the
Figure 3.10
2
1
3
last 5 digits are the SP2100’s serial number. Highlight the SP2100 and press
the “Next” button. Windows will search for and automatically install
the appropriate drivers for the SP2100 to be used as a HID & serial device
through the USB cable. You’ll see balloon in the bottom right corner by the
clock indicating driver installation , then one that says that the drivers are
installed and the SP2100 is ready to use.
1
2
3
4
5
6
3.3 - Windows HID Connection Instructions, con’t
Figure 3.11
4
5
6
4. Note that Windows may take a while to identify the
serial driver. If you’re presented with a security
message that Windows cannot verify the publisher of
the driver, select “Install this driver anyway” option to
continue.
5. When the drivers are finished installing, the final screen
of the “New Device Wizard” on the PC will display
“This device has been successfully added to this
computer”. Note the keyboard icon assigned your
SP2100. Now just press the “Finish” button to complete
the wizard.
6. The SP2100 will beep and display
HID
in the Status Bar - see
figure 3.12
.
CONGRATULATIONS! Your SP2100 is now connected to your Windows PC! Test it out by starting your favorite data
entry application, make sure the cursor is flashing where you want the barcode data. Then just press the SP2100’s Scan
Button until the imager reads the barcode. The SP2100 is just like a keyboard, but you don’t have to type anything in!
3.5 - HID Tips & Tricks with the SP2100
As you probably saw on the YouTube video or from our web site, the SP2100 has some built-in features that make its use
very convenient. Note that the HID features vary somewhat by operating system, (
See
Section 4.1
and
figure 3.14
for OS
differences)
below are the major SP2100 HID features:
●
Pop-Up the soft keypad
by pressing the SP2100’s Bottom Side Button for 1-3 seconds then release to show the
device’s soft keypad.
●
Mixed-Mode Data Entry
- Once you have the device keypad up, you can scan barcodes and use the SP2100 at the
same time (iOS only).
●
Don’t forget that when the SP2100 is in “Power Saver”
mode, you’ll need to press the Scan Button twice to scan;
once to bring the SP2100 to Full Power Mode, then once again to activate the imager.
●
By Default, the SP2100 is set to “Send and Store”
- The SP2100 lets you pick what you’re going to do with the
scanned barcode data. You have the option to store, send and store or send only. See
Section 4.1
for detailed
information on memory storage modes.
●
Use Your SP2100 without your PC, Tablet of Phone
- You don’t need to be connected to a host to scan barcodes -
you can scan them into memory, then download them to your device later. See
Section 3.6
and
Section 3.7
for detailed
instructions..
●
Read Barcodes From your Computer or Mobile Device Screen
- Because it’s a 2D imager, the SP2100 allows
you to read barcodes directly from a computer or mobile device screen. There are some rules to keep in mind if
you’re going to do this regularly.
See Section XXX.XX for detailed information.
●
Change the “terminator”
- By default, the SP2100 sends a “Carriage Return” at the end of the barcode(
ASCII
Chr(13)
), but you can set it to just about anything you’d like. See
Section 5.0
for instructions.
3.4 - Mac HID Connection Instructions
Figure 3.12


