7. Coolant procedures
In this phase, the pressurization pump is activated to
fi
ll the pump. Liquid is
fl
ushed through the service kit tube connected to the
tank
fi
lter cap.
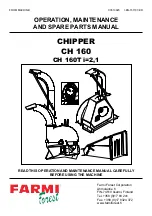
7. Disconnect the small hose that is part of the service kit hose to hose “F” (chiller tank return line).
Image 7-11
Disconnecting small service hose to hose ’F”
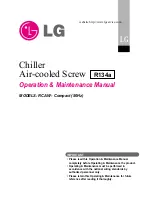
8. Connect the other end of the service kit hose to the lower metal quick connector of the chiller (create a loop).
Image 7-12
Connecting service hose to lower quick coupler
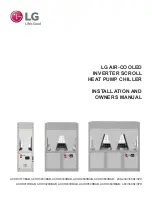
9. Connect hose “F” (chiller tank return line) to the upper coupler of the pump.
F
Image 7-13
Connecting "F"
10.Top up the tank with the remaining
fl
uid from the service kit container. See procedure "Adding coolant to the tank", page 31.
Note:
Only use Barco approved cooling liquid. Refer to the Barco website for spare parts.
11.Follow the service tool wizard to
fi
ll the entire coolant circuit.
12.Remove the service kit hoses.
13.Mount the insulation cover.
30
R5906015 ULC-30A 01/02/2018
Содержание ULC-30A
Страница 1: ...ULC 30A Service manual R5906015 01 01 02 2018...
Страница 4: ......
Страница 6: ...Table of contents Index 97 2 R5906015 ULC 30A 01 02 2018...
Страница 10: ...1 Safety 6 R5906015 ULC 30A 01 02 2018...
Страница 23: ...5 Covers 1 1 1 2 2 2 2 2 2 2 2 2 2 2 Image 5 4 Installing the 14 screws R5906015 ULC 30A 01 02 2018 19...
Страница 24: ...5 Covers 20 R5906015 ULC 30A 01 02 2018...
Страница 28: ...6 Fan unit 24 R5906015 ULC 30A 01 02 2018...
Страница 40: ...7 Coolant procedures 36 R5906015 ULC 30A 01 02 2018...
Страница 70: ...10 Refrigeration unit 66 R5906015 ULC 30A 01 02 2018...
Страница 92: ...11 Electronics Unit 88 R5906015 ULC 30A 01 02 2018...
Страница 100: ...A Appendix 96 R5906015 ULC 30A 01 02 2018...