SureCross™ DX80 Quick Start Guide
P/N 128185 Rev A
Banner Engineering Corp. • Minneapolis, MN U.S.A.
www.bannerengineering.com • Tel: 763.544.3164
16
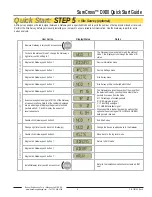
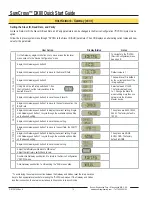
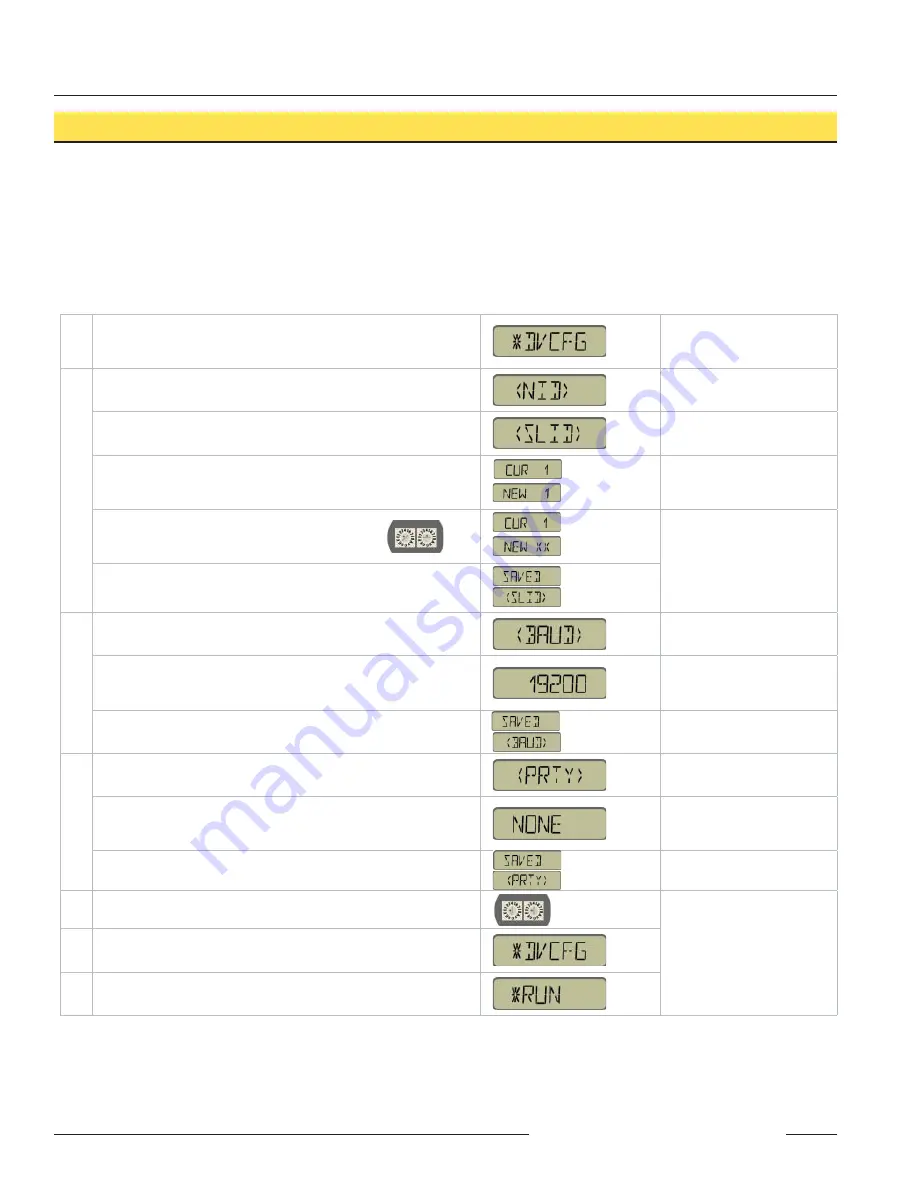
On the Gateway, single-click button one to move across the top level
menu options to the “Device Configuration” menu
To navigate to the *DVCFG
(Device Configuration) menu,
see page 6.
Single-click Gateway push button 2
Single-click Gateway push button 1 to move to the Slave ID field.
Default value is 1
Single-click Gateway push button 2
The new Slave ID is defined
by the current position of the
rotary switches.
Using 0-9 on the left rotary switch and 1-9 on
the right switch, set the rotary switches to the
desired Slave ID
Select between 01 to 99.
The factory default is set
to 1. Change the Slave ID
when running more than one
network into the Modbus
Master device.
Single-click Gateway push button 2 to save the new Slave ID.
Single-click Gateway push button 1 to move to the next menu option, the
BAUD rate.
Single-click Gateway push button 2 to display the current setting. Single-
click Gateway push button 1 to cycle through the available options. Stop
on the desired setting.
The options are 9600, 19200,
38400. The factory default is
19200.
Single-click Gateway push button 2 to save the new setting.
Single-click Gateway push button 1 to move to the next field, the PARITY
field.
Single-click Gateway push button 2 to display the current setting. Single-
click Gateway push button 1 to cycle through the available options. Stop
on the desired setting.
The options are NONE,
EVEN, ODD. The factory
default is NONE.
Single-click Gateway push button 2 to save the new setting.
Adjust the left rotary switch back to NID value.*
Adjust the right rotary switch back to zero.
Double-click Gateway push button 2 to return to the Device Configuration
(*DVCFG) menu.
Click Gateway push button 1 until reaching the *RUN menu option.
SET SLA
VE ID
User Action
Display/Status
Notes
Setting the Slave ID, Baud Rate, and Parity
Similar to Network ID, the Slave ID, Baud Rate, and Parity parameters can be changed in the Device Con
fi
guration (*DVCFG) system menu
option.
Follow the top level system menu through *DVCFG to the Slave ID (SLID) parameter. The LCD displays an alternating current value and new
value for the parameter.
SET BAUD RA
TE
SET P
ARITY
Host Network - Gateway (con’t)
* To avoid losing the network connection between the Gateway and Nodes, reset the rotary switches
back to their appropriate values before leaving the *DVCFG sub-menus. If the Gateway and Nodes
lose their connection, the network may take up to 20 seconds to re-synchronize.

