


Create a profile
The public is invited to create profiles of students, faculty, teams, school visitors or other stories
of general interest. A Create a Profile link appears at the bottom of each page. Profiles will not
appear on the site until they have been approved.
Creating a profile
Click on the Create a Profile link at the bottom
of the page. It will take you to the Enter Profile
page.
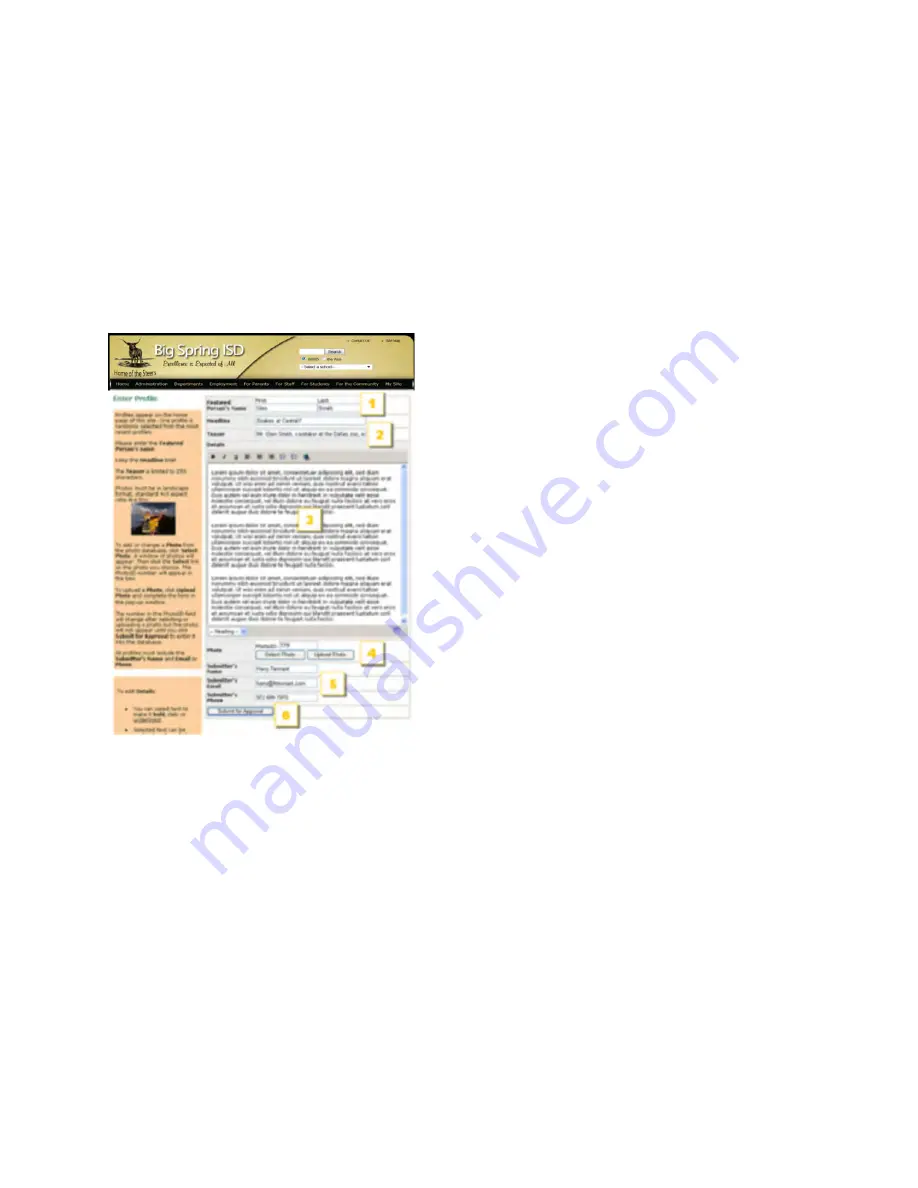
1.
Profiles are usually about a person. Enter
the featured person’s name.
2.
Profile headlines and teasers appear in
rotation on the home page. Make your
headlines and teasers grab the interest or
imagination of the reader. The teaser is limited
to 255 characters.
3.
Enter the Profile details.
4.
Each Profile can include a photo. The photo
can be selected from the photos already on the
site (see Browsing, searching and selecting
photos) or you can upload a new photo. The
system will automatically resize your photo to
conform to the site design requirements.
5.
Enter your name, e-mail address and phone
number in case the profile administrator needs
to talk to you.
6.
Click the Submit for Approval button. You
will be sent an e-mail when the Profile is
approved.
Содержание F30
Страница 1: ...PROCEDURE MANUAL BIG SPRING ISD TECHNOLOGY 3600 11TH PLACE 432 264 4155 ...
Страница 6: ...You will need to set your profile the first time you login by clicking on my profile ...
Страница 7: ...Choose the correct campus that you are assigned to and then choose Save Changes ...
Страница 8: ...You will need to click Request New Ticket ...
Страница 9: ...Please select the problem type you are having from this list ...
Страница 10: ...Click on yes to start your ticket Once you start your ticket there is no way to quit ...
Страница 12: ...Click on the home button when you are done to see your open ticket ...
Страница 13: ...You can now logout Your ticket has been submitted and we will work on it as quickly as possible ...
Страница 65: ...Email Certificate Installation 3 Click Next 4 Click Next again ...
Страница 66: ...Email Certificate Installation 5 Select Finish 6 Select Yes on the Security Warning screen ...
Страница 67: ...Email Certificate Installation 7 Click OK on the following box 8 Click OK in the View Certificate box ...
Страница 68: ...Email Certificate Installation 9 Click Yes in the Security Alert box ...
Страница 74: ...4 Adjust the volume of your computer audio using the Computer CD Player knob on the front of the receiver ...
Страница 77: ......
Страница 140: ...15 Click OK 16 Click Next 17 Leave the check box UNCHECKED Click Next 18 Uncheck the checkbox click Next ...
Страница 141: ...19 Click Next 20 Click Next 21 Click Install ...
Страница 149: ...5 If you are asked to choose a time zone just leave it on the default 6 Webmail should be open and ready to use ...
Страница 152: ...8 Locate Set as Default Printer in the list and select it left click 9 A new default printer has been selected ...
Страница 155: ... Click on Yes to update Malwarebytes It should update without a problem and will move to the next screen when ready ...
Страница 158: ... Make sure all of the boxes are checked in the list of results You may have to check each box individually ...
Страница 164: ...7 Enter awards one at a time 8 Enter events games meets one at a time 9 Add FAQs Links and Files as needed ...
Страница 170: ......
Страница 190: ......


