


53
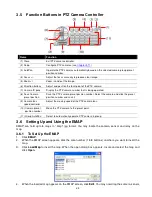
4.3 Recording Setting
In the Recording dialog box, click
OK
to accept the new settings, click
Cancel
to exit without saving, and
click
Default
to revert back to original factory setting.
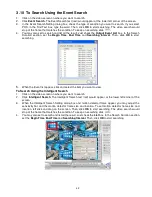
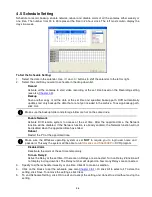
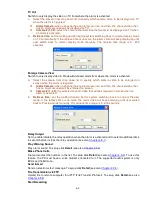
(10)
(11)
(9)
(1)
(2)
(3)
(4)
(5)
(6)
(7)
(8)
(1) Camera Icons
Select the camera number you want to set the recording setting. To select all the cameras, enable the
ALL
check box. To select more than one camera,
Right click
on the camera icon. To select one camera only,
Left
click
on the camera icon. The camera icon turns red when it is selected.
(2) Recording Mode
The blocks from 00 to 23 represent the time in 24-hour clock. To record in full 24 hours, select the recording
mode and click the
button. If you want to only record at a particular time,
click the colored block beside the
recording mode then click on the time blocks
. When the system starts recording a red triangle mark would
appear at the upper left corner of the screen. The recording modes are listed below:
-
Always Recording
Record the video from the selected camera and save it to the designated storage path (see also
Chapter 4.1 #1
).
-
Motion Recording
Start recording the video from the selected camera only when the system detects movement. Once a
motion is detected, the system automatically saves the previous frames and stop based on the
Start
Record Prior
and Stop
Record After settings
.
-
Smart Recording
Automatically switch to recorded at the maximum frame rate setting once a motion is detected and if
there is no motion, it records at the minimum frame rate setting Set the maximum and minimum frame
rate setting in
(7) Frame Rate
section.
-
Voice Detecting Recording
DVR system will record the sound when the voice exceeds the intensity value in Voice Detection
setting.
-
No Recording
The system won’t do any recording.
(3) Enable Audio
Select to assign the audio channel of the selected camera. You can only assign one audio channel to one
camera source. This way you can record both audio and video.
i
An Audio I/O card is required to use this function.
Содержание NV 5000
Страница 8: ......
Страница 30: ...22 Name Function 17 Start recording video 18 To enable auto pan function ...
Страница 123: ...115 4 Mark the UPnP Framework check box and click OK ...


