Rev. 4.0 13ELE2000 Page 6 /14
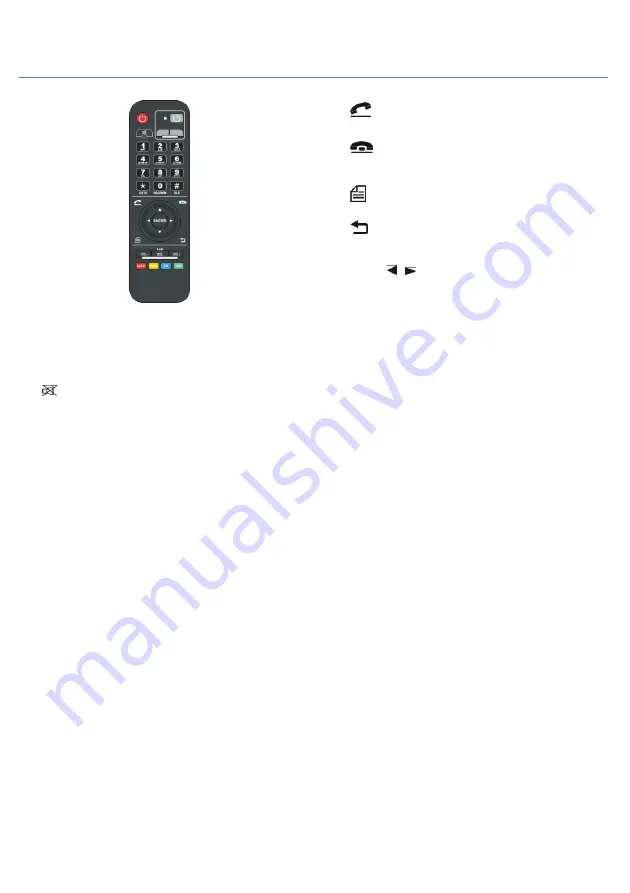
IR remote control unit
1.
PWR(red):
This button is used to turn on/off the unit
. The
graphic display on screen requires approximately five
seconds to be composed when the unit is powered up.
Powering down (turning off) the 13ELE2000 takes the same
amount of time to complete; counting from the moment
that the screen is blanked.
2.
: When the unit is powered on, this button will toggle
audio mute.
3.
0 - 9 : numeric keys.
a.
Radio mode – keys 1 – 6 are used to select preset
station.
Press and hold
the Keys 7(TA), 8(AF) and 9(PTY)
also operate the corresponding named function when
in FM radio mode.
b.
DVD/VCD/CD mode – shortly press to directly access
chapter or track by their numeric index.
Press and hold
to operate the correspondingly named function.
c.
Bluetooth mode: telephone dial pad keys
4.
GOTO/*:
a.
In DVD and VCD mode, use this button and then the
cursor buttons to select TITLE, CHAPTER, AUDIO,
SUBTITLE, ANGLE, TT TIME, CH TIME, REPEAT, TIME
DISP. After the selection, press ENTER button to
confirm the new settings. When this display is shown,
use number buttons 0-9 select the desirable track.
b.
In radio mode, press this button then use the number
button to manually specify frequency. In FM radio,
frequency is specified to the radio using 5 digits without
the decimal. E.g. 123.4MHz is entered by “GOTO” “1”
“2” “3” “4” “0”.
c. When dialling a telephone number using Bluetooth,
this is the “*” key on the telephone key pad.
5.
CLR/#: Where applicable, undo numeric key typing shown
on screen, for example, correction of telephone number
when using the Bluetooth dialler. When dialling a
telephone number using Bluetooth, this is the “#” key on
the telephone key pad.
6.
:
This button is used to receive an incoming Bluetooth
phone call, and to dial up a Bluetooth phone call.
7.
:
This button is used to reject an incoming Bluetooth
phone call, and to hang up a Bluetooth phone call that is in
progress.
8.
: This button is used to switch the current interface to
the main interface.
9.
: In DVD/VCD/CD mode, press the button to be back to
the previous mode. This button can be used to call up the
“root” source selection screen.
10.
▲
/
▼
/ / /ENTER:
a.
During media playback, the user may use this group of
button to “fast reverse/fast forward, beginning chapter
or track, go to previous or next chapter or track”;
b.
In radio mode, these buttons can be used to search for
a station or recall a preset station.
c.
Cursor control: During operations such as DVD setup,
use the triangle buttons to navigate file lists and the
setup menus.
11.
VOL- VOL+:
a.
VOL-/VOL+ used on their own: adjust volume.
b.
When these buttons are used in conjunction with SEL
button, the corresponding selections can be adjusted.
12.
SEL/LED: Adjust audio and angle of the motorised screen.
When corresponding function near the lower left of the
graphical display,use VOL+ and VOL- button to adjust the
desire value.
Press and hold
the button to switch the colour
of the button backlights – orange or blue.
13.
MODE: AV source selection.
14.
BAND: Radio mode - select AM FM bands.
15.
EQ: Use this button to access sound equaliser settings.
16.
DISP: This button is used to turn on or off clock display (on
the upper right corner of the screen).
Learning function
On the upper right of this IR remote unit, a cluster of three
buttons are configurable by user – they have “learning”
functions. For example, frequently accessed functions on an
external monitor or the satellite TV receiver can be programmed
onto these buttons at will. Programming or “learning”
procedures are simple. The user may follow these steps.
1.
Prepare the IR remote control unit to be “learnt”, the
“source device”.
2. On our IR remote control(target device),
press and hold
the
red power button (top right) until the LED is lit. This takes 5
seconds. When the LED is lit, our IR remote control unit is
in “learning” mode.


