Rev. 4.0 13ELE2000 Page 12 /14
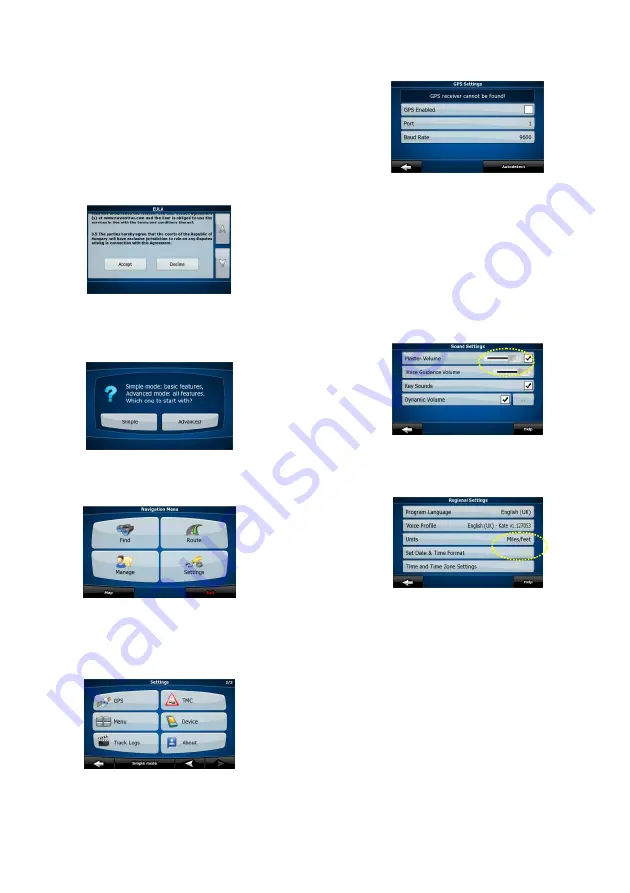
This illustration of first-time-use has the first two screenshots
that will not be displayed during normal, daily use. Ensure the
SD card containing the map software is inserted fully (see earlier
quick start section “Satellite Navigation”). Bring up “root” screen,
tap navigation. Tap the icon on the right hand side to display the
directory browser. Use this browser to locate the “nngnavi.exe”
file. Tap the name of this file to highlight it then tap “OK”.
The map needs a moment to load. The system may ask the user
to select voice language and screen display language. When this
happens select by tapping the available items from the list
presented on screen. After we have finished, tap OK at the
bottom of the screen to continue. The settings now selected can
be changed later. The EULA screen is displayed as shown:
The user needs to read the text and scroll down using the “down
arrow” on the right hand side of the screen. The “Accept” icon is
shown when the end of the text is reached. If the user agrees to
the EULA, tap this to see the next screen as shown:
This illustration uses the “Advanced” option on the right. Tap it
to continue. The user can change this setting later. The following
screen will be shown:
Satellite navigation needs GPS signal which is received by a GPS
antenna (usually concealed). This step ensures that the system
register the antenna. Tap lower left “Settings” to display the
“Settings” screen. On this screen, tap the left arrow on the lower
left corner to turn to second page as shown:
Note that “TMC” is not implemented on our system so the
upper right icon corresponding to this has no effect on the
system. Locate the “GPS” icon (upper right) and tap to display
the GPS screen as shown:
Tap “GPS Enabled” to ensure the check box is cleared. Tap
“Autodetect” (lower right corner). Observed that the system will
found the GPS antenna and the check box will be checked
automatically. “Port” and “Band Rate” will also display the
correct values that are suitable for our GPS antenna. The system
is now set up to navigate. When we have finished, tap right
arrow (lower right corner) to go back to the previous screen.
Two further settings may be very useful.
(1)
Navigation Menu -> Settings 1/2 -> Sound:
“Master Volume” may be adjusted to a higher level given that
road noise needs to be compensated by louder sound.
(2)
Navigation Menu -> Settings 1/2 -> Regional:
“Units” is imperial (Miles/ feet) in UK but this should be metric
(Kilometres/metres) in Europe.
Now satellite navigation is ready to use. To input an address to
the system (after which it can be made the destination):
Navigation Menu -> Find -> Find address
Tap “Country” to pick one from the list. Use arrows at the
bottom of the screen to turn to different pages until the desired
country name is displayed. Tap to select it. Tap <City Name> to
close into your address in mind. Postcode can be typed here
using the on-screen keyboard. If exact house number cannot be
located, tap the “Street Midpoint” and “Intersection” icon on
the bottom bar to obtain the best approximation. The map
software also provides means to store the route, change the
route and add waypoints (via) to the route.


