


ASUS Z8NH-D12 Series
2-31
2. USB connector (5-1 pin USB3; A-Type USB4)
These connectors are for USB 2.0 ports. Connect the USB module cables
to connectors USB3, then install the modules to a slot opening at the
back of the system chassis. These USB connectors comply with USB 2.0
specification that supports up to 480 Mbps connection speed.
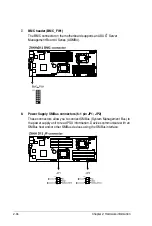
3. Thermal sensor cable connectors (3-pin TR1, TR2)
These connectors are for temperature monitoring. Connect the thermal
sensor cables to these connectors and place the other ends to the devices,
which you want to monitor temperature.
Содержание Z8NH-D12
Страница 1: ...Motherboard Z8NH D12 Series Z8NH D12 Z8PH D12 IFB Z8PH D12 SE QDR ...
Страница 13: ...1 Product introduction This chapter describes the motherboard features and the new technologies it supports ...
Страница 24: ...2 6 Chapter 2 Hardware information 2 2 4 Motherboard layouts Z8NH D12 ...
Страница 25: ...ASUS Z8NH D12 Series 2 7 Z8PH D12 IFB ...
Страница 26: ...2 8 Chapter 2 Hardware information Z8PH D12 SE QDR ...
Страница 56: ...2 38 Chapter 2 Hardware information ...
Страница 57: ...3 Powering up This chapter describes the power up sequence and ways of shutting down the system ...
Страница 58: ...ASUS Z8NH D12 Series Chapter summary 3 3 1 Starting up for the first time 3 3 3 2 Turning off the computer 3 4 ...
Страница 100: ...4 40 Chapter 4 BIOS setup ...
Страница 167: ...ASUS Z8NH D12 Series 6 33 8 Click your preferred options and click Finish to exit the wizard ...
Страница 175: ...ASUS Z8NH D12 Series A 3 A 1 Z8NH D12 block diagram ...
Страница 176: ...A 4 Appendix A Reference information A 2 Z8PH D12 IFB block diagram ...
Страница 177: ...ASUS Z8NH D12 Series A 5 A 3 Z8PH D12 SE QDR block diagram ...
Страница 178: ...A 6 Appendix A Reference information ...