


ASUS Z8NH-D12 Series
2-11
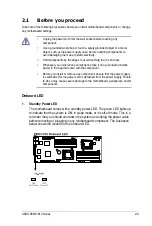
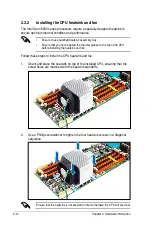
2.3.1
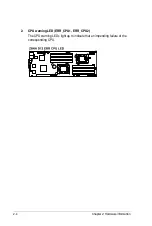
Installing the CPU
To install a CPU:
1.
Locate the CPU socket on the motherboard.
Before installing the CPU, ensure that the socket box is facing toward you and
the load lever is on your left.
2.3
Central Processing Unit (CPU)
The motherboard comes with dual surface mount LGA 1366 Socket designed for
the Intel
®
Xeon 5500 series CPU in the Land Grid Array (LGA) package.
• Upon purchase of the motherboard, ensure that the PnP cap is on
the socket and the socket contacts are not bent. Contact your retailer
immediately if the PnP cap is missing, or if you see any damage to the PnP
cap/socket contacts/motherboard components. ASUS shoulders the repair
cost only if the damage is shipment/transit-related.
• Keep the cap after installing the motherboard. ASUS will process Return
Merchandise Authorization (RMA) requests only if the motherboard comes
with the cap on the Socket 1366.
•
The product warranty does not cover damage to the socket contacts
resulting from incorrect CPU installation/removal, or misplacement/loss/
incorrect removal of the PnP cap.
Содержание Z8NH-D12
Страница 1: ...Motherboard Z8NH D12 Series Z8NH D12 Z8PH D12 IFB Z8PH D12 SE QDR ...
Страница 13: ...1 Product introduction This chapter describes the motherboard features and the new technologies it supports ...
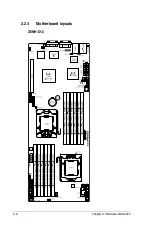
Страница 24: ...2 6 Chapter 2 Hardware information 2 2 4 Motherboard layouts Z8NH D12 ...
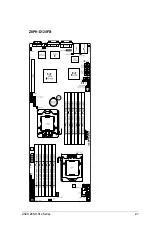
Страница 25: ...ASUS Z8NH D12 Series 2 7 Z8PH D12 IFB ...
Страница 26: ...2 8 Chapter 2 Hardware information Z8PH D12 SE QDR ...
Страница 56: ...2 38 Chapter 2 Hardware information ...
Страница 57: ...3 Powering up This chapter describes the power up sequence and ways of shutting down the system ...
Страница 58: ...ASUS Z8NH D12 Series Chapter summary 3 3 1 Starting up for the first time 3 3 3 2 Turning off the computer 3 4 ...
Страница 100: ...4 40 Chapter 4 BIOS setup ...
Страница 167: ...ASUS Z8NH D12 Series 6 33 8 Click your preferred options and click Finish to exit the wizard ...
Страница 175: ...ASUS Z8NH D12 Series A 3 A 1 Z8NH D12 block diagram ...
Страница 176: ...A 4 Appendix A Reference information A 2 Z8PH D12 IFB block diagram ...
Страница 177: ...ASUS Z8NH D12 Series A 5 A 3 Z8PH D12 SE QDR block diagram ...
Страница 178: ...A 6 Appendix A Reference information ...