


ASUS Z8NH-D12 Series
5-27
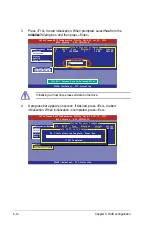
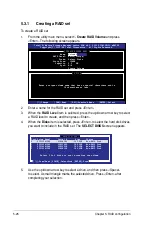
6.
Use the up/down arrow key to select the stripe size for the RAID array (for
RAID 0, 10 and 5 only), and then press <Enter>. The available stripe size
values range from 4 KB to 128 KB. The following are typical values:
RAID 0: 128KB
RAID 10: 64KB
RAID 5: 64KB
We recommend a lower stripe size for server systems, and a higher stripe size
for multimedia computer systems used mainly for audio and video editing.
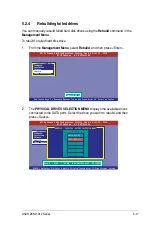
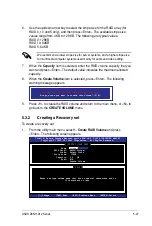
7.
When the
Capacity
item is selected, enter the RAID volume capacity that you
want and press <Enter>. The default value indicates the maximum allowed
capacity.
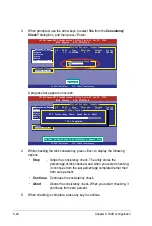
8.
When the
Create Volume
item is selected, press <Enter>. The following
warning message appears.
WARNING: ALL DATA ON SELECTED DISKS WILL BE LOST.
Are you sure you want to create this volume? (Y/N):
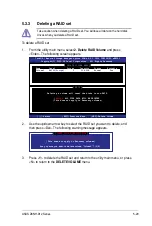
9.
Press <Y> to create the RAID volume and return to the main menu, or <N> to
go back to the
CREATE VOLUME
menu.
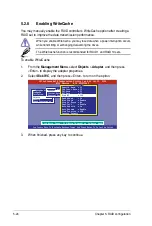
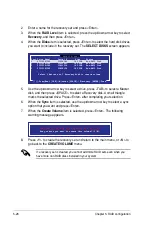
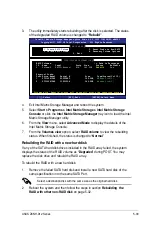
5.3.2
Creating a Recovery set
To create a recovery set
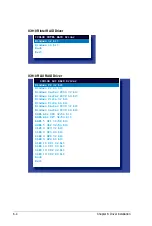
1.
From the utility main menu, select
1. Create RAID Volume
and press
<Enter>. The following screen appears.
Intel(R) Matrix Storage Manager option ROM v8.5.0.1030 ICH10R/DO wRAID5
Copyright(C) 2003-08 Intel Corporation. All Rights Reserved.
[
CREATE VOLUME MENU
]
[
HELP
]
Enter a unique volume name that has no special characters and is
16 characters or less.
[
↑↓
]Change [TAB]-Next [ESC]-Previous Menu [ENTER]-Select
Name:
Volume0
RAID Level: RAID0(Stripe)
Disks: Select Disks
Strip Size: 128KB
Capacity: 0.0 GB
Sync: N/A
Create Volume
Содержание Z8NH-D12
Страница 1: ...Motherboard Z8NH D12 Series Z8NH D12 Z8PH D12 IFB Z8PH D12 SE QDR ...
Страница 13: ...1 Product introduction This chapter describes the motherboard features and the new technologies it supports ...
Страница 24: ...2 6 Chapter 2 Hardware information 2 2 4 Motherboard layouts Z8NH D12 ...
Страница 25: ...ASUS Z8NH D12 Series 2 7 Z8PH D12 IFB ...
Страница 26: ...2 8 Chapter 2 Hardware information Z8PH D12 SE QDR ...
Страница 56: ...2 38 Chapter 2 Hardware information ...
Страница 57: ...3 Powering up This chapter describes the power up sequence and ways of shutting down the system ...
Страница 58: ...ASUS Z8NH D12 Series Chapter summary 3 3 1 Starting up for the first time 3 3 3 2 Turning off the computer 3 4 ...
Страница 100: ...4 40 Chapter 4 BIOS setup ...
Страница 167: ...ASUS Z8NH D12 Series 6 33 8 Click your preferred options and click Finish to exit the wizard ...
Страница 175: ...ASUS Z8NH D12 Series A 3 A 1 Z8NH D12 block diagram ...
Страница 176: ...A 4 Appendix A Reference information A 2 Z8PH D12 IFB block diagram ...
Страница 177: ...ASUS Z8NH D12 Series A 5 A 3 Z8PH D12 SE QDR block diagram ...
Страница 178: ...A 6 Appendix A Reference information ...