


5-14
Chapter 5: RAID Configuration
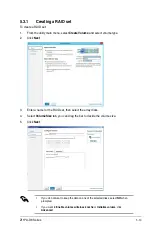
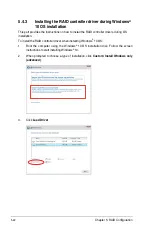
6.
Confirm the volume creation, than click
Create Volume
to continue.
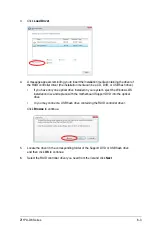
This process could take a while depending on the number and size of the disks. You can
continue using other applications during this time.
7.
Wait until the process is completed, then click
OK
when prompted.
You still need to partition your new volume using Windows Disk Management before
adding any data.
The RAID set is displayed in the
Volumes
list and you can change the settings in
Volume Properties
.
Содержание Z11PA-D8 Series
Страница 1: ...Z11PA D8 Series User Guide ...
Страница 22: ...2 4 Chapter 2 Hardware Information 2 2 3 Motherboard layout ...
Страница 37: ...2 19 Z11PA D8 Series 10 PCH_MFG1 setting 3 pin PCH_MFG1 This jumper allows you to update the BIOS ME block ...
Страница 54: ...2 36 Chapter 2 Hardware Information ...
Страница 58: ...3 4 Chapter 3 Powering Up ...
Страница 106: ...4 48 Chapter 4 BIOS Setup ...
Страница 130: ...5 24 Chapter 5 RAID Configuration ...
Страница 148: ...6 18 Chapter 6 Driver Installation ...
Страница 150: ...A 2 Appendix Z11PA D8 Series block diagram with SATA M 2 device Z11PA D8 Series block diagram without SATA M 2 device ...
Страница 158: ...A 10 Appendix ...