13
Astra P-10 USER MANUAL
The infrared remote control is intended for day-to-day use when the combustion system is fully configured and operational. It is used
for changing the burning power and temperature settings, turning the combustion in the stove on and off.
In the upper part of the display, there is a line of indicators signaling various modes and alerts of the controller. The IR sensor in that
line is used for communication with remote control unit.
The screen displays the set or current values for the currently selected menu option. Buttons help to navigate through the menu and
control different functions of the stove controller. The intended use of the buttons is described in the table above.
The display has an integrated beeper. The beeper generates feedback signals, when the display buttons are being pressed. The
following sound signals are available:
• Short high tone: sounds when navigating the menu and editing the settings.
• Long low tone: sounds in case of an invalid operation (wrong button pressed).
• Long high tone: in case of an alert, this tone sounds with the user-defined volume; in case of an error, this tone sounds at 100%
volume; for description of alerts and errors, refer to the chapter “Troubleshooting”.
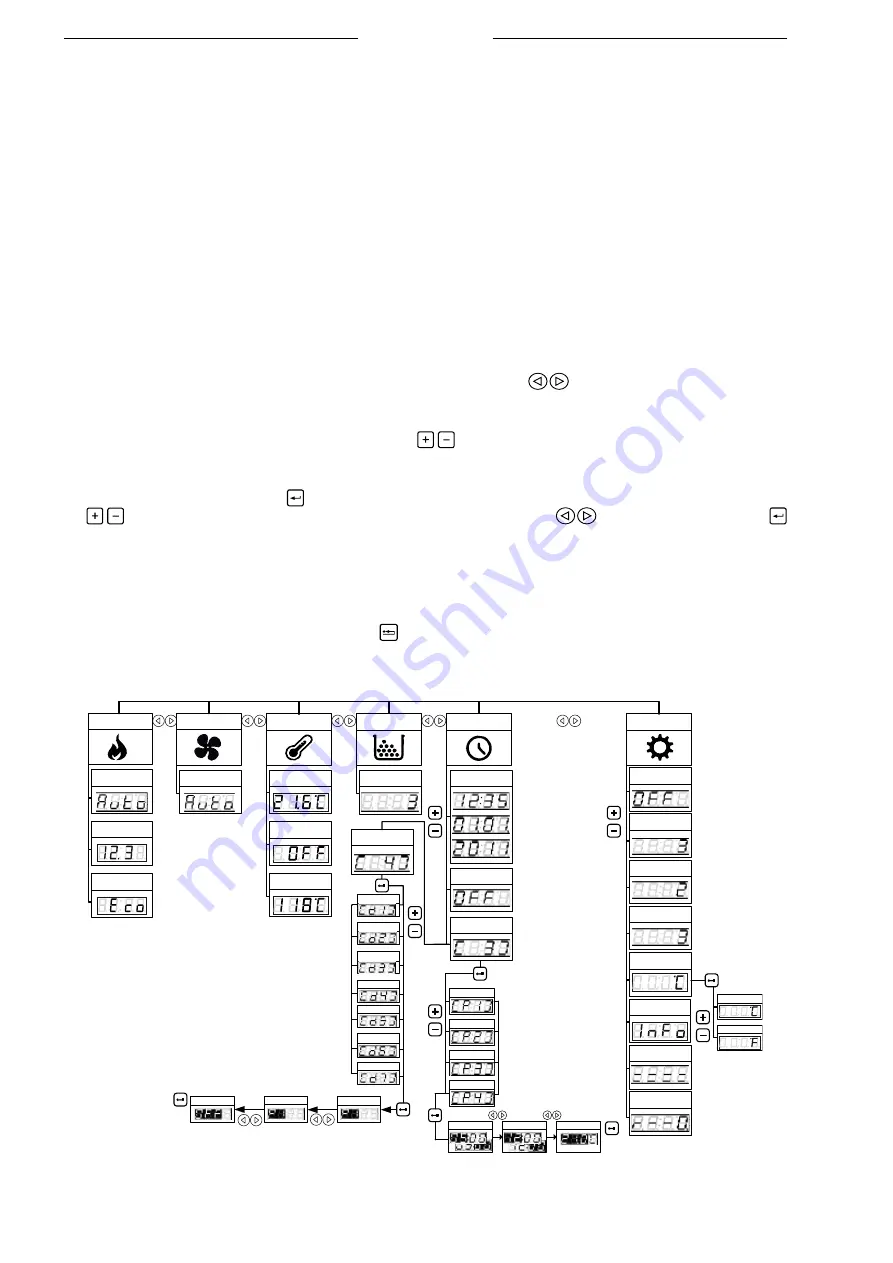
• NAVIGATING THE MENU
In order to navigate the menu horizontally, in the same level, use the menu buttons
. When choosing a menu option, an icon
in the indicator line of the display lights up. At the same time, the screen indicates either the value of the chosen menu parameter, or,
in the case the chosen menu section has a sublevel (for example, Time menu), the value of the first subsection parameter.
In order to navigate the menu vertically, use the menu buttons
. When navigating the lower sublevel of the menu, a number
of a particular menu subsection briefly lights up. For example, the Time menu section has a lower level menu consisting of four
subsections. Each time you skip to the next subsection the number from 1 to 4 lights in the screen.
To modify a setting in the menu, press button to enter the edit mode for the selected setting. The screen value starts blinking.
Use
buttons to change the value. To move through the steps in the edit mode, use
. buttons. When finished, press
button to save the setting and exit the edit mode. The display returns to the menu entry you have just edited.
The screen of the display shows the set value or the actual measured value, depending on the setting. For example, when you edit
the temperature, you enter the desired room temperature. After you exit the edit mode, the screen indicates the actual measured
temperature which may differ from the set temperature. When you edit, for example, the burning power setting, the screen indicates
the set value.
To exit the edit mode without saving the changes, press button. This button is also used for returning up one level in the menu.
For example, if you are editing the Program 3 in the Weekly Timer Periods menu subsection, press the Cancel button to discard the
changes and return to Program 3. Pressing the Cancel button further moves you to Weekly Timer Periods, then - to the Clock menu
section.
Clock
Time/date
Temperature
Power
Setup
Burning power
Room
temperature °C
Weekly timer
ONN/OFF
Weekly timer
periods
Weekly timer
Days
Idle display
brightness
Program 1
Program 2
Program 3
Program 4
1. Program
3. Program
Fuel quality
Key lock
Service menu
Time
Fuel
2. Program
Manual feeding
Status indication
Units of temperature
measuring
Celsius
Fahrenheit
Programinės įrangos
versija
The anti-freeze
mode
Fan
Fan speed
The economy
mode
The smoke
temperature
Monday
Tuesday
Wednesday
Thursday
Friday
Saturday
Sunday
Start time
End time
Temperature
Idle display
Beeper volume
mode
Fig. 11
Menu structure


