9
Installation
Power supply / Power supply unit
The power supply unit is designed for 100V to 240V AC (50-60 Hz). It is supplied with four change
adapters enabling virtually worldwide use. Where necessary, connect the plug normally used in your
country to the power supply unit. There are two versions of the plug-in power supply unit that are
connected slightly differently:
Version 1: Set the switch on the power supply unit to OPEN and push out the existing plug upwards.
Then insert the new plug required into the power supply unit and lock it with the switch (LOCK).
Version 2: Remove any existing plug by pressing OPEN. Then insert the required new plug into the
power supply unit at a slight angle with the label TOP upwards. Press downwards until it snaps into
place.
microSD card
Aastra 620d, 630d (as of device software 4.0) : Inside your handset underneath the battery there is
space for accommodating an optional microSD card. This special microSD card stores the handset’s
logon data on your communication system, all the main local device data and the personal directory.
This ensures that, if the device is defective, it is possible to take out the card and use it on a replace-
ment device so operations can be maintained in the shortest possible time and without having to
log on again.
Commercially available microSD cards cannot be used.
Please take note of the User’s Guide supplied with the card and the more detailed descriptions avai-
lable on the website at http://www.aastra.de or http://www.aastra.com .
Important information about the battery
The devices are powered by a Li-ion battery (both standard and power battery).
It is vital that you read the safety regulations before using the battery for the first time. Keep these
safety regulations and all instructions for use at hand for future reference.
• Dispose of used batteries according to the instructions on page 97.
Failure to heed any of the following precautions when using the battery can lead to overheating, fire
and danger of explosion.
• CAUTION: Risk of explosion if the battery is replaced by an incorrect type.
• Never try to use the battery for the power supply of any device other than these handsets.
• Never use or leave the battery close to a naked flame.
• Never put the battery into a microwave oven, do not throw it into a fire and do not expose it to
high temperatures by any other means.
8
Installation
USB and external charging connection
Aastra 620d, 630d: A mini USB connection (2.0) is located at the bottom right. This has two func-
tions:
• as an interface for connecting to a PC to load data from or to the device, for example. If the hand-
set is connected to a PC, the battery is charged at the same time. The charging process is, howe-
ver, slower than if the handset is charged in the charging unit.
• as a connection socket for a USB charging device (see Accessories, page 101) to charge the hand-
set even when it is in a leather pouch. The charging process is also slower here than charging in
the charger cradle.
Only use a shielded USB cable of the type “USB 2.0 A on USB Mini B”.
Aastra 630d - USB connector: To remove the sealing cover
The opening of the USB connection in the Aastra 630d is closed with a captive cover. If the USB cable
is not in use, please close the opening so the device can be used in accordance with its protection
class.
Remove the sealing cover from the device by pulling it out on the upper edge. Never pull it out on
the bottom edge.
Connecting the charging unit
Aastra 610d, 620d: This handset can be used without any changes to the charger cradle.
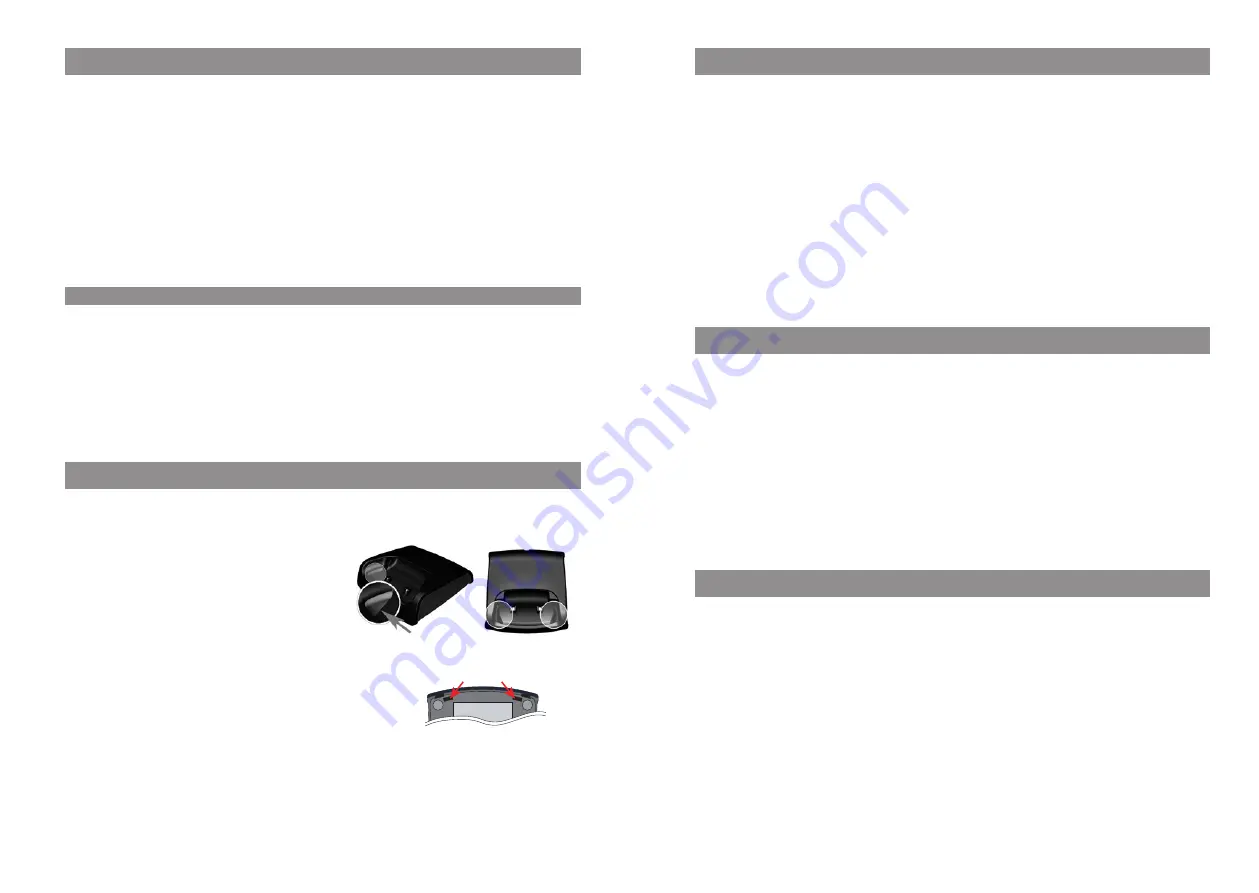
Aastra 630d: To use this handset, you must remove
the two lateral guides in the charger cradle. They are
easy to lift on the inside edge using a fingernail or a
paper clip.
The plastic guides can also be removed, by pushing a suitable
screwdriver into the slits on the bottom of the charger.
Connect the plug-in power supply to the charger cradle and place the connection cable through the
cable guide. Place the charger cradle on a non-slip surface. Change the plug of the power supply
unit if necessary (see below).


