background image

9

SillHa Oral Wellness Instrument

1.1.4 Measurement Principle

This instrument measures the oral rinse measurement sample using the dual-
wavelength reflectance method. The change in the color of the test strip after 
sample application is measured by the reflectance of light with wavelengths of 565 
nm, 635 nm and 760 nm. Then, results are obtained for cariogenic bacteria, 
acidity, buffer capacity, blood, leukocyte, protein and ammonia.

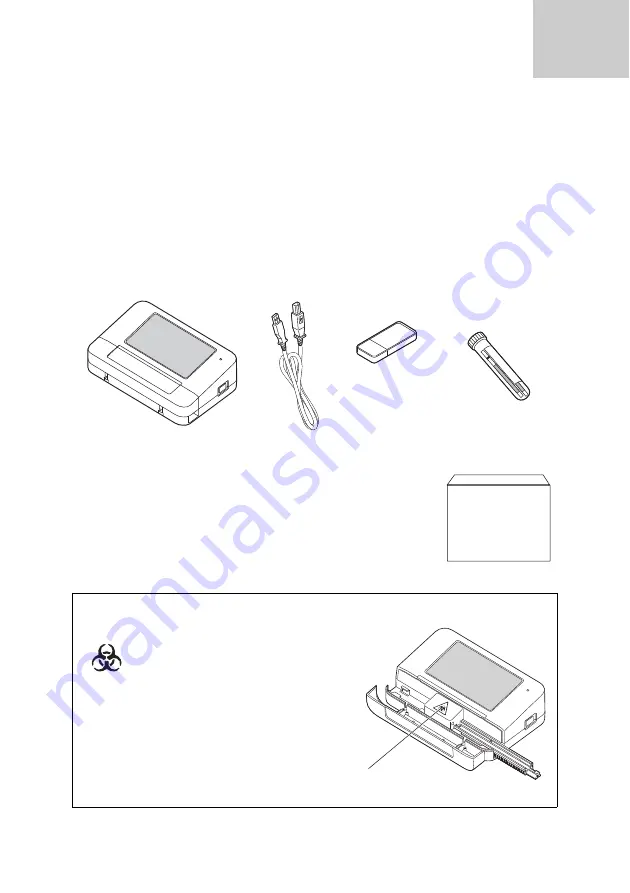
1.2 Contents of the Shipping Carton

You will find the following items in the shipping carton. Make sure all of these 
items are present inside. If anything is missing or damaged, contact ARKRAY. 

Instrument

USB cable

USB memory 
stick (SillHa 
software for 
Windows and 
Mac OS)

Check strips

•Operating manual (this document)

SillHa paper 
(test strip kit)

- 30 test strips
- 30 oral rinse 

solutions

- SillHa paper 

package insert

CAUTION:

Inside the reading unit cover

Do not touch the parts inside the 
reading unit cover and the 
test strip holder with unprotected 
hands. Wear personal protective 
equipment to prevent exposure to 
pathogenic microorganisms while 
placing the test strip, and during 
maintenance of these parts.

1.1.4

Содержание SillHa LH-4912

Страница 1: ......

Страница 2: ......

Страница 3: ...ion 16 1 5 1 Installing the SillHa Software Windows Edition 16 1 5 2 Installing the SillHa Software Mac Edition 18 1 5 3 Connecting the Instrument PC and Printer 19 1 5 4 Set Initial Settings on Instrument 19 1 5 5 Automatic Upgrading of the Instrument Software 20 Chapter 2 Measurement 22 2 1 Cautions During Measurement 22 2 1 1 Handling the Measurement Sample 22 2 1 2 Handling the SillHa paper Te...

Страница 4: ...ta on the PC 52 3 5 3 Importing the Patient Information 53 3 5 4 Creating a List of Result Data 54 3 6 Setting a Comment on the PC 55 3 6 1 Registering the Names of the Clinic and Doctor 55 3 6 2 Creating Potential Causes and Recommendation for the Result Sheet 56 3 6 3 Creating an Overall Comment 57 3 6 4 Upgrading the Instrument Software As Necessary 58 Chapter 4 Maintenance of Instrument 60 4 1...

Страница 5: ...lass A NOTE This instrument has been tested and found to comply with the limits for a Class A digital device pursuant to part 15 of the FCC Rules These limits are designed to provide reasonable protection against harmful interference when the instrument is operated in a commercial environment This instrument generates uses and can radiate radio frequency energy and if not installed and used in acc...

Страница 6: ...such as warnings and precautions that cannot for a variety of reasons be presented on the medical device itself 5 4 4 Keep dry Indicates a medical device that needs to be protected from moisture 5 3 4 Fragile handle with care Indicates a medical device that can be broken or damaged if not handled carefully 5 3 1 Humidity limitation Indicates the range of humidity to which the medical device can be...

Страница 7: ...ithout the use of any tools Equipped with the self check function The light volume and driving speed are checked when the instrument starts If the measurement cannot be successfully completed an error message is shown to notify the user 1 1 2 ARKRAY Customer and Technical Service The Troubleshooting Guide is in Chapter 5 for both the instrument and the software If you have questions or require tec...

Страница 8: ... environment Temperature 50º 86ºF 10º 30ºC Humidity 30 60 RH No condensation Storage environment Temperature 33 8º 95ºF 1º 35ºC Humidity 20 80 RH No condensation Environment during transport Temperature 14º 140ºF 10º 60ºC Humidity 20 80 No condensation Dimensions 160 W x 51 H mm Weight Approx 430 g including a rechargeable battery Power supply USB 5 VDC rechargeable battery used Power input DC 2 5...

Страница 9: ...You will find the following items in the shipping carton Make sure all of these items are present inside If anything is missing or damaged contact ARKRAY Instrument USB cable USB memory stick SillHa software for Windows and Mac OS Check strips Operating manual this document SillHa paper test strip kit 30 test strips 30 oral rinse solutions SillHa paper package insert CAUTION Inside the reading uni...

Страница 10: ...surement sample Reading unit cover Open this cover to place the test strip Power button Press and hold for one second or longer to turn the instrument ON Press and hold for two seconds or longer to turn the instrument OFF USB terminal Connect the USB cable to this USB terminal and connect the other end of the cable to the PC This terminal is used for communicating with the PC and charging the inst...

Страница 11: ...of the instrument It is displayed in the range of 32º 104ºF 0º 40 C When the temperature is below 32 F 0 C LO is displayed and when it exceeds 104 F 40 C HI is displayed Test button Complete the test of the measurement sample see page 25 Battery level indication Indicates the battery level The battery is fully charged The battery level has been reduced but measurement can be performed The battery ...

Страница 12: ... Test is tapped Start button This button is enabled when the medical chart number is received When disabled it is grayed out IMPORTANT To obtain accurate measurement results per form the operation according to the operation guide on the screen and the procedures in 2 3 Performing a Measurement on page 25 Waiting for Chart No entry from the PC Chart No is received from PC Standby Screen while prepa...

Страница 13: ...page 11 button Increase the numeric value by 1 Entry field Displays numeric value button Decrease the numeric value by 1 Delete button Delete the current numeric value one digit at a time Cancel button Cancel the entered numeric value and return to the previous screen Numeric buttons Enter a numeric value OK button Confirm the entered numeric value and return to the previous screen Example When th...

Страница 14: ... Test button Enter the measurement mode see pages 22 28 Call button Call the past test results see page 49 Data ctrl button Export or import the result data see pages 51 and 52 Setting button Register a comment enter clinic dr and maintenance see pages 55 57 Minimize the screen X Exit the SillHa software 1 3 3 ...

Страница 15: ...s come from the instrument disconnect the USB cable from the device If it persists after restarting the device contact Customer Service at 844 559 0842 DO NOT Place the instrument within 3 inches of an object on the left and right to allow for free movement of the strip holder Install the instrument close to magnetic sources Install near places where chemicals are stored or near equipment that gen...

Страница 16: ...allation Wizard screen appears Follow instructions in the Wizard to install the software Click Next Read the Terms of Use and click I Agree Check the installation destination folder name specified under Destination folder a and click Next b Check the folder name to be added to the Start Menu a and click Next b A shortcut will be saved on this folder b Click Browse to change Select the destination ...

Страница 17: ...ick Finish REFERENCE If the Microsoft SQL Server Compact Setup Screen appears a Click Next b Read the license agreement Check a box next to I accept the terms in the license agreement and click Next c Click Install Installation will start d When Completing the Microsoft SQL Server Compact 4 0 ENU Setup appears click Finish When the completed screen appears click Finish REFERENCE When the screen be...

Страница 18: ...f your PC Double click the Mac_mySaliva pkg file in the USB memory The Installation screen appears Click Continue Read the License Agreement and click Continue Click Agree Click Install to perform a standard installation Enter the Username and Password a and click Install Software b Installation will start When the installation complete screen appears click Close Make sure the shortcut icon below ...

Страница 19: ... the power button Remove your finger when a beep is heard and the screen lights up The test strip holder extends from the instrument A beep is heard again and the Top menu screen is displayed Press and hold the power button again and remove your finger once the test strip holder will start moving The test strip holder will retract inside the instrument The display and instrument power will turn of...

Страница 20: ...d upgrade the software of the instrument REFERENCE If an error or trouble occurred during the upgrade restart the PC software and instrument and then perform the procedure again from step Turn off the power of the instrument and click OK in the PC screen of step When the message below is displayed turn on the power of the instrument again REFERENCE If the next screen is not displayed in at least 1...

Страница 21: ...de is completed the message below is displayed and the power of the instrument turns off automatically After click OK in the PC screen of the step turn on the power of the instrument again Top menu screen is displayed for both PC and instrument NOTE Do not remove the USB cable during upgrade and never turn off the power of the instrument 1 5 5 ...

Страница 22: ...SUREMENT SAMPLES Oral rinse sample is used as the measurement sample in this instrument Wear personal protective equipment to prevent exposure to pathogenic microorganisms when han dling the measurement sample Dispose of used test strip and oral rinse saliva sample per local regulations If the measurement sample is spilled wipe it off with normal disinfectant wipes and dispose of the used cloth in...

Страница 23: ...ckage insert that comes with the SillHa paper before use Do not use a test strip beyond the expiration date or a test strip with a dis colored pad even if it is within the expiration date This may cause inaccurate results Use the test strip within 10 minutes after removing it from the foil wrapper If you remove more than the required number of test strips and leave them for a while they may absorb...

Страница 24: ...erform Test These items are required to perform the test 1 SillHa paper test strip 3 Dropper 5 Oral rinse solution 2 Personal protective equipment 4 Cup purified water NOTE Perform this salivary testing only for individuals who can rinse their mouth with oral rinse solution lightly for approximately 10 seconds and spit into a cup CAUTIONS Do not touch the area where the test strip holder moves to ...

Страница 25: ...ent IMPORTANT Observe the time limit of each procedure It is recommended to read the procedure beforehand and understand the flow of operations For details on handling the test strip read the package insert that comes with the SillHa paper Use the recommended dropper for best results Check the temperature on the screen of the instrument before starting measurement When the temperature is lower tha...

Страница 26: ...e or the instrument a When Test is pressed on the PC the patient information screen appears see page 27 on the PC b When Test is pressed on the instrument the following Waiting Test procedure screen will display on the instrument while waiting for the chart number c The Procedure Screen provides instructions and timing to obtain and place the sample and perform the test Follow carefully for best r...

Страница 27: ...Item Description Chart No Required field Enter the medical chart number up to 30 alphanumeric characters Name Enter the first name and last name of the patient up to 10 characters Birthdate Age Gender Enter the patient information Remark Enter a comment up to 40 characters Call button If you click this button after entering the Chart No and Name the registered patient information appears automatic...

Страница 28: ... put the oral rinse solution in their mouth and swish gently for 10 seconds to spread throughout the mouth c The oral rinse should be spit back into the cup after 10 seconds Remove a test strip from foil wrapper and place on a flat absorbent surface Aspirate the measurement sample with the dropper a Be careful not to aspirate air bubbles b Fill the dropper to above the line as shown in the picture...

Страница 29: ... strip on a clean absorbent surface to remove excess sample from all pads REFERENCE When three seconds are left until the end of the countdown a short beep starts sounding and a long beep sounds at 0 second IMPORTANT Finish dropping the sample on all eleven pads within 10 seconds If it is delayed results may not be accurate Apply one drop of sample keeping the tip of the dropper away from the pad ...

Страница 30: ...nter the Patient Information on the PC Measurement will start automatically and the remaining time is displayed IMPORTANT If the test strip deviates from the groove of the test strip holder accurate measurement results cannot be obtained The test strip holder will start moving Do not touch the instrument until measurement is complete to prevent personal injury The test strip holder moves twice whe...

Страница 31: ...r 2 4 Viewing the Test Results on the PC Once the measurement is complete the test results are displayed on the PC The result sheet can be selected from two types Type A and Type B Type A Comparison using bar graphs Comparison with past test results up to two records is possible An overall comment can be entered IMPORTANT For test results obtained at a temperature lower than 68ºF 20 C the temperat...

Страница 32: ...teria acidity buffer capacity blood leukocyte protein and ammonia In Type A and Type B click the to each item and select a comment that matches the test results If you click and double click near the center of the blank field you can enter any comment up to 108 characters Overall comment Click and select a comment that matches the test results If you click and double click near the center of the b...

Страница 33: ...e and Recommendation See 3 6 Setting a Comment on the PC on page 55 Registration of the names of the clinic and doctor See 3 6 1 Registering the Names of the Clinic and Doctor on page 55 To stop the creation of report Click Menu The result sheets that have not been printed are saved as Not created 2 5 2 Printing the Result Sheet REFERENCE Select 8 5 x 11 Letter paper size on your print screen Exam...

Страница 34: ...t sheet make this choice on your print screen and save to location of your choice REFERENCE To continue measurements click Menu to return to the Top menu screen and go to 2 3 2 Enter the Patient Information on the PC on page 27 2 5 3 Example of Printing a Result Sheet REFERENCE All result sheets are printed on letter size paper NOTE You may be able to attach the PDF to your patient electronic char...

Страница 35: ...35 SillHa Oral Wellness Instrument Type A Bar chart Type B Radar chart 2 5 3 ...

Страница 36: ...lick X When Close appears click OK 2 7 Check Measurement If test results seem inaccurate perform a check measurement using a check strip to check the condition of the instrument Instructions are shown on the instrument screen Clean the test strip holder See 4 2 1 Cleaning the Test Strip Holder on page 61 Turn on the instrument Hold the power button until a beep is heard Run the SillHa software by ...

Страница 37: ...holder Slide the test strip along the groove on the test strip holder until it stops IMPORTANT Do not touch the surface of the check strip If sebum adheres to the check strip accurate measurement results cannot be obtained IMPORTANT If the check strip deviates from the groove of the test strip holder accurate measurement results cannot be obtained Check strip Check strip Until it stops Reading uni...

Страница 38: ...bel affixed to the check strip container Refl Within the range Repro OK The instrument is normal Tap OK to return to the Top menu screen The check measurement is then complete Tap Menu to return to Top menu screen Refl Outside the range or Repro NG Either the instrument or the check strip is faulty Tap OK and go to next procedure below Follow the procedure below if Refl is outside the range or Rep...

Страница 39: ...efl Within the range Repro OK The instrument is normal The check strip used for the first check measure ment is faulty Refl Outside the range or Repro NG There is a problem with the instrument Contact ARKRAY Tap OK The display returns to the Top menu screen 2 7 ...

Страница 40: ...age Setting Date Set the date and time 43 Digit Set the digits of the medical chart number 44 Others Sound Set the sound level of the beep 45 Brightness Set the screen brightness 45 Strip direction Set the direction of the test strip holder 46 History Re transmit the most recent measurement results to the PC 48 Top menu screen Chapter 3 Auxiliary Operations 3 1 ...

Страница 41: ...41 SillHa Oral Wellness Instrument 3 1 2 Auxiliary Operations of the SillHa Software REFERENCE The SillHa software can be operated even when the instrument is off Top menu screen 3 1 2 ...

Страница 42: ...o import the patient information data in CSV format 53 Create list Used to create a list of the saved result data 54 Setting Clinic Dr Used to register the clinic and doctor s name 55 Comment Potential causes Used to create a potential cause to be added to the test results 56 Recommendation Used to create a recommendation to be added to the test results 56 Overall comment Used to create an overall...

Страница 43: ...u want to change for the correct date and time Enter the numeric value either through or through the numeric buttons and tap OK REFERENCE Delete Delete the entered numeric value one digit at a time Cancel Cancel the entered numeric value and return to the previous screen Tap Menu The display returns to the Top menu screen REFERENCE Upon returning to the Top menu screen the settings are reflected i...

Страница 44: ...o change Enter the numeric value either through or through the numeric buttons and tap OK Repeat steps and to set the start digit and number of digits Tap Menu The display returns to the Top menu screen Item Description Start digit This is the 1st digit displayed on the instrument No of digits Number of digits from the Start digit 1 to 13 digits Example 10 digits from the 3rd digit 3rd to 12th dig...

Страница 45: ...Tap Setting on the Top menu screen Tap the Others tab Tap to change the sound level and brightness The current settings are displayed on the right side Tap Menu The display returns to the Top menu screen Item Description Sound Mute Level 1 to 4 The beep sounds at the selected level each time this button is tapped Brightness Level 0 to 4 3 2 3 ...

Страница 46: ...t if the settings are made to enable the placing of the test strip from the left side Tap Setting on the Top menu screen Tap the Others tab Tap From left Tap Apply Tap Start The test strip holder extends from the instrument and unlocks Open the reading unit cover Slide the test strip holder to the right and remove it Wear personal protective equipment to prevent exposure to pathogenic microorganis...

Страница 47: ...ment Insert the test strip holder along the instrument guide a and lightly push the test strip holder until the mark comes slightly inside the outer edge of the instrument b Tap Start The test strip holder retracts inside the instrument and locks The display returns to the Top menu screen Close the reading unit cover r mark Test strip holder a b 3 2 4 ...

Страница 48: ...s will be transmitted Tap Menu The display returns to the Top menu screen If necessary create a result sheet for the received measurement results using the SillHa software on the PC See 3 4 Calling the Test Results on page 49 NOTE Before re transmitting the test results run the SillHa software on the PC and establish communication with the instrument see 2 3 1 Turn on Instrument and Run software o...

Страница 49: ...atient and display them in a list Click Call on the Top menu screen Specify the patient Enter information in any of the fields Chart No FN or LN The medical chart number can also be selected from the list by clicking REFERENCE If W 304 The corresponding test history does not exist is displayed Click OK to close the pop up window List of test results 3 4 ...

Страница 50: ... saved but not printed Call the test results See 3 4 1 Searching for Test Results on page 49 Check a box for the result sheet you want to edit Click Edit at the bottom right of the screen The result sheet is displayed Edit the result sheet See 2 5 Creation of the Result Sheet on page 32 The result sheet has not been created Done Already created printed 3 4 2 ...

Страница 51: ...e clinic name of the doctor comment etc can be used On the Top menu screen click Data ctrl Export in that order In Export to enter the data storage destination REFERENCE To select from a list of folders Click On the Browse For Folder screen select the export to folder and click OK Click Start When Exported successfully is displayed click OK The export process is then complete REFERENCE The exporte...

Страница 52: ... Top menu screen click Data ctrl Import in that order In Import from specify the folder on which the export file is saved The folder name is mySalivaTestResult Date REFERENCE To select from a list of folders Click On the Browse For Folder screen select the folder and click OK Click Start When Imported successfully is displayed click OK The import process is then complete 3 5 2 ...

Страница 53: ...anumeric characters mandatory 2 Patient s first name Up to 15 characters 3 Patient s last name Up to 15 characters 4 Date of birth Year Month Day Demarcate with a slash 5 Gender One alphabet M Male or F Female 6 Comment Up to 40 characters On the top menu screen click Data ctrl Patient info in that order In Import from specify the patient information file CSV format prepared in step REFERENCE To s...

Страница 54: ...screen click Data ctrl Create list in that order In Export to specify the storage destination of the file containing the list REFERENCE To select from a list of folders Click On the Browse For Folder screen select the folder and click OK Click Start When Test result list data created is displayed click OK The creation of the list is then complete v w 3 5 4 ...

Страница 55: ...want to edit and go to step Click the blank entry field When a check mark appears on the left side click the entry field again A cursor appears Enter the name of the clinic up to 20 characters Up to 10 clinic names can be entered REFERENCE Check a box next to the name of the clinic that is to be displayed as the default If a box is not checked for any clinic name the default is blank x Used to del...

Страница 56: ... be edited On the Top menu screen click Setting click Comment click Potential causes and Recommendation Click the tab of the measurement item to create a comment Click under the test result table A blank entry field appears REFERENCE To edit an existing comment Click the entry field to edit and go to step Click the blank entry field When a checkmark appears on the left side click the entry field a...

Страница 57: ...g an Overall Comment Create a comment to be added to the overall comment field of the result sheet The comments created here can be selected from the list during creation of the result sheet New comments can be added and comments that are already saved can be edited Select ON OFF to either show or hide the overall comment on the test result sheet On the Top menu screen click Setting click comment ...

Страница 58: ...d for any comment the default is blank x Used to delete a comment Click OK When Updated successfully is displayed click OK The creation of a comment is then complete 3 6 4 Upgrading the Instrument Software As Necessary Make sure the PC and instrument are connected by the USB cable and the power supply to the instrument is OFF On the Top menu screen of the SillHa software click Setting Maint Click ...

Страница 59: ...ng appears and the software upgrade will start REFERENCE If T 504 A timeout has occurred is displayed The software upgrade could not be started Click OK and repeat the procedure from step When the instrument upgrade is complete and Completed appears click OK The upgrade is then complete Click Menu to return to the Top menu screen 3 6 4 ...

Страница 60: ...microorganisms when performing maintenance tasks marked with biological risk symbol Dispose of used test strips cleaning tools and personal protective equipment in accordance with local regulations for biohazardous waste Caution Maintenance task Frequency See page Cleaning of the test strip holder Every day 61 Cleaning of the reading unit If E 101 or T 203 occurs 63 Adjustment of the driving speed...

Страница 61: ...ements are complete clean the test strip holder The following instruction is for the test strip holder with the direction setting From right default setting Open the reading unit cover On the Top menu screen of the instrument tap Maint Clean in that order Tap Start The test strip holder extends from the instrument and unlocks Slide the test strip holder and remove it Reading unit cover u Test stri...

Страница 62: ...ate Carefully wipe off the dirt with a soft cloth moistened with water or alcohol Tap Next Hold the test strip holder so that its white plate is on the left and attach it from the right side of the instrument Insert the test strip holder along the instrument guide a and lightly push the test strip holder until the mark comes slightly inside the outer edge of the instrument b White plate Test strip...

Страница 63: ...est strip holder See step in 4 2 1 Cleaning the Test Strip Holder on page 61 Check the cleaning slot on the bottom of the instrument Clean the reading unit Insert a cotton swab moistened with water or alcohol into the cleaning slot Wipe off the dirt while ensuring that the tip of the cotton swab is touching the sensor Attach the test strip holder See step in 4 2 1 Cleaning the Test Strip Holder on...

Страница 64: ...ving speed On the Top menu screen tap Maint Adjust in that order Tap Start Adjusting is displayed and the driving speed is adjusted approximately one minute The test strip holder moves When the screen below appears tap OK The display returns to the Top menu screen IMPORTANT If E 101 or T 203 continues to occur even after adjustment has been performed twice or more contact ARKRAY 4 2 3 ...

Страница 65: ...es on page 67 See 5 1 3 Instrument Trouble Causes and Remedies on page 68 If the problem persists turn off the instrument and contact ARKRAY Wear personal protective equipment to prevent exposure to pathogenic microorganisms before any operation that may expose you to measurement samples Dispose of used measurement samples and personal protective equipment in accordance with local regulations for ...

Страница 66: ...p OK The instrument will automatically perform necessary processing W 002 Remove the test strip The power cannot be turned off because the test strip is left on the test strip holder Remove the test strip and tap OK W 003 The test strip holder is not attached properly The test strip holder is attached improperly Properly attach the test strip holder and tap OK W 011 The battery level is low Measur...

Страница 67: ...ng speed adjustment see page 64 E 102 The photometric section is exposed to strong light The photometric section is exposed to stray light Tap OK Close the reading unit cover and retry measurement E 103 A communication error occurred An error occurred in communication between the instrument and the PC Tap OK Disconnect the USB cable from both the ends of the instrument and the PC and connect them ...

Страница 68: ... attached properly Tap OK Properly attach the test strip holder and turn on the power T 203 The LED emits insufficient light The white plate and the reading unit are dirty Tap OK and turn off the power Clean the white plate on the test strip holder see page 61 and the reading unit see page 63 If the trouble persists perform driving speed adjustment see page 64 T 204 Calculation trouble Calculation...

Страница 69: ...elow If a warning error or trouble occurs a code and message are displayed as shown on the right Take the necessary action to remove the cause See 5 2 1 SillHa Software Warning Causes and Remedies on page 70 See 5 2 2 SillHa Software Error Causes and Remedies on page 71 See 5 2 3 SillHa Software Trouble Causes and Remedies on page 72 If the problem persists contact ARKRAY 5 2 ...

Страница 70: ...has not been specified Click OK and specify the export to location W 306 Specify the import from location The location where the import from data is saved has not been specified Click OK and specify the storage location of the data W 307 The password is incorrect The password is incorrect Click OK and enter the correct password W 308 Select the data Edit was clicked even when the result sheet was ...

Страница 71: ...memory is insufficient Click OK Expand the PC memory E 404 Data could not be imported Either data does not exist in the specified import from location or the file is corrupted Click OK and check the storage location of the data to be imported E 405 The test results list data could not be created The storage capacity HDD of the PC is insufficient Click OK Expand the PC memory E 406 Printing could n...

Страница 72: ...m is incorrect Reconnect the USB cable between the PC and the instrument Restart SillHa software and the instrument and repeat the operation you were performing before the error occurred T 502 The file of the writing control program cannot be opened The file of the writing control program is incorrect T 503 The file of the writing ROM data cannot be opened The file of the writing ROM data is incor...

Страница 73: ...tware 14 Delete button 13 Digit 44 Display Digits of Medical Chart Number 44 Display Operator Panel 10 Doctor Name 55 Driving Speed 64 E Entry field 13 Errors Instrument 67 SillHa Software 69 Export 51 F Features 7 Frequency 60 H Hardware Requirements 8 History 48 History button 48 I Import 52 Installation and Connection 16 Instrument 9 Instrument Settings 43 Starting 24 Upgrading the Software 58 ...

Страница 74: ...are 14 Setting value 13 Setup Screen 13 SillHa Software Installing Mac Edition 18 Installing Windows Edition 16 Running 24 Screen 14 Sound Sound Level 45 Specifications 8 Start button 12 Status display 12 Strip direction 46 Symbols 6 T Tab 13 Temperature 11 Test button Instrument 11 SillHa Software 14 Test Results Calling 49 Viewing 31 Test strip 24 Test strip holder 10 Test strip holder Cleaning ...

Страница 75: ......

Страница 76: ......

Отзывы: