background image

PiCUS TreeQinetic Manual 

38 

5.9.2.1  Android 

 
Connect your mobile device to a PC with a USB cable. When doing so, pay attention to the 
display of your mobile device; you may have to confirm that data may be exchanged with the 
PC. 
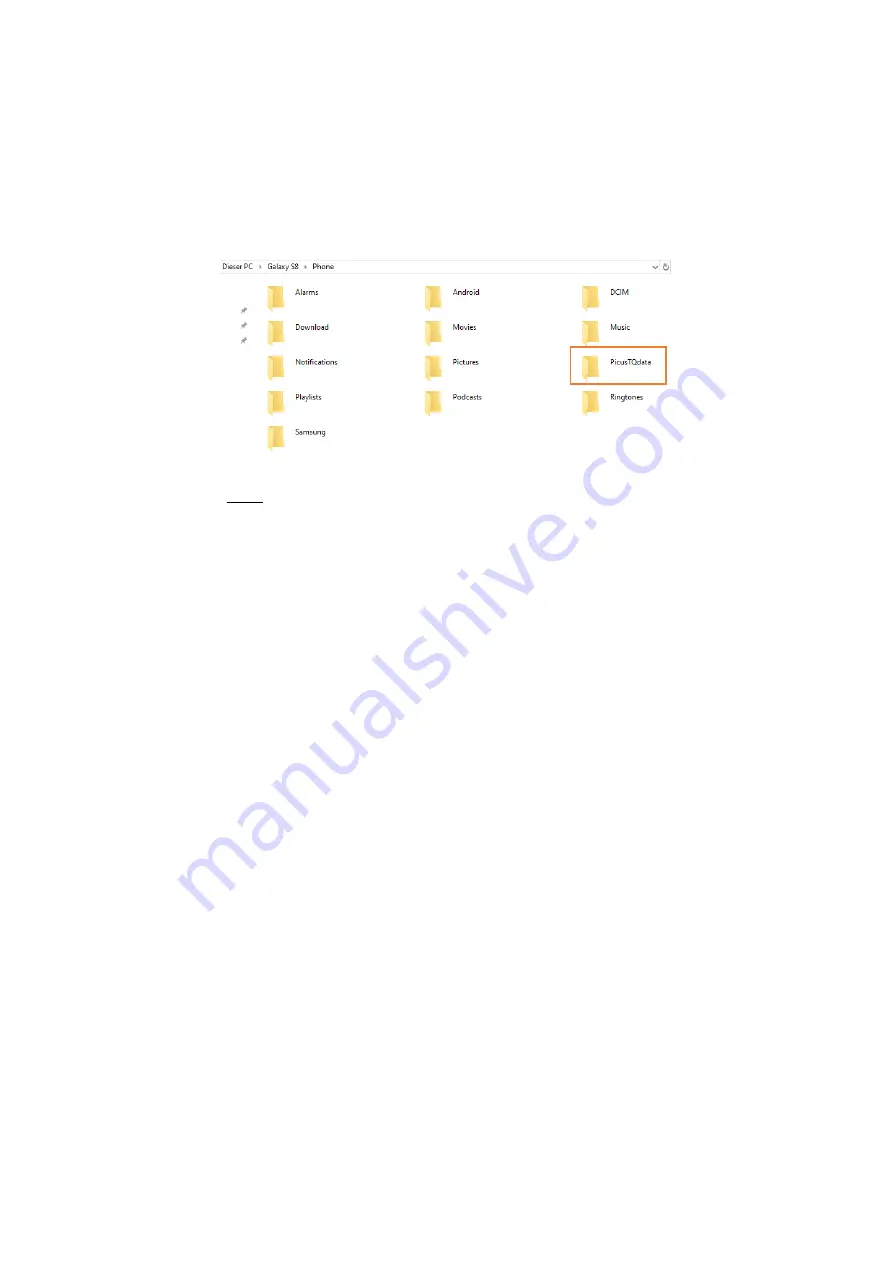
Then,  on the  PC,  navigate  to  your  mobile  device  using  the file  browser you  are  using  (e.g. 
Windows Explorer). Among other things, you will find the main folder of the PTQ.App there. 

 
As described in 

5.9.1

 this folder contains the project folders of all projects you have created 

with the PTQ.App. 
Copy/move the project folders of all projects you want to work on to the hard disk of your PC. 

NOTE


With older Android versions it may be necessary to restart the phone once to make the main 
folder visible on the PC. 


5.9.2.2  iOS 

 
Connect your Apple mobile device to a MAC with a USB cable. 
Then, on the MAC, navigate to your mobile device in the file browser you are using (e.g. Finder) 
(under 

Locations

). Switch to the tab 

Files

. All apps that share files are listed there. Open the 

PTQ.App

 entry here. Now you see the main folder 

PicusTQData

Unlike  Android,  the  MAC  file  browser  cannot  navigate  deeper  into  the  folder  structure. 
Therefore you have to copy the complete main folder to the hard disk of your MAC. 
 

5.9.3  Compatibility with Arbostat 

 
Arbostat is the classic PC software for evaluating pulling test data recorded with the PiCUS 
TreeQinetic measuring system. 
 
The measurement data files generated by the PTQ.App correspond to the format expected by 
Arbostat and are therefore fully compatible. 
 
The only difference is that now the data of all pulling tests performed with the new PTQ.App 
are already organized in a well sorted, handy project structure. For example, it is no longer 
necessary to manually collect and sort measurement data from a laptop, documentary photos 
from a camera and any handwritten notes. 
 
If you want to process a measurement from one of your projects in Arbostat, navigate into the 
corresponding project folder and there into the subfolder of the measurement setup with which 
you have carried out this measurement. There you will find the saved measurement data files, 
which you can import into Arbostat as usual. 
Furthermore  you  will  find  all  taken  crown  photos  in  the  project  folder,  in  the  subfolder 

CrownPics


Содержание PiCUS TreeQinetic

Страница 1: ...tems of these versions Hardware Version 0 1 0000 Firmware Version 0 0 0707 App Version 1 0 Manual version 28 Mai 2021 argus electronic gmbh Erich Schlesinger Stra e 49d 18059 Rostock Germany Tel 49 0...

Страница 2: ...harger Optional 18 4 1 9 Anemometer Optional 19 4 2 General Operating Instructions 20 4 2 1 Ambient Conditions 20 4 2 2 Module Addresses 20 4 2 3 Automatic switch off 21 4 2 4 Charging 21 4 2 5 Mainte...

Страница 3: ...age Inclinometer 35 5 7 5 Page Anemometer 35 5 8 Additional Information Background Processes 35 5 8 1 Interruption of the Bluetooth Connection 35 5 8 2 Vibrating Alert 35 5 8 3 Internal Calculations 3...

Страница 4: ...nation in italics 3 General Information This chapter deals with general information 3 1 Intended Use PiCUS tree measurement technology offers tree experts a comprehensive set of diagnostic tools for t...

Страница 5: ...he inclination of the tree part to which they are attached First the inclinometer mount is attached onto which the measuring instrument is then placed and aligned The com unit allows to receive and re...

Страница 6: ...1 3 Forcemeter 1 4 Inclinometer 1 5 Inclinometer mount in the lid compartment not pictured 1 6 Elastometer 1 7 Elastometer needles in pairs 5 8 Gauge for Elasto needles 1 9 Overload Indicator 1 10 Mea...

Страница 7: ...ging cable 3 12 PTQ USB cable 1 13 Data cablel 5 m 2 14 Data cable 30 m Forcemeter 1 15 Shackle Forcemeter 2 16 Pliers for Elasto needles hand riveter 1 17 Power supply 1 18 Power supply cable 1 Table...

Страница 8: ...ending with BT5 is able to connect to mobile devices such as tablets and smartphones To ensure communication to older laptop computers a BT5 USB dongle is delivered with these devices No Designation...

Страница 9: ...1 Turn off modules 2 Unplug cable 3 Turn on modules All modules which are turned on without a cable connected to them automatically activate the radio link Cable connection 1 Turn off modules 2 Plug a...

Страница 10: ...measured values for force and rope angle as well as the battery voltage and the module address By pressing the OK button once the forcemeter switches to offset mode zeroing By pressing the OK button...

Страница 11: ...use incorrect measurement results and damage the forcemeter especially the attachment of the round spacers Figure 1 Forcemeter with properly attached shackles 4 1 3 Inclinometer PTQ inclinometers meas...

Страница 12: ...e address After switching on the firmware version module address and the individual serial number of the respective measuring instrument are temporarily displayed By pressing the OK button once the In...

Страница 13: ...against the bark at the desired position and fastened with a pan head screw By tightening the screw the three tips are pulled against the surface and prevent slipping and twisting The screw used shou...

Страница 14: ...ss After switching on the firmware version module address and the individual serial number of the respective measuring instrument are temporarily displayed By pressing the OK button once the Elastomet...

Страница 15: ...th the lower needle bracket and initially held slightly tilted to the right The bottom of the display points to the tree A slight tilting movement brings the upper needle bracket up to the upper needl...

Страница 16: ...switch The flashing lights also indicate the measurements state Blue flashing indicates the stand by mode the device is not receiving data Green light means the overload indicator is connected but no...

Страница 17: ...ng 5 Data cable 30 m Transmitting data from forcemeter to com unit Do not use for charging 6 USB cable Backup for transmission to PC Table 8 Delivered cables and their applications 4 1 7 Case The PiCU...

Страница 18: ...es Connection to modules 3 Socket for data cable Data transmission to com unit Table 9 Eightfold charger Parts and explanations Operation To charge up to eight modules connect the power supply to the...

Страница 19: ...Button Navigation in the menu 8 Data cable socket Data transmission to com unit optional 9 Input measuring unit Connection to measuring unit mandatory 10 Antenna Radio connection Table 10 Anemometer...

Страница 20: ...immediately before pulling so that no further drift can occur before the measured values are recorded If necessary shade the inclinometers during the test Protect the instruments from avoidable dirt m...

Страница 21: ...d one after the other Sensor modules must always be connected directly to the com unit for charging The sensors must not be charged via the data cable manifold To change the sensor to be charged the p...

Страница 22: ...d handled carefully the devices can be used for many years without the need for maintenance or repairs 4 2 6 Spread of Infestations Theoretically it cannot be excluded that pathogens are spreaded by t...

Страница 23: ...osition of the examined tree via the GPS of your mobile device The prerequisite for this is your permission to use the positioning system 2 Camera optional Data acquisition for a pulling test necessar...

Страница 24: ...issions You will now see all permissions requested by the app and can manually grant or deny them using the buttons on the right 5 2 3 Features of iOS If you have denied one or more of these authoriza...

Страница 25: ...on the typical work flow in a pulling test Accordingly the tabs and their pages are usually processed from left to right and the respective page content from top to bottom 5 3 2 Features of Android 5...

Страница 26: ...t status of the device search The lower one shows the current status of the Bluetooth connection 4 Device List All PTQ Com Units found during the last device search are listed here Tap on one of the d...

Страница 27: ...e Data 5 5 2 Open a saved project by tapping on one of the other list entries the view automatically switches to the next page Tree data 5 5 2 Delete a saved project via the context menu of the respec...

Страница 28: ...etup Create a new measurement setup by tapping on the first list entry Create New Setup the view automatically switches to the next page Test Setup 5 5 3 Open a saved test setup by tapping on one of t...

Страница 29: ...th a grey background color and a instead of the connection type This can have various causes such as Interrupted radio connection after change of position of the sensor module or communication unit Em...

Страница 30: ...f the elastometer with respect to the pulling direction in Example Device is mounted directly in pulling direction 0 device is mounted opposite to pulling direction 180 Enter the pulling force proport...

Страница 31: ...ment data recording starts During and after this calibration the instruments should not be touched anymore Afterwards the measurement runs in live mode i e data recording is paused This can be recogni...

Страница 32: ...oftware The data displays of the different instrument types are organized in columns For each sensor module found during the device search a cell with the following information is displayed 1 Device c...

Страница 33: ...alue Red Overload alarm measuring value of at least one sensor module has reached alarm limit 5 7 Tab Data View 5 7 1 Page Result This page shows a short summary of the measurement just performed 1 St...

Страница 34: ...gram display can also be zoomed using the usual 2 finger pull gesture on both axes This applies to all diagrams of the Data View tab The magenta colored line represents the alarm limit set for the for...

Страница 35: ...he mobile device and the PTQ communication unit can be affected by various external circumstances and in the worst case may be interrupted This can be recognized by the signal strength symbol in the t...

Страница 36: ...pulling test is carried out To do this pull the tree to the maximum load you have targeted and keep the force there constant for about 10 seconds before releasing the tree 5 8 3 2 Rope Angle The app...

Страница 37: ...eated within this project The folder name results from the creation time of the measurement setup and the entered name A subfolder and various files are created in each setup folder setup json This fi...

Страница 38: ...e main folder PicusTQData Unlike Android the MAC file browser cannot navigate deeper into the folder structure Therefore you have to copy the complete main folder to the hard disk of your MAC 5 9 3 Co...

Страница 39: ...PiCUS TreeQinetic Manual 39 6 Software To be updated...

Страница 40: ...To PC USB 2 0 Bluetooth 5 0 Dongle Charge channels 3 channels for modules each 800 mA 7 2 PTQ Forcemeter Property Value general Weight 1970 g Dimensions 235 mm x 75 mm x 60 mm Battery Capacity 2000 mA...

Страница 41: ...0 01 V Kommunikation Radio connection 868 MHz 14 dBm 115 2 kBps Range at free line of sight 150 m 7 4 PTQ Elastometer Property Value general Weight 590 g Dimensions 220 mm x 60 mm x 38 mm Distance inb...

Страница 42: ...of sight 150 m 7 6 PTQ Case Property Value Dimensions Ca 500 mm x 400 mm x 200 mm Weight empty Ca 2 7 kg Weight Starter kit Ca 11 kg 7 7 Requirements Mobile Device Android Device Apple Device Operatin...

Отзывы: