III
Installing a Printer Driver (for other interfaces except USB)
65
4. Troubleshooting
71
LED and LCD Diagnosis
71
Media Problems
71
Ribbon Problems
72
Other Problems
72
Printer Status
73
Transmission Problems
74
Recovery
74
Printer Maintenance
75
Cleaning the Print Head
76
Cleaning Interval
76
Cleaning Material
76
Cleaning Direction
77
Cleaning the Roller
77
Cleaning the Media Compartment
77
5. Advanced Installation and Adjustment
78
Print Head Pressure
78
Print Head Print Line Position
81
Ribbon Tension Adjustment
84
Printing Wrinkle
86
Rotary Cutter and Guillotine Cutter Installation
89
Rotary Cutter and Guillotine Cutter Settings
92
Rotary Cutter with Paper Jam
95
Guillotine Cutter with Paper Jam
96
Dispenser & Rewinder Installation
97
RTC Battery Replacement
100
Stand-alone with Keyboard
101
Stand-alone with Barcode Reader
107
Содержание X-2300
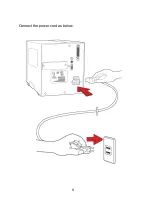
Страница 9: ...9 Connect the power cord as below ...
Страница 11: ...11 Standard Mode Head Latch Paper Sensor Guide Paper Roller Thermal Print Head ...
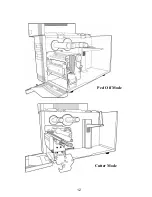
Страница 12: ...12 Peel Off Mode Cutter Mode ...
Страница 47: ...47 accuracy especially for small labels less than 1 5 high ...
Страница 49: ...49 1 Firmware Version Information 2 Standard RAM Size ...
Страница 64: ...64 The driver should now be installed ...
Страница 66: ...66 3 Assign the directory to keep Seagull driver for example C Seagull and click Next 4 Click Finish ...
Страница 82: ...82 Figure 1 ...
Страница 83: ...83 Figure 2 Figure 3 ...
Страница 85: ...85 Figure 1 Figure 2 ...
Страница 98: ...98 5 Insert the left side of dispenser bracket and secure the three screws to the print module ...
Страница 106: ...106 ...
Страница 119: ...119 Types Data Matrix ECC 200 only QR code Composite Codes Aztec Barcode Micro PDF417 Graphics GRF Hex and GDI ...

