Installation
6
5.5" Color Passive Mini-Touch Panels
Installing touch panels and a CB-MTP Back Box (plasterboard)
The touch panel must always be installed with the release slot located at the bottom.
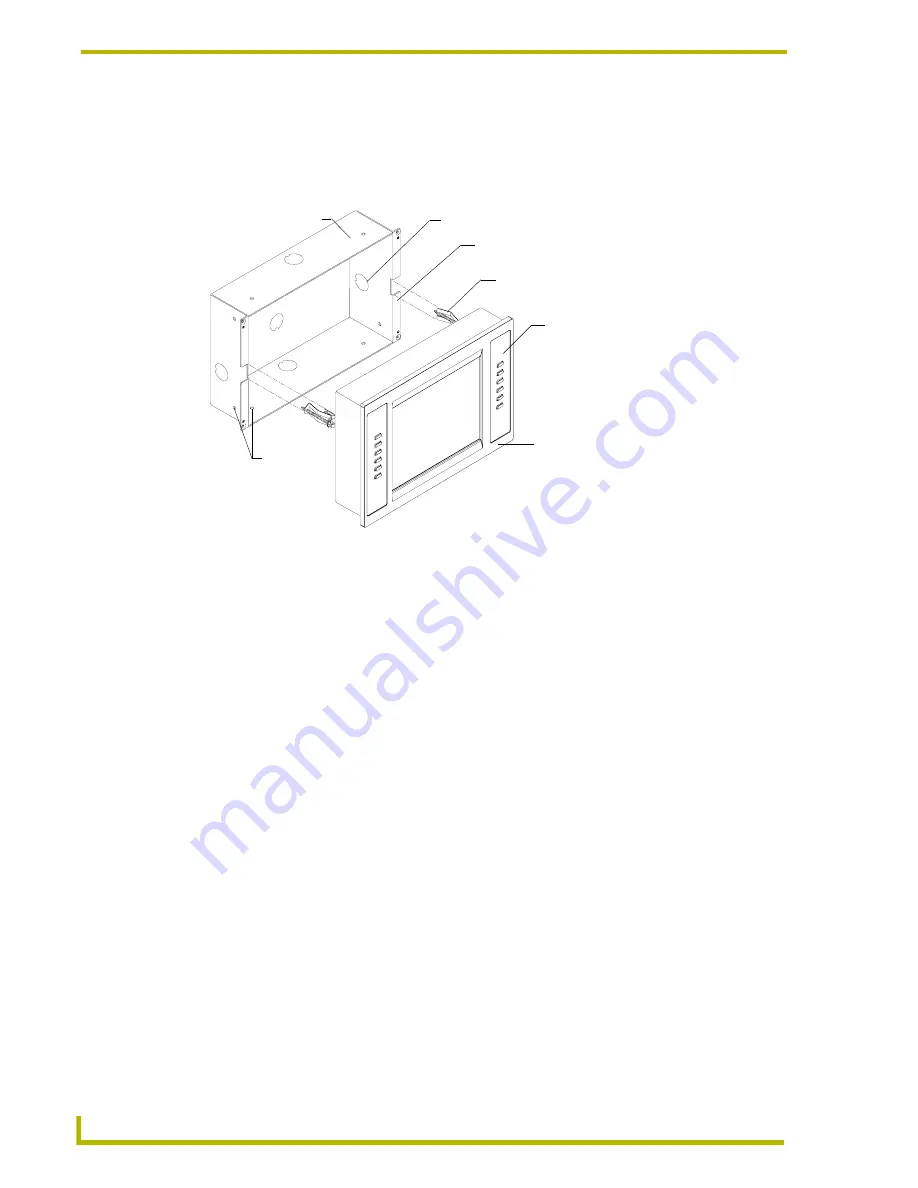
FIG. 4 shows the AXD-MCP/PB and CB-MTP UniMount Back Box for plasterboard.
1.
Cut out the surface using the dimensions shown in FIG. 5.
2.
Carefully insert a flat-blade screwdriver into the release slot on the touch panel’s faceplate and
remove the engraved overlay.
3.
Lay the touch panel facedown on a soft cloth and remove the screws from the low-profile Back
Box; remove the Back Box and discard.
4.
Place the CB-MTP into the cutout and mark the threaded insert positions, as shown in FIG. 5.
5.
Remove the CB-MTP and drill four #6-32 insert holes. Then, place a threaded insert (or screw
anchor) into each hole.
6.
Disconnect the AXlink connector from the Central Controller.
7.
Remove one or more knockouts to accommodate the wiring as required.
8.
Thread the incoming AXlink wiring through the CB-MTP knockouts. Refer to the
Wiring the
Mini-Touch Panels
section on page 8 for pinout descriptions.
9.
Fasten the CB-MTP to the plasterboard using the expansion screws supplied with the
enclosure.
10.
Connect the AXlink wiring to the touch panel.
11.
Test the connection by reconnecting the AXlink connector to the Central Controller. The panel
beeps power-up. Before continuing, disconnect all connections until panel installation is
complete.
12.
Fasten the touch panel to the CB-MTP with the #6-32 screws supplied.
13.
Place the Decor-style faceplate onto the bezel. You can also secure the Decor faceplate to the
bezel using the four Phillips flathead security screws.
FIG. 4
AXD-MCP/PB and CB-MTP Back Box (plasterboard)
CB-MTP Unimount
BackBox enclosure
Knockout
Plasterboard surface mounting flanges
AXD-MCP/PB faceplate
Engraved overlay
Stud
mounting
holes
Expansion clips


