SNQ-60x0-320F Series Data Center Switch
Hardware Installation Guide
9
Eight Phillips-head frontal rack-mount bracket screws.
Additional equipment needed to install the switch into a rack-mount unit:
One Phillips-head screwdriver. This screwdriver will be used for the rack-mount bracket screws
One additional screwdriver. This screwdriver will be used for the rack-mount unit screws and its type and size
depends on the rack-mount unit screws being used.
Eight rack-mount unit screws. These screws will be used to attach the switch onto to the rack-mount unit and
are not included in the switch’s packaging as rack-mount units differ at each installation site.
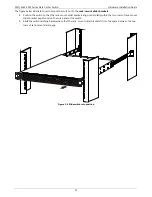
The figure below illustrates how to install the
frontal rack-mount brackets
onto the switch.
1.
Place the switch on a flat horizontal surface.
2.
Position the frontal rack-mount bracket over the screw holes on the side of the switch. The ears of the bracket
must be facing forward and outwards.
3.
Use the frontal rack-mount screws and the Phillips-head screwdriver to fasten the bracket onto the side of the
switch.
4.
Repeat steps 1 to 3 for the other frontal rack-mount bracket on the other side of the switch.
Figure 5-2 Attach frontal rack-mount brackets to switch


