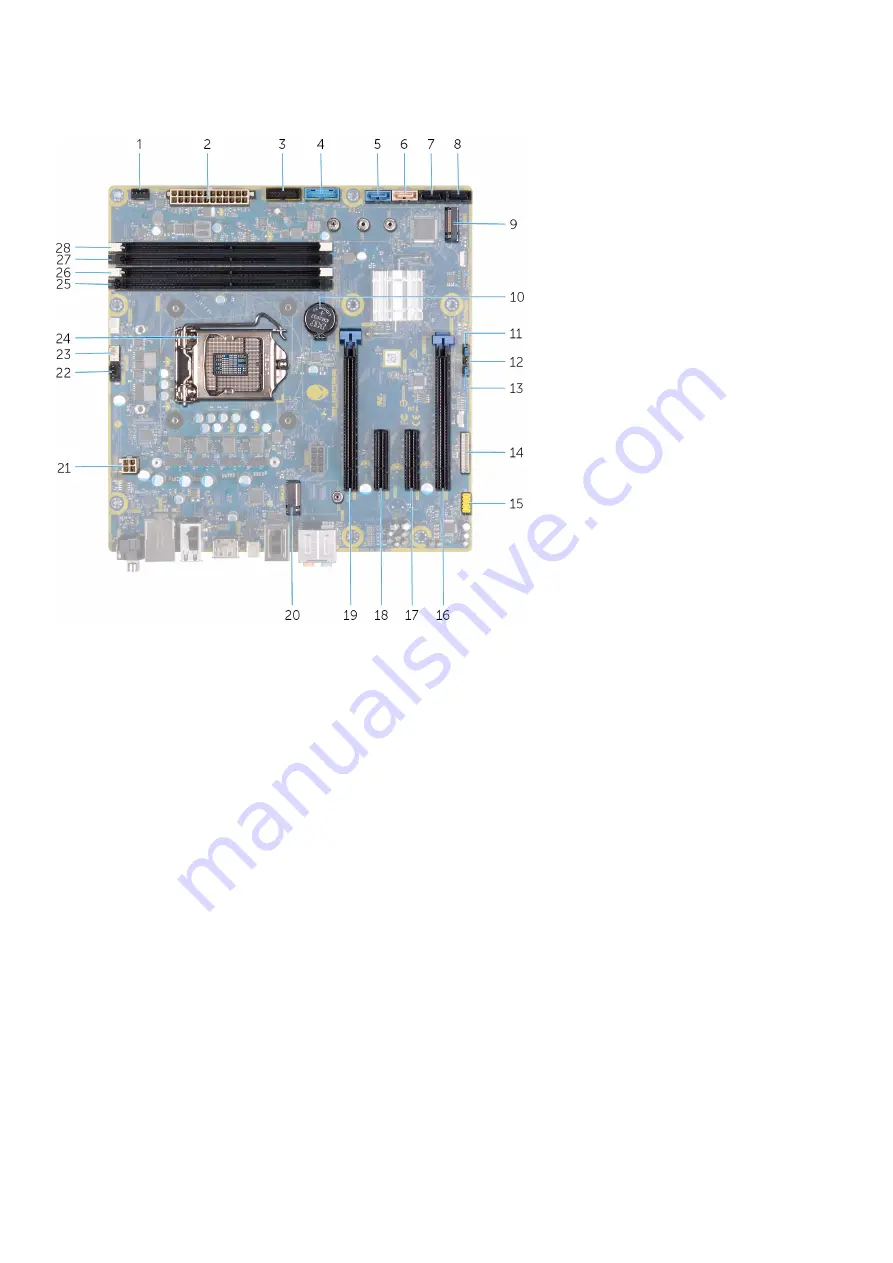
System-board components
1. front-chassis fan connector (FRONT_FAN)
2. power-supply connector
3. front-panel USB cable 2 (F_USB2)
4. front-panel USB cable 1 (F_USB1)
5. SATA 6 Gbps drive connector (SATA1)
6. SATA 6 Gbps drive connector (SATA2)
7. SATA 6 Gbps drive connector (SATA3)
8. SATA 6 Gbps drive connector (SATA4)
9. solid-state drive slot (M.2 SSD)
10. coin-cell battery
11. Service mode (SERVICE MODE)
12. CMOS reset jumper (CMOS_CLR)
13. Password reset jumper (PW_CLR)
14. LED controller connector (LED_CONTROLLER)
15. front audio connector (F_AUDIO)
16. PCI-Express x8 slot (SLOT4)
17. PCI-Express x4 slot (SLOT3)
18. PCI-Express x4 slot (SLOT3)
19. PCI-Express x16 mechanical/x8 electrical slot (SLOT1)
20. wireless-card slot (M.2 WIFI)
21. processor connector (AIX_CPU)
22. top-chassis fan (TOP_FAN)
23. processor-cooling assembly pump-fan connector
(PUMP_FAN)
24. processor socket (CPU1)
25. memory-module slot 3 (DDR4/XMM3)
26. memory-module slot 1 (DDR4/XMM1)
27. memory-module slot 2 (DDR4/XMM2)
28. memory-module slot 4 (DDR4/XMM4)
Recommended tools
The procedures in this document may require the following tools:
•
Philips screwdriver #1
•
Flat-head screwdriver
•
Plastic scribe
10
Содержание Aurora R9
Страница 1: ...Alienware Aurora R9 Service Manual Regulatory Model D23M Regulatory Type D23M002 ...
Страница 17: ...17 ...
Страница 20: ...NOTE Note the orientation on the hard drive carrier to replace it correctly 20 ...
Страница 23: ...NOTE Note the orientation on the hard drive carrier to replace it correctly 23 ...
Страница 28: ...28 ...
Страница 45: ...Steps 1 Ensure that the securing clips are extended away from the memory module slot 45 ...
Страница 49: ...49 ...
Страница 51: ...51 ...
Страница 53: ...53 ...
Страница 56: ...56 ...
Страница 59: ...59 ...
Страница 62: ...62 ...
Страница 63: ...63 ...
Страница 71: ...Steps 1 Place the processor fan and heat sink assembly on the processor 71 ...
Страница 82: ...Steps 1 Lay the computer on the right side 82 ...
Страница 89: ...89 ...


