background image


11 

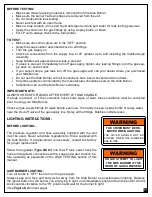
BEFORE TESTING: 

• 

Make sure that all packing material is removed from the Side Burner. 

• 

Make sure the burner tie-down straps are removed from the unit. 

• 

Do not smoke while leak testing. 

• 

Never leak test with an open flame. 

• 

Make a soap solution of one part liquid detergent and one part water for leak testing purposes. 

• 

Apply the solution to the gas fittings by using a spray bottle, or brush. 

• 

For LP units, always check with a full cylinder. 


TO TEST: 

• 

Make sure all control valves are in the “OFF” position. 

• 

Apply the soap solution described above to all fittings. 

• 

Turn the gas supply on. 

• 

Check  all  connections from  the  supply  line, or  LP  cylinder  up  to  and  including  the manifold  pipe 
assembly. 

• 

Soap bubbles will appear where a leak is present. 

• 

If a leak is present, immediately turn off gas supply, tighten any leaking fittings, turn the gas sup-
ply back on, and recheck. 

• 

If  you  cannot  stop  a  gas  leak  turn  off  the  gas  supply  and  call  your  dealer  where  you  purchased 
your Side Burner. 

• 

Do not use the Side Burner until all connections have been checked and do not leak. 

• 

Only those parts recommended by the manufacturer should be used on the Side Burner. 

• 

Substitution can void the Side Burner’s warranty. 

 
IMPORTANT NOTE:


ALWAYS CHECK FOR LEAKS AFTER EVERY LP TANK CHANGE.


If a leak is present, or if the connection hose shows signs of wear, these conditions must be corrected 
prior to using your Side Burner. 
 
Check all gas supply fittings for leaks before each use. It is handy to keep a spray bottle of soapy water 
near the shut-off valve of the gas supply line. Spray all the fittings. Bubbles indicate leaks. 
 

LIGHTING INSTRUCTIONS:


BEFORE LIGHTING… 
 
The  pressure  regulator  and  hose  assembly  supplied  with  the  unit 
must  be  used.  Never  substitute  regulators  for  those  supplied  with 
the Side Burner. If a replacement is necessary, contact the factory 
for proper replacement. 
 
Screw the regulator (Type  QCC1) into the LP tank. Leak check the 
hose and regulator connections with a soap and water solution be-
fore  operating  as  explained  on  the  LEAK  TESTING  section  of  this 
manual. 
 
 
SIDE BURNER LIGHTING: 
Turn all knobs to “OFF” then turn on the gas supply. 
Always keep your face and body as far away from the Side Burner as possible when lighting. Depress 
the igniter button for the burner you are trying to light, and immediately push and turn the burner control 
knob counter-clockwise to the “HI” position and wait for the burner to light.  
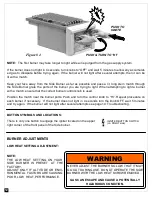
(See Figure # 4 on next page) 

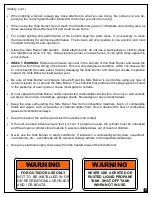
WARNING


THE COVER MUST BE RE-

MOVED WHEN LIGHTING. 


THE  COVER  SHOULD  NOT  BE 
CLOSED  WHEN  THE  BURNERS 
ARE IN USE.


WARNING


DO NOT ATTEMPT TO LIGHT 

THE SIDE BURNER IF THE 

ODOR OF GAS IS PRESENT. 

Содержание ALSB-2

Страница 1: ......

Страница 2: ...2 PASTE SERIAL NUMBER LABEL IN THIS LOCATION NOTES BARBEQUE SERIAL NUMBER LABEL ...

Страница 3: ...al Gas Installation code or CAN CGA B149 2 Propane Installation code All components must be grounded in accordance with local codes or with the National Electrical Code ANSI NFPA 70 990 or Canadian Electrical code CSA C22 1 CALIFORNIA PROPOSITION 65 WARNING The burning of gas cooking fuel generates toxic by products which are on the list of substances which are known by the State of California to ...

Страница 4: ...ky cloth in place of potholders Do not let potholders touch hot por tions of the Side Burner grate Only certain types of glass heatproof glass ceramic earthenware or other glazed utensils are suita ble for Burner use These types of materials may break with sudden temperature changes Use only on low or medium heat settings and according to their manufacturer s directions Grease is flammable Let hot...

Страница 5: ...ntrols are turned off and the Side Burner is cool before using any type of aerosol cleaner on or around the Side Burner The chemical that produces the spraying action could in the presence of heat ignite or cause metal parts to corrode Do not operate the Side Burner under unprotected combustible construction Use only in well ventilat ed areas Do not use in buildings garages sheds breezeways or any...

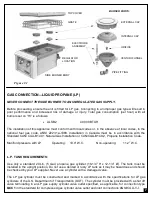
Страница 6: ...1 Remove all packaging materials 2 Install and secure the body of the Side Burner to your counter s enclosure 3 Ensure that the burners are positioned correctly on their venturi funnels and are fully seated onto their supports See figure 1 4 Install the Side Burner Grate 5 Make the connection to the gas regulator according to the instructions on pages 8 9 for your gas type 6 To comply with safety ...

Страница 7: ...0 0 W C Non operating 11 2 W C L P TANK REQUIREMENTS Use only a standard 20 Lb 5 Gal propane gas cylinder 18 1 4 H x 12 1 4 Ø The tank must be installed in the upright position Do not use a dented or rusty LP tank as it may be hazardous and should be checked by your LP supplier Never use a cylinder with a damaged valve The LP gas cylinder must be constructed and marked in accordance with the speci...

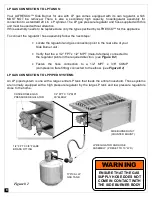
Страница 8: ...it Verify that the a 1 2 FPT x 1 2 MPT male to female connected to the regulator points in the required direction see Figure 2 Fasten the hose connection to a 1 2 MPT x 3 8 COMP compression flare fitting connected to the elbow see Figure 2 LP GAS CONNECTION TO LP PIPED SYSTEMS An LP piped system is one with a large central LP tank that feeds the entire household Those systems are normally equipped...

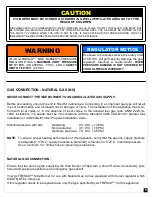
Страница 9: ...re that the service pipe supplying the Side Burner is fitted with a shut off valve conveniently posi tioned and easily accessible as an emergency gas shutoff Your ALFRESCO Side Burner for use with Natural Gas comes equipped with its own regulator which MUST NOT be removed If this regulator needs to be replaced use only the type specified by ALFRESCO for this appliance CAUTION CYLINDERS MUST BE STO...

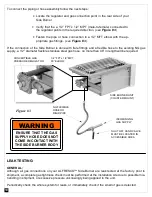
Страница 10: ... Burner Verify that the a 1 2 FPT x 1 2 MPT male to female connected to the regulator points in the required direction see Figure 3 Fasten the pipe or hose connection to a 1 2 MFT elbow with the ap propriate gas fittings see Figure 3 If the connection of the Side Burner is done with flare fittings and a flexible hose to the existing NG gas supply a 1 2 diameter flexible stainless steel gas hose no...

Страница 11: ...YS CHECK FOR LEAKS AFTER EVERY LP TANK CHANGE If a leak is present or if the connection hose shows signs of wear these conditions must be corrected prior to using your Side Burner Check all gas supply fittings for leaks before each use It is handy to keep a spray bottle of soapy water near the shut off valve of the gas supply line Spray all the fittings Bubbles indicate leaks LIGHTING INSTRUCTIONS...

Страница 12: ... burner you are trying to light When attempting to light a burner with a match ensure that the correct burner control knob is used Position the match near the burner ports Push and turn the control knob to HI Repeat procedure on each burner if necessary If the burner does not light in 4 seconds turn the knob OFF wait 5 minutes and try again If the burner will not light after several attempts see p...

Страница 13: ...to this reputation DAY TO DAY CARE To maintain the original appearance of your ALFRESCO Side Burner a regular cleaning routine should be carried out using the following guidelines 1 After use following the safety precautions detailed on page 4 and 5 wipe the Side Burner with a soft damp soapy cloth and rinse with clean water preferably warm hot water This should remove most substances encountered ...

Страница 14: ...occurs in stainless steel is pitting of the surface The rea son for this corrosive attack can usually be attributed to certain household products for example Bleaches Most common domestic bleaches sterilizing solutions contain chlorine in the form of sodium hypo chlorite If used in concentrated form bleaches can attack the stainless steel causing pitting of the sur face They should always be used ...

Страница 15: ...IDERATIONS In order to maintain your Side Burner in clean working order it will be necessary under certain conditions to take additional precautions If your Side Burner is located in a coastal area it will be exposed to salty air which is corrosive If it is located close to a swimming pool or Jacuzzi with chlorinated water then it will be exposed to dilute hydrochloric acid which can be formed as ...

Страница 16: ...can enjoy many years of service from it and keep it looking the way it should In the event that any light rusting is found on the stainless steel it will usually not be the stain less steel which is corroding but iron particles which have somehow been deposited on the sur face For more information on this subject please request our Rust removal bulletin As a first course of action though we recomm...

Страница 17: ...17 ...

Страница 18: ...per left corner Gas Type Date of installation A brief description of the problem INQUIRIES AND INFORMATION For all other Alfresco Gourmet Grill information such as power installation cut out requirements or any other product inquiries please contact Alfresco Gourmet Grills 888 383 8800 or 323 722 7900 Customer Service Department 323 726 4700 fax 7039 East Slauson Avenue Commerce CA 90040 Or visit ...

Страница 19: ...com or call 866 203 5607 to report service problems and or to obtain replacement parts for your Alfresco Side Burner Replacement parts are shipped F O B Commerce California 90040 Before calling for service please make sure you have the following information Model number serial number date of purchase and proof of purchase by original owner Limitations Exclusions 1 Alfresco s warranty applies only ...

Страница 20: ...20 ...
Отзывы: