background image

20 

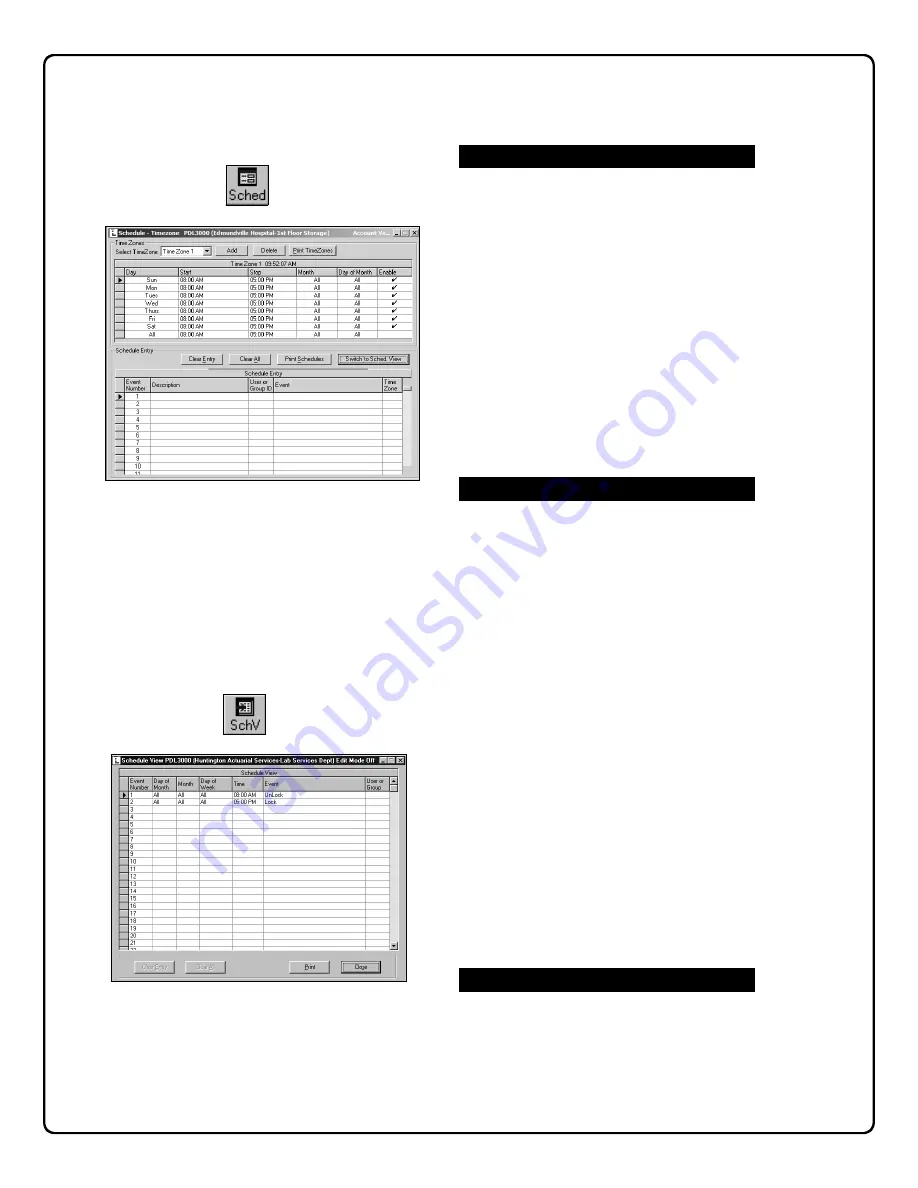
Schedules are customized by the use of two screens.  The first is the 

Schedule


-


Timezone 

screen.  Click the 

Sched 

button or click 

Window

Schedules 

to open.   


Use the 

Schedule


-


Timezone 

screen to create schedules.  Just as 

each schedule consists of two main parts:  the action the lock will 
perform (an 

event

) and a time the event will occur (a 

TimeZone

), the 

Schedule


-


Timezone 

screen contains two main sections: 


TimeZone 

section (top) - Allows the creation of 

TimeZones

, i.e. 

the time(s) the events in the schedule will take place 

Schedule Entry 

section (bottom) - Allows the selection of events 

the lock will perform and links events to TimeZones. 

 
The second screen is the 

Schedule View 

screen.  Click the 

SchV 

button or click 

Window

Schedule View 

to open. 


The 

Schedule View 

screen separates the TimeZone(s) for each 

schedule, clearly displaying ALL parts of the schedule.  The 

Schedule 

View 

screen also displays the schedule as it is executed by the lock 

programming.  Although the previously described 

Schedule


-


Timezone 

screen may display only limited TimeZone information, the 

complete schedule may in fact consist of multiple events depending on 
how the TimeZone was created.  Therefore the 

Schedule View

 screen 

is very useful in that it presents the "complete picture", displaying all 
parts of the schedule, for each schedule you have to work with. 


Note:

  Schedules are local to the lock and not shared, while 

TimeZones are 

global 

and will appear in all lock configurations within 

an Account.   


When selecting the events and TimeZones for your schedules, you 
may need to specify the 

User or Group ID 

in order to complete the 

event.  The 

Description

 field is used to display descriptive text for 

identification purposes only.  The 

Event Number

 records and monitors 

ALL events stored or sent to the lock. 


Schedules can be 

single-ended 

or 

double-ended

: single-ended 

schedules have a start time only; double-ended schedules have both a 
start and stop time.  Most schedules are double-ended.   


An example of a single-ended schedule is a single "Lock" event with the 
TimeZone 1 start time set to 5:00 PM only.  This schedule will cause the 
device to lock every day at 5:00 PM.  An example of a double-ended 
schedule is an "Unlock" event with the TimeZone 1 start time set to 8:00 
AM and the stop time set to 5:00 PM.  This schedule will cause the 
device to unlock every day at 8:00 AM and lock at 5:00 PM. 


Unlock

 – Device unlocks at programmed time. 

Lock

 – Device locks at programmed time. 

Disable Group

 – All Users within specified Group become disabled at 

the programmed time. 

Enable Group

 - All Users within specified Group become enabled at 

the programmed time. 

Disable User

 –Specified User is disabled at programmed time. 

Enable Group

 - Specified User is enabled at programmed time. 

Passage Mode by Group 1- Open Window

 – Places device into 

Passage Mode 

(unlocked state) when a member of Group 1 

enters their User Code.  The Start Time opens the timeframe 
where the Group 1 member can enter their code, the Stop Time 
ends the timeframe (closes the window). 


Note:

  If a Group 1 member has placed the device into Passage 

Mode, the device will not exit Passage Mode automatically.  Be 
sure to lock manually or schedule a single-ended 

Lock 

event to 

coincide with the End Time. 

Relay Activation by Group 1 – Open Window

 – Sets a timeframe 

where if a Group 1 member enters their User Code, a relay 
activation is sent.  An example application of the relay is to disarm 
an alarm control panel. 

Enable Group 4 by Group 1- Open Window

 – Sets a timeframe 

where if a Group 1 member enters their User Code, all members 
of Group 4 will become enabled.  


Note:

  Group 4 will remain enabled if a Group 1 member has 

entered within the specified time.  Be sure to disable Group 4 
manually, or schedule a single-ended 

Disable Group 

event to 

coincide with the End Time.   


The 

Schedule View 

screen can be used to verify the full details of 

each schedule, allowing you to review the arrangement of the start and 
stop times for each event.  The 

Schedule View 

screen is also intended 

to be used to view existing schedules received from installed locks.   

Creating Schedules and TimeZones 

Working with Schedules 

Switching to Schedule View 

Event Types 

Содержание DL-WINDOWS V3.6.0

Страница 1: ...0 Publicly traded on NASDAQ Symbol NSSC ALARM LOCK 2007 Downloading Software for the Trilogy Line of Standalone Access Control Systems PDL3500 PDL4500 RESIDENCY LOCK PDK3000 DK3000 DL3000 DL4100 PRIVA...

Страница 2: ...Screen Field Definitions 30 Lock Data Screen Field Definitions 31 Event Log Viewer Screen Field Definitions 32 Programmable Features Screen Options tab 33 Programmable Features Screen Customize DST 34...

Страница 3: ...tiple Locks see page 15 Allows you to save time when creating a new lock Cloning duplicates all schedules and Users programmed from an existing lock You can clone up to 2000 locks of the same lock typ...

Страница 4: ...e this cable to transfer the Lock Program from your lock to an AL PRE DB9 to DB9 Serial Cable supplied Enroll ProxCards quickly into DL Windows then transfer this new ProxCard data from the computer t...

Страница 5: ...use you do not have to transport or find electricity for your computer Data can also flow in reverse from the lock through the AL DTM back to the computer for examination IBM COMPATABLE LAPTOP OR DESK...

Страница 6: ...to the lock are organized by their Function Number Want to change the date inside the lock Use Function Number 38 Want to add a User Code Use Function Number 2 With DL Windows you first use the vario...

Страница 7: ...example every Tuesday at 5PM that are referred to as TimeZones You use the Schedule TimeZone screen to create these TimeZones and once created you can link events to these TimeZones Note The Schedule...

Страница 8: ...u wish to allow one time access to a temporary worker Simply enter the User 297 User Code into the lock keypad Later when the temporary worker enters the User 300 User Code into the lock keypad the Us...

Страница 9: ...using the Schedule TimeZone screen Feat Opens the Programmable Features dialog which allows you to choose various Options within the DL Windows software Log Open the Event Log Viewer screen to examine...

Страница 10: ...tup and Test Import CSV File Import CSV File From Excel Import CSV File From DL Windows Export Active Account to CSV Import a Single ADF Account File Backup Accounts Check for Ambush Code Conflict Com...

Страница 11: ...3 Add Users and other data using Global Users screen see page 16 4 Enroll ProxCards for PDL locks only see page 17 5 Add Schedules and TimeZones see page 20 6 Send Information to the lock see page 21...

Страница 12: ...port that passes the DL Windows automatic detection test will be selected When finished click Exit Note If you are not using COM1 you must run this utility to identify the active comm port Starting D...

Страница 13: ...t the directory the Import Utility will use When selecting your database files the Files of type pull down menu lists two file types New DL Windows Index files Old DL Windows Index files The Old file...

Страница 14: ...d field type a new password in the New Password field and re type the same new pass word in the Confirm field 3 Press Enter on your keyboard to accept the changes DL Windows can utilize a Security Pas...

Страница 15: ...to delete an Account right mouse click the name of the Account and select Delete Account from the menu A warning popup will appear and click Yes to confirm and click No to can cel Add Locks to the Ac...

Страница 16: ...ct the first User press and hold the SHIFT key then click the last User in the range you can also press CTRL and click individual Users Within the range of Users highlighted right click in the highlig...

Страница 17: ...he Add Cards button The ProxCard Enrolling dialog opens The AL PRE is now ready to accept Prox entries 5 In the ProxCard Enrolling dialog right check Enable AL PRE Enroll ProxCards with the AL PRE DB9...

Страница 18: ...below To manually add proximity information first uncheck Enable AL PRE The Card No and Facility fields become active as shown in the following image If you choose to add the Proximity data manually...

Страница 19: ...pe manually by selecting User Defined You will need the HID form like the one shown below With out this you will not be able to complete this entry and possibly corrupt your data If you have this data...

Страница 20: ...a single ended schedule is a single Lock event with the TimeZone 1 start time set to 5 00 PM only This schedule will cause the device to lock every day at 5 00 PM An example of a double ended schedul...

Страница 21: ...y of entering a Master or Manager Code entering Program Mode and inputting Function 58 Simply enter User 298 s User Code to initiate PC communications with the lock It is an option with all the locks...

Страница 22: ...een Verify that this information is correct 5 If Communicating is not displayed after Step 3 as shown in the image below then communications have failed Check the following a COM Port Selection b Cabl...

Страница 23: ...r data was changed at the lock Because DL Windows will not automatically receive and accept User changes made at the lock if you wish to retain the data displayed in the Lock Differences screen you mu...

Страница 24: ...e Max Event Log Length pull down list as shown in the image below When using a PC the complete log up to a maximum of 40 000 events can be received When Update Group Status is selected in the Receive...

Страница 25: ...to PC COMM MODE If not already in PC COMM MODE press green button to enter this mode 2 Press and HOLD both the left and green buttons on the AL DTM After several messages appear release the buttons wh...

Страница 26: ...tion of User 299 1 Plug the AL PCI2 cable into the correct COM port in your PC and plug the 2 pin banana plug connector into the AL DTM observing correct tab direction 2 Open an Account in DL Windows...

Страница 27: ...Steps for each lock to be programmed Make sure that each Lock is being assigned the correct LockID This will ensure that the locks are programmed Re enter 299 Code to Continue Door 0001 Send PGM Packe...

Страница 28: ...d to retrieve event logs 1 In DTM Support screen click in the DTM Function column for the selected lock click the down arrow and the pull down menu will display Select the Receive Log Function Multipl...

Страница 29: ...orrect identity Includes Custom Field described below User Name Names appear in this column when First Name and Last Name fields in this screen are populated Field turns yellow when both a User Code a...

Страница 30: ...the Master Code is highlighted displaying the default User information in the window with the fields ready to be populated ProxCard Data Use the AL PRE to enroll ProxCards and ProxKey keyfobs and the...

Страница 31: ...User s department or the shift to which the User is assigned If any User attempts to access the lock outside of the Group s scheduled hours the lock will deny entry Indicates the current status of the...

Страница 32: ...Log Viewer screen is used to view each event also called the Audit Trail The date the event occurred MM DD YY Click the heading to sort its contents The time the event occurred in 24 hour military ti...

Страница 33: ...For version 3 5 6 see page 53 The above screen is from a PDL3000 lock Note the Daylight Saving Time area includes the 24 pre programmed modes as well as a 25th mode to allow customization selecting mo...

Страница 34: ...ill take place at 2 00 AM the days selected Click OK to save and click Cancel to discard changes Programmable Features Screen Customize DST Click the pull down menu and a calendar will appear Daylight...

Страница 35: ...e an alert that an unauthorized Use Code entry has been detected Will activate relay anytime a User enters a valid User Code and is granted access Will activate relay if the lock has been programmed f...

Страница 36: ...ough the door without the need for a User Code Remote input disables the lock while a short is maintained across remote input Therefore if a switch is used for the remote input as long as the switch i...

Страница 37: ...he 4100 series lock can be programmed to disable User Code and PROX card access for up to 250 minutes When active all User Numbers 12 and higher are disabled and User Numbers 1 11 or a key can always...

Страница 38: ...to occur only on this specific day every month of the year Double click on the day s desired If the day is enabled a 9 will appear under the Enable column Add TimeZone Click the Add Button the Select...

Страница 39: ...ly two columns for one event and the third column is left blank all information for the event will be automatically deleted At any time all programmed schedules can be printed by clicking on Print Sch...

Страница 40: ...his is the Day of the Week entered in the TimeZone area of the Schedule TimeZone screen This is the time entered in the TimeZone area of the Schedule TimeZone screen This is the Event entered in the S...

Страница 41: ...obal Users screen and simply lists all potential Users within an Account DL Windows keeps track of each Global User listed in the Global Users screen by use of the Global ID number The number acts as...

Страница 42: ...ou to combine Users from one Account with another Account Before using either Import utility first open the Account to which the data will be imported If the Account does not yet exist a new test Acco...

Страница 43: ...ion folder if you selected the default folders look in C DL Windows Highlight the Account files you wish to transfer hold down the Ctrl key and click on each file Right click the highlighted files and...

Страница 44: ...onfigurations Use this button after the AL DTM had valid data loaded from the lock Data will be received from all locks that have been selected in the DTM Support screen The DTM Support screen will re...

Страница 45: ...ams from DL Windows to AL DTM Receive multiple lock logs or lock programs stored in the AL DTM back to DL Windows 2 LOCK Mode AL DTM Lock Communications Transfer lock program from the AL DTM to a spec...

Страница 46: ...If database errors occur within Accounts click Tools Compact and Repair To ensure that your Account data is not lost you can back up all of your Accounts into a single folder Simply click Tools Backup...

Страница 47: ...he Find phrase No field and press ENTER on your keyboard Changing the Default Language On the toolbar click Opt and the Options dialog opens see below Additional languages are available in the Select...

Страница 48: ...unlock event adding the days when the lock should remain locked In the example shown below the lock will remain locked on the 4th of July Click the Select TimeZone pull down menu and select TimeZone 2...

Страница 49: ...k will stay locked all day This feature allows for a window of time to be created where if any Group 1 User Code is entered within the programmed window a relay will be activated for 2 seconds This re...

Страница 50: ...he Change Password dialog type the existing password in the Old Password field type a new password in the New Password field and re type the same new password in the Confirm field Press f on your keyb...

Страница 51: ...nnect the double ended banana plug into the AL DTM and into the lock that is to be programmed observing proper tab direction 3 Press the Green Button on the AL DTM until the AL DTM displays the follow...

Страница 52: ...iving PGM Packet 008 Lock s Time and Date Updated Comm Complete 07 24 04 02 28PM Current date and Time 0993 FREE MEMORY BLOCKS Current Memory Status Press the left black button answer YES Waiting for...

Страница 53: ...imum number of invalid entry attempts with wrong User Code has been reached valid entries are 1 60 seconds The duration in seconds that the lock will remain unlocked after a valid code has been entere...

Страница 54: ...unicate with the Lock and or Data Transfer Module DATA TRANSFER MODULE A device that permits transfer of program data between a computer and the lock DATE Month Day and Year entered as MMDDYY DAY OF W...

Страница 55: ...ram data to be entered through the keypad Only specific Users can program a lock manually by entering their USER CODE followed by the key To exit program mode hold any key until repeated beeps are hea...

Страница 56: ...n purporting to act on its behalf to modify to change or to assume for it any other warranty or liability concerning its products In no event shall ALARM LOCK be liable for an amount in excess of ALAR...

Отзывы: