27
Anaconda
USER MANUAL
4. Remove the protective caps.
5. Point the equipment at an object.
6. Activate the Anaconda by turning the operating switch ON. After approximately 3 sec, video of
the thermal scene should appear.
7. If the day scope includes a focusing ring (i.e., parallax adjustment knob), adjust the focus for a
parallax-free image.
8. Turn on the day scope’s reticle illumination and adjust the reticle brightness.
9. Adjust the focus of Anaconda by turning the focus ring (CW for far focus, CCW for near focus).
NOTE:
The total focus range is covered with 3/4 turns of the objective focus ring.
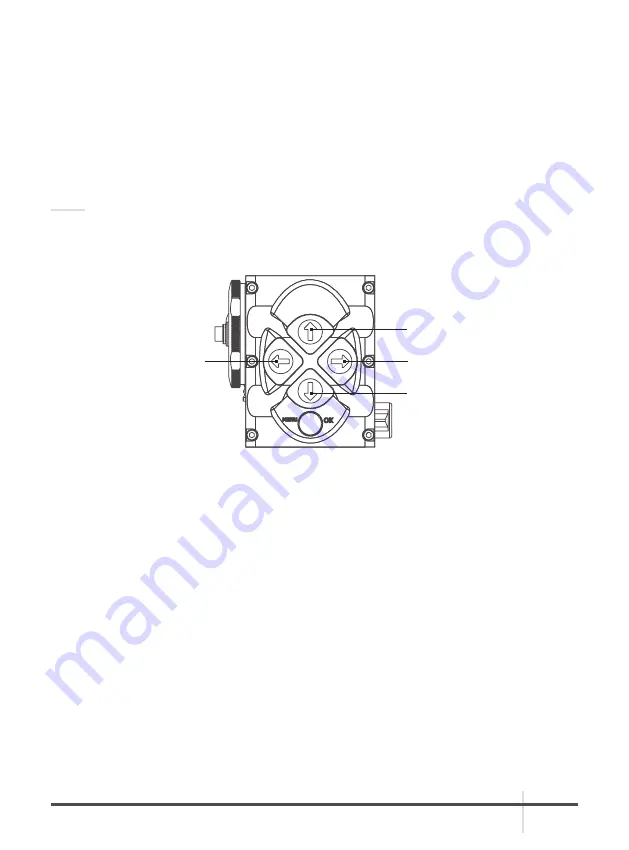
10. Using the buttons on the control panel (Figure 2-27), configure the Anaconda for your specific
situation.
For more information on operational setting procedures, see Part 2.2 (Controls and Display
Indications).
A. Adjust the brightness of the display to your preferred level.
Push the brightness adjustment buttons to increase (1)/decrease (3) the display brightness by
one level at a time until you reach your desired brightness level.
B.
Use UCMNUC/ FFC (User-Controlled Manual Non-Uniformity Correction/ Flat-Field
Correction) function to improve image quality. As the camera and the detector heat up during
use, the detector pixels will drift. The pixels do not drift uniformly. The camera software
compensates for the drift up to an accurate position point, but when the limit is reached the
UCMNUC/ FFC function is triggered. A uniform mechanical shutter is placed between the lens
and the detector for a moment and the signal is processed.
Push and hold the two brightness control buttons (1 and 3) at the same time to manually trigger
the User-Controlled Manual Non-Uniformity Correction/ Flat-Field Correction.
If necessary, interrupt the automatic UCMNUC/ FFC process by pushing the OK button (5) on
the control panel during the 5-second countdown, which will appear at the bottom of the display.
C. Adjust as necessary using the MAIN MENU. See Part 2.2.2 (Using the MAIN MENU).
FIGURE 2-27. SETTING BUTTONS
(1) BRIGHTNESS UP/
PALETTE (FWD)
(3) BRIGHTNESS DOWN /
PALETTE (BWD)
(4) RETICLE COLOR /
RETICLE PATTERN
(2) DIGITAL ZOOM /
RETICLE ON/ OFF
Содержание ANACONDA Series
Страница 1: ...USER MANUAL ANACONDA THERMAL IMAGING CLIP ON SYSTEM...
Страница 39: ......


