background image

- 73 -

EZDigPro

User & Calibration Manual

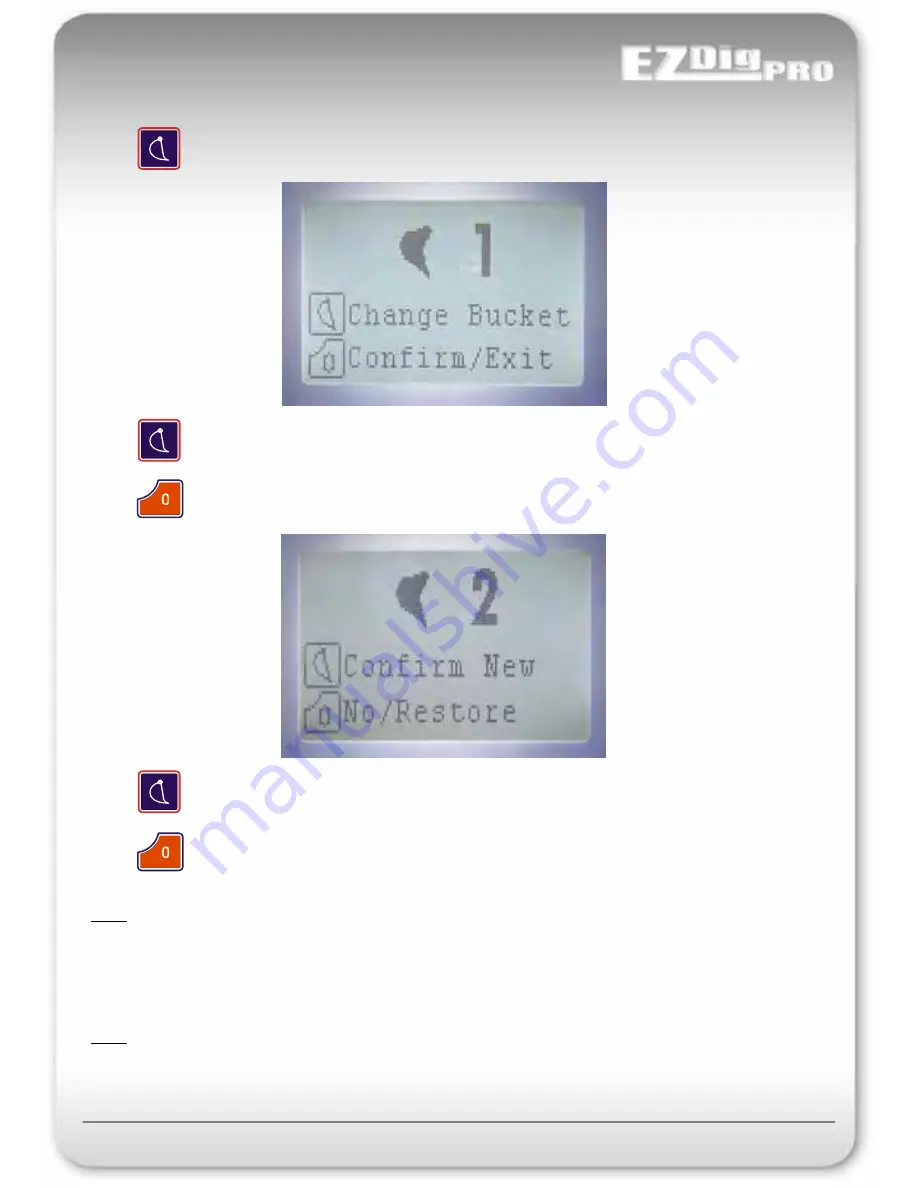
Press                to change the bucket in use.

Press                to return to previous screen. If the bucket number has been changed the following screen will appear:

[usage]

Bucket Selection

Press                to confirm the new bucket selected and return to previous screen

Press                to return to the previous screen and not change the actual bucket (old selected bucket will stay in use)

Note: If you want to calibrate the new bucket doing a whole automatic calibration all sensors (slow method), you have 

to choose your new bucket at this page prior to calibration. If you want to calibrate the new bucket using the manual 

calibration method (for the bucket only, fast method), you can choose your new bucket (number) during the manual 

calibration method.

Note: Even though you might have not moved the bucket sensor after you’ve changed the bucket (if attached to the 

dog bone or quick connector), you still have to calibrate this new bucket.

Be sure to use the correct number in the calibration mode when you’re doing the calibration.

Press                to enter the bucket selection page.

Содержание EZDigPro

Страница 1: ...User Manual 23 EZ01_03 manual version software version...

Страница 2: ...Sensor Reception 92 Alarms Sensors 93 Remote Display 94 Specifications 95 Safety EMC FCC CDRH 96 97 Warranty Contact Information 98 99 Introduction System Functionality 3 System Components 4 6 First T...

Страница 3: ...or teeth point A in figure 1 and the depth value shown is the distance from the actual position to the correct depth value target With the system the operator has to dig straight only moving the boom...

Страница 4: ...4 EZDigPro User Calibration Manual x1 x1 x3 x3 x1 x1 x1 x1 x1 x1 intro System Components x1 x1 x2 x2 x1 x1 x1 x1...

Страница 5: ...5 EZDigPro User Calibration Manual intro System Components Each component of the system has a serial number Please note this number before requesting service...

Страница 6: ...sensor the only way to make the system work is to lock the articulated boom during calibration and operation You ll be prompted during the calibration of the system to ensure the correct number of se...

Страница 7: ...be attached see Sensor Assignment section Power up the control box and assign the sensors to the correct machine elements where they will be attached see Sensor Assignment section Fix the sensors in...

Страница 8: ...n Control Box Junction Suction Cup 1 2 The control box can be powered using the supplied cable directly through the cigarette lighter If a direct connection to the battery is needed please verify the...

Страница 9: ...9 EZDigPro User Calibration Manual installation Components Installation Suction Cup Remote Display 1 2 Note The radio antenna is on the top of the Remote Display...

Страница 10: ...ro User Calibration Manual installation Components Installation Junction Control Box Remote Display Note The Remote Display must always be connected to the control box Otherwise the entire system will...

Страница 11: ...rs and other medical devices Sensors Sensors are equipped with batteries charged through solar cells The supplied multi charger might be necessary to externally charge the sensors Charge the batteries...

Страница 12: ...netic attachments or attach the sensors magnetically to the support plates which can be welded or screwed on the individual elements The advantage of the support plates you don t need to mark the sens...

Страница 13: ...rs See above Boom 2 Dipper stick if working with 3 sensors Usually the best place as the dipper stick has the greatest latitude in movement and you need space to be able to move through the laser plan...

Страница 14: ...ic cap of the sensor is located you will be asked during the calibration process C On the dog bone If you decide to install the bucket sensor on the dog bone be sure to run the dog bone calibration be...

Страница 15: ...ZDigPro User Calibration Manual installation Components Installation Fixing with Magnets Pay Attention Strong magnets Don t put hand or fingers between sensor and support plate or other metal parts Se...

Страница 16: ...Pro User Calibration Manual installation Components Installation Fixing with Support Plates Pay Attention Strong magnets Don t put hand or fingers between sensor and support plate or other metal parts...

Страница 17: ...on Manual installation Components Installation Fixing with Support Plates Pay Attention Strong magnets Don t put hand or fingers between sensor and support plate or other metal parts Releasing to mach...

Страница 18: ...starting to work with the system you must assign each sensor to the machine elements where they will be installed and calibrate the machine with the calibration procedure At system start up a welcome...

Страница 19: ...his is the start up procedure SENSOR ASSIGNMENT DONE SENSOR ASSIGNMENT DONE YES NO SETTING MENU SETTING MENU REMOTE DISPLAY CONNECTED REMOTE DISPLAY CONNECTED YES NO ALARM PAGE ALARM PAGE CALIBRATION...

Страница 20: ...down in any text menu If the cursor is on the last line of the page it starts again from the top or next page is displayed if there is one Press to move the cursor up in any text menu If the cursor is...

Страница 21: ...n to the laser plane height Zeroing function To zero the depth or reach value To exit any menu Press once to cycle through the horn settings Off On Loud Enabling the speaker enables additional on grad...

Страница 22: ...CALIBRATION calibration Part Names Conventional Boom 3 Sensor Machine Boom 1 Boom 2 Chassis Bucket If you have an articulated boom and you lock it to the main boom and use it as a single boom the sys...

Страница 23: ...use the sensor that was on Boom 3 Place the sensor that was on Boom 2 the articulated boom from your first machine onto the dipper stick which is now called Boom 2 Sensor 1 will again be on the main b...

Страница 24: ...s not needed default mode see next page to continue If a password has been set the system will prompt for it Scroll to Confirm and press If the password is incorrect the message Access denied will be...

Страница 25: ...tion deleted Strongly recommended after a system update new software Save To SAVE all the changes made during the calibration process This is mandatory so you don t lose modified data with a control b...

Страница 26: ...are horizontal it will cause problems Even if there is no error message shown you may get errors during calibration or operation 3 Follow the menu prompts on the next page 4 Put that sensor on the boo...

Страница 27: ...orizontal ENTER continue ZERO exit SENSOR ASSIGNM No sensor ready to be programmed ZERO to exit SENSOR ASSIGNM No sensor ready to be programmed ZERO to exit Follow these menu prompts to assign each se...

Страница 28: ...s checked with Sensors Search After a pause you will see 1 of the 3 screens shown in blue below If the number of received sensors doesn t match what you just indicated you ll see screen 1 or 2 If it m...

Страница 29: ...e dog bone You need to temporarily use the boom 1 sensor for this 2 Booms Bucket Sensors Calibration A self leveling laser pointer or rotational laser is very helpful 3 Laser Receiver Calibration You...

Страница 30: ...t your installation automatic calibration Sensors Position Bucket sensor position DogBone Bucket Bucket sensor position DogBone Bucket Bucket sensor mounting side Left Right Bucket sensor mounting sid...

Страница 31: ...t Right Calibration DogBone Booms Bucket Laser Calibration DogBone Booms Bucket Laser Calibration Booms Bucket Laser Calibration Booms Bucket Laser Continue answering the menu questions about your ins...

Страница 32: ...t Press Enter Boom 1 sensor must be mounted on the bucket Press Enter Boom 1 sensor on bucket side Left Right Boom 1 sensor on bucket side Left Right Attach Boom 1 sensor temporarily to the Bucket Don...

Страница 33: ...in on Boom 1 Press Enter Boom 1 sensor can be moved again on Boom 1 Press Enter When the Dog Bone calibration is done the Boom 1 sensor temporarily mounted on the bucket can be attached again on Boom...

Страница 34: ...the self leveling laser pointer that s included with the system You can mount it on a tripod attach it anywhere on the machine using the magnetic L bar or use the remote display s suction cup mount wh...

Страница 35: ...35 EZDigPro User Calibration Manual automatic calibration Booms Bucket LASER LEVELING METHOD Laser Pointer...

Страница 36: ...36 EZDigPro User Calibration Manual automatic calibration Booms Bucket OTHER LEVELING METHODS...

Страница 37: ...ght Diff 0 000 Continue EZCalibration Height Diff 0 000 Continue Enter Enter Don t calibrate the system with the machine s engine idling Keep the engine at least at half throttle half RPM On load sens...

Страница 38: ...etween the first and the second line and enter it in the menu Note The bigger the height difference between d1 d2 the more accurate your calibration will be This is significantly more important than t...

Страница 39: ...u did with the lower line minimum 10 for 3 sensors minimum 15 for 4 sensors Proceed by pressing over Calculate to compute the points taken to the calibration value automatic calibration Booms Bucket E...

Страница 40: ...r a confirmation to overwrite the previous calibration YES will overwrite the previous calibration and permanently store it NO will discard all calculated values automatic calibration Booms Bucket Cal...

Страница 41: ...from the pivot point to the middle of the laser receiver see page 54 for Manual calibration Laser Receiver To do it automatically Set up a horizontal rotational laser at a height that will allow you...

Страница 42: ...ll appear After a couple of seconds the message Press Enter means the unit is ready for a new acquisition Move your dipper stick to a new position prior to pressing Press and acquire the beam again No...

Страница 43: ...the Side where the sensor is installed viewing the excavator from the cab L Left and R Right This setting has to be done for every sensor manual calibration Boom 1 BOOM 1 CALIBRAT Side L Length 6 600...

Страница 44: ...he correction factor Offset is the angle difference between the sensor absolute angle and the real machine boom angle It can be manually adjusted Actual is the actual real boom angle valid only after...

Страница 45: ...the horizontal plane of the transmitter first by pointing the beam on point A moving up and down the laser and then moving the boom until the point B is again spotted by the beam In this case the angl...

Страница 46: ...g Tips METHOD 3 The vertical alignment could be also obtained by using the plumb bob method Fig 10 Note When the boom is horizontal the angle is zero when pivot M lower than L the angle is negative an...

Страница 47: ...nter of pivot F Move the cursor to highlight parameter Length and set the exact value expressed in the selected unit of measure Fig 3 conventional boom Fig 4 articulated boom manual calibration Boom 2...

Страница 48: ...es referring to Fig 5 or Fig 6 Press and you will see the new offset value acquired BOOM 2 ANGLE Fig 6 articulated boom Fig 5 conventional boom manual calibration Boom 2 BOOM 2 CALIBRAT Side L Length...

Страница 49: ...installed viewing the excavator from the cabin L Left and R Right Measure accurately the length between the center of pivot G and the center of pivot H Move the cursor to highlight Length and set the...

Страница 50: ...eter Angle set the exact boom value in degrees referring to Fig 8 Press and you will see the new offset value acquired manual calibration Boom 3 BOOM 3 CALIBRAT Side L Length 6 600 Angle 30 0 Offset 2...

Страница 51: ...ngles from pivot to pivot Press when ready to take the correct offset value Seg2Angle Set the real segment 2 angle as done above for segment 1 DOG BONE Bucket Sensor mounted on the Bucket Leverage man...

Страница 52: ...he exact value expressed in the selected unit of measure Fig 9 System can store up to 9 different buckets for each machine from 1 to 9 The bucket number that will be manually calibrated is the actual...

Страница 53: ...Angle Set the exact bucket angle value in degrees Press and you will see the new offset value acquired manual calibration Bucket BUCKET ANGLE BUCKET CALIBRAT Side Length Angle Offset Actual BUCKET CAL...

Страница 54: ...he Laser Receiver Insert the relevant value in meters or feet VertDist This value corresponds to the distance between E and D center of Laser Receiver to point D on projection AB ref Fig 11 Fig 20 Ins...

Страница 55: ...TIONAL BOOM BOOM 1 ARTICULATED BOOM LASER RISE ED LASER RISE ED LASER DISTANCE AC LASER RISE ED 0 LASER RISE ED Fig 11 Fig 12 Fig 13 Fig 14 LASER DISTANCE AC manual calibration Measuring Tips REFERENC...

Страница 56: ...Calibration Manual BOOM 2 ARTICULATED BOOM LASER RISE ED LASER DISTANCE AC LASER RISE ED 0 LASER RISE ED Fig 15 Fig 16 Fig 17 manual calibration Measuring Tips REFERENCE DRAWINGS TO DETERMINE POSITION...

Страница 57: ...anual BOOM 2 CONVENTIONAL BOOM BOOM 3 ARTICULATED BOOM LASER RISE ED LASER DISTANCE AC LASER RISE ED 0 LASER RISE ED Fig 18 Fig 19 Fig 20 manual calibration Measuring Tips REFERENCE DRAWINGS TO DETERM...

Страница 58: ...OMP H Speed H 0 Comp H 0 000 Set the elevation between the rotating laser and the reference point into the depth value manually editing it in the main work screen It s possible to exit from calibratio...

Страница 59: ...t on it the system will jump back again to the calibration page with the acquired values shown Exit and save your calibration Press over DO COMP L and the laser page will appear try to catch the laser...

Страница 60: ...ic bucket icon reflects the real bucket angle Depth Slope setting visualization plus a small depth graphical bar Press to change the page Main operator screen shown at system start up Depth and actual...

Страница 61: ...Depth Slope setting visualization plus a small depth graphical bar Press to change the page Main operator screen shown at system start up Depth reach and actual slope set are shown Note The advanced...

Страница 62: ...for more information Display of Advanced Mode settings 1 Bucket Selection 2 Buzzer Status 0 OFF 1 ON 2 LOUD 3 Height Max and Height Min 4 Memory Function Detailed information on these settings except...

Страница 63: ...to switch OFF ON the LEDs depending on the actual depth can be customized with Dead Band Selection User Parameters Page 74 Page 78 Other functions of the remote display LEDs Depth Green LED and Reach...

Страница 64: ...depth value will be zero at that depth even in other reach positions and the distance value to that point will be shown if the bucket is higher positive or lower negative A Bucket too low Negative dep...

Страница 65: ...if A depth value has been set manually that value will be shown when pressing Solution Press and press afterwards to zero out the depth value The laser function is enabled Solution Press and press wit...

Страница 66: ...ce you press the sign changes Press to invert the sign positive negative Press to fast zero the value Press to confirm the value and end the setting mode The shown depth is now the distance from the a...

Страница 67: ...end the setting mode The shown slope is now the value used to calculate the depth related to the slope set and the reach position Note The direction of the slope is indicated by the slope icon based o...

Страница 68: ...r as the reference it s VERY IMPORTANT that the Y of the system is exactly parallel to the laser transmitter s Y axis If not you can get inaccuracies especially if you are digging a steep slope Slope...

Страница 69: ...to enable the laser receiver sensor The laser beam page will appear indicating that the system is waiting for a laser acquisition Move the machine s booms up or down slowly and steadily until the lase...

Страница 70: ...d move through the laser beam every time after you ve moved the machine prior to start digging to grade 2 Using the laser plane as an absolute reference setting the laser beam elevation from ref 0 kee...

Страница 71: ...before Short press Press hold LASER HEIGHT 0 000 Confirm Beam catch within 15 sec DoubleLS parameter ON default OFF Set the known laser height to your reference target height distance Stop the machin...

Страница 72: ...top the boom movement when the control box beeps indicating that the laser receiver has reached the laser beam There will be a stop sign on the screen Stop the boom movements and wait approx 2 seconds...

Страница 73: ...oing a whole automatic calibration all sensors slow method you have to choose your new bucket at this page prior to calibration If you want to calibrate the new bucket using the manual calibration met...

Страница 74: ...h value zero or inside the selected dead band range Solid audible signal To change the horn volume after you leave this dead band selection page use the same button with a short press to cycle through...

Страница 75: ...lution Advan Mode Enables advanced software features of the control box Reach indication set Memory Function Min Max height warning Profile Mode May be enabled by changing the setting from OFF to ON U...

Страница 76: ...gs pages Sensors Check Dedicated page showing the raw angle and battery value received from the sensor Calibration Menu To calibrate the system described in the calibration section This section can be...

Страница 77: ...tenths and hundredths F I feet and inches Values shown in feet and inches to the Example 8 2 Note For calibration lengths are always shown to the tenths of inches feet inches tenths of inches Example...

Страница 78: ...oarse are listed in Usage Dead Band Selection on page 74 You can change the defaults in this Parameters screen LedDeUp LedDeDw LedReGr LedReRe Depth and reach indication limit of the Remote Display PA...

Страница 79: ...o values are complementary and the buzzer frequency is related to the BuzFreDw parameter GraphBarR Visualization limit of the depth graph bar shown in the third operator work screen DepthIconR Below t...

Страница 80: ...the reach value will be zero at that distance even in other depth positions and the distance value to that point will be shown if the bucket is further away positive or closer negative to the cab A Bu...

Страница 81: ...ess to confirm the value and end the setting mode The shown reach is now the distance from the actual bucket position to the target reach If the bucket is closer to the cab in respect to the target re...

Страница 82: ...ed from the next location After moving the excavator you will need to use this same reference point or another point that is at exactly the same elevation 5 Keep Reference Press to save the value at t...

Страница 83: ...d the display will have the following warning Move the booms down to return to previous screen max height not reached To disable the Max Height function press and hold The icon will appear on the Max...

Страница 84: ...um depth set an alarm will sound and the display will have the following warning Move the bucket up to return to previous screen max depth not reached To disable the max depth function press and hold...

Страница 85: ...selected profile No further settings and the system will return in the working page Edit Enter a new shape for the selected profile or edit the actual shape This can be done manually or by copying an...

Страница 86: ...ss with the cursor over Acquire P to acquire the actual bucket position as the selected profile point You can now move the bucket to the next point actual point number is shown on the same line When t...

Страница 87: ...o enter the profile manual mode Press with the cursor over Depth to set the depth of the selected profile point Press with the cursor over Reach to set the reach of the selected profile point Use at t...

Страница 88: ...side of the screen point 1 the line follows the settings done You can zoom in zoom out on the graph with or buttons Press to exit to the main operator page Note Once you moved your machine you need to...

Страница 89: ...int as the minimum height See dedicated page for more details Function enabled When limit is reached there will be a warning screen and alarm Press or to select the desired function bold border Press...

Страница 90: ...is in use depth affected by the function See dedicated page for more details Height MAX Change the icon with Function disabled There s no maximum height set Setting in Progress Move the boom to the ma...

Страница 91: ...Boom 3 Booms excavator Bucket Dipper Stick Articulated Boom Boom You can continue working by using to go to another screen The low battery page will pop up again every 10 minutes if the battery is st...

Страница 92: ...Ang 3 Boom 3 sensor angle Ang 4 Bucket sensor angle Batt 1 Boom 1 sensor battery level Batt 2 Boom 2 sensor battery level Batt 3 Boom 3 sensor battery level Batt 4 Bucket sensor battery level Laser L...

Страница 93: ...SIGNMENT Check received sensors on previous Sensors Check page Do Sensor Assignment procedure SENSOR N new system or new components usually after start up OFF SENSOR NOT SYNCHRONIZED WRONG CONFIGURATI...

Страница 94: ...g Alarms Remote Display ALARMS REMOTE DISPLAY ALARMS REMOTE DISPLAY LEDs are all OFF No Connection between Control Box and Remote Display or Remote Display is not Working Check connection Clean connec...

Страница 95: ...IP 68 Control Box Display IP 64 Electrical Characteristics Power Supply 9 V 30 VDC Current Requirements max 220 mA Rating and Environmental Features Operating Temperature Range from 20 C to 70 C 4 to1...

Страница 96: ...s stipulated by the guidelines and standards When using computers and two way radios pay attention to the information about electromagnetic compatibility provided by the manufacturer CAUTION Disturban...

Страница 97: ...se undesired operation Notice for Canada Ce syst me est conforme la norme FCC part 15 en vigueur aux USA WARNING Changes or modifications not expressly approved by the manufacturer for compliance coul...

Страница 98: ...epaired or replacement Products will be shipped to Customer at the manufacturer s expense The repaired product or part will be shipped as soon as reasonably possible The manufacturer shall not be resp...

Страница 99: ...responsible for checking and maintaining calibration At a minimum the sensor position should be periodically checked if magnetic mounted DISCLAIMER Should a court of jurisdiction not allow the entire...

Отзывы: