


Hardware Reference Guide
13
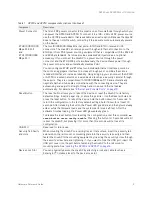
M
OUNTING
THE
AP330
OR
AP350
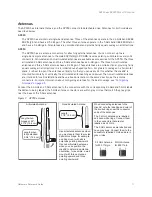
With the HiveAP upside down, align the two flexible V-shaped tabs and the security tab extension on the rail
mount with the two tab slots and the security screw cavity on the underside of the HiveAP, and then push the
HiveAP upward until it clicks into place as shown in
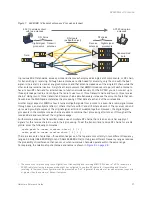
Figure 5 Attaching the HiveAP to the rail mount
For the AP350, attach the articulated antennas and swivel them into a vertical position pointing downward to
provide optimal coverage. When done, adjust the ceiling tiles back into their former position.
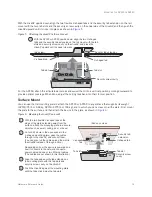
Surface Mount
You can use the flat mounting plate to attach the AP330 or AP350 to any surface that supports its weight
(AP330: 1.5 lb or 0.68 kg; AP350: 2.375 lb or 1.08 kg), and to which you can screw or nail the plate. First, mount
the plate to the surface, and then attach the device to the plate, as shown in
Figure 6 Mounting the HiveAP on a wall
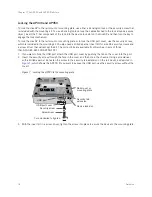
With the AP330 or AP350 upside down, align the two V-shaped
tabs and the security tab extension on the rail mount with the tab
slots and security screw cavity on the HiveAP, and press the
HiveAP upward until it snaps into place.
3
Security tab extension
Security screw cavity
Tab slot
Tab slot
V-shaped tab
V-shaped tab
(side view)
Security screw
cavity
Tab slot
Tab slot
Security tab
extension
V-shaped
tab
V-shaped tab
(bird’s eye view)
2
3
1
With the two flexible V-shaped tabs at the
sides of the plate extending away from the
surface, attach the mounging plate to a secure
object such as a wall, ceiling, post, or beam.
Cut or drill a hole in the open space in the
L-shaped mounting plate, pass the cables
through to the HiveAP, and connect them.
(You can also run the cables along the wall to
the HiveAP instead of through a hole.)
Depending on how the device is powered and
how it connects to the network, connect a
power cable and one or two Ethernet cables.
(The cables are not shown in this illustration.)
Align the tabs and security tab extension on
the mounting plate with the tab slots and
security screw cavity on the HiveAP.
Push the HiveAP against the mounting plate
until the tabs click inside the tab slots.
4
Содержание Aerohive APs
Страница 1: ...Aerohive Hardware Reference Guide ...
Страница 7: ...Contents 6 Aerohive ...
Страница 17: ...Chapter 1 The AP330 and AP350 Platforms 16 Aerohive ...
Страница 47: ...Chapter 3 The AP320 Platform 46 Aerohive ...
Страница 61: ...Chapter 4 The AP170 Platform 60 Aerohive ...
Страница 91: ...Chapter 8 The High Capacity HiveManager 90 Aerohive ...


